Lenovo IdeaCentre B300 Lenovo IdeaCentre B3 Series Hardware Replacement Guide - Page 18
Connect the data and power cables back to the hard disk drive.
 |
View all Lenovo IdeaCentre B300 manuals
Add to My Manuals
Save this manual to your list of manuals |
Page 18 highlights
5. Remove the 4 screws that secure the hard disk drive to the hard disk drive bay. 6. Slide the hard disk drive out of the bay. 1 2 1 1 1 7. Install the new hard disk drive. (1) Slide the new hard disk drive into the drive bay. (2) Screw back the 4 screws on the drive bay. 8. Connect the data and power cables back to the hard disk drive. 9. Align the 4 screw holes in the hard disk drive bay with the mounting holes in the chassis, then screw it back. 10. Install the computer cover and stand. 31043502_B3_HRG_EN_V1.0.indd 15 Hardware Replacement Guide 15 2010.4.14 4:13:48 PM
-
 1
1 -
2
-
3
-
4
-
5
-
6
-
7
-
8
-
9
-
10
-
11
-
12
-
 13
13 -
 14
14 -
 15
15 -
 16
16 -
 17
17 -
 18
18 -
 19
19 -
 20
20 -
 21
21 -
 22
22 -
 23
23
 |
 |

±µ
Hardware Replacement Guide
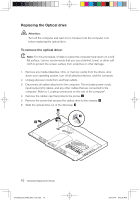
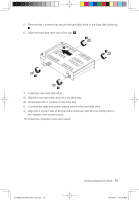
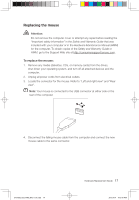
5.
Remove the 4 screws that secure the hard disk drive to the hard disk drive bay.
6.
Slide the hard disk drive out of the bay.
2
1
1
1
1
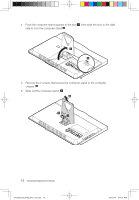
7.
Install the new hard disk drive.
(1) Slide the new hard disk drive into the drive bay.
(2) Screw back the 4 screws on the drive bay.
8.
Connect the data and power cables back to the hard disk drive.
9.
Align the 4 screw holes in the hard disk drive bay with the mounting holes in
the chassis, then screw it back.
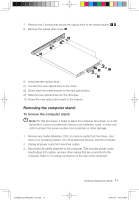
10. Install the computer cover and stand.
31043502_B3_HRG_EN_V1.0.indd
15
2010.4.14
4:13:48 PM