Lenovo IdeaPad Z510 Hardware Maintenance Manual - IdeaPad Z410, Z510 - Page 35
FRU replacement notices, Screw notices - driver
 |
View all Lenovo IdeaPad Z510 manuals
Add to My Manuals
Save this manual to your list of manuals |
Page 35 highlights
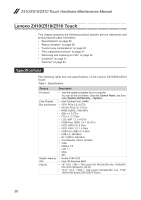
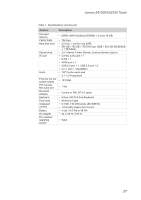
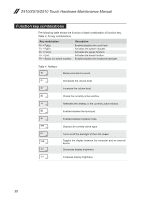
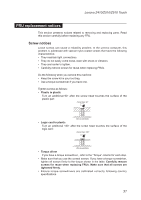
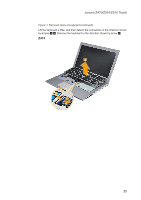
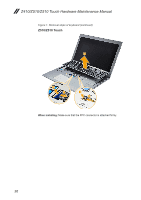
Lenovo Z410/Z510/Z510 Touch FRU replacement notices This section presents notices related to removing and replacing parts. Read this section carefully before replacing any FRU. Screw notices Loose screws can cause a reliability problem. In the Lenovo computer, this problem is addressed with special nylon-coated screws that have the following characteristics: • They maintain tight connections. • They do not easily come loose, even with shock or vibration. • They are harder to tighten. • Carefully remove screws for reuse when replacing FRUs. Do the following when you service this machine: • Keep the screw kit in your tool bag. • Use a torque screwdriver if you have one. Tighten screws as follows: • Plastic to plastic Turn an additional 90° after the screw head touches the surface of the plastic part: more than 90° (Cross-section) • Logic card to plastic Turn an additional 180° after the screw head touches the surface of the logic card: more than 180° (Cross-section) • Torque driver If you have a torque screwdriver , refer to the "Torque" column for each step. • Make sure that you use the correct screws. If you have a torque screwdriver, tighten all screws firmly to the torque shown in the table. Carefully remove screws for reuse when replacing FRUs. Make sure that all screws are tightened firmly. • Ensure torque screwdrivers are calibrated correctly following country specifications. 31
-
 1
1 -
2
-
3
-
4
-
5
-
6
-
7
-
8
-
9
-
10
-
11
-
12
-
13
-
14
-
15
-
16
-
17
-
18
-
19
-
20
-
21
-
22
-
23
-
24
-
25
-
26
-
27
-
28
-
29
-
 30
30 -
 31
31 -
 32
32 -
 33
33 -
 34
34 -
 35
35 -
 36
36 -
 37
37 -
 38
38 -
 39
39 -
 40
40 -
41
-
42
-
43
-
44
-
45
-
46
-
47
-
48
-
49
-
50
-
51
-
52
-
53
-
54
-
55
-
56
-
57
-
58
-
59
-
60
-
61
-
62
-
63
-
64
-
65
-
66
-
67
-
68
-
69
-
70
-
71
-
72
-
73
-
74
-
75
-
76
-
77
-
78
-
79
-
80
-
81
-
82
-
83
-
84
-
85
-
86
-
87
-
88
-
89
-
90
-
91
-
92
-
93
-
94
-
95
-
96
-
97
-
98
-
99
-
100
-
101
-
102
-
103
-
104
-
105
-
106
-
107
-
108
-
109
-
110
-
111
-
112
-
113
-
114
 |
 |
