Lenovo IdeaPad Z510 Hardware Maintenance Manual - IdeaPad Z410, Z510 - Page 38
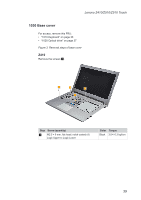
Removal steps of keyboard, Insert the screwdriver into one of the screw hole on the bottom
 |
View all Lenovo IdeaPad Z510 manuals
Add to My Manuals
Save this manual to your list of manuals |
Page 38 highlights
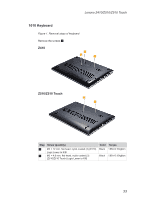
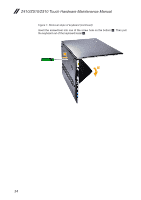
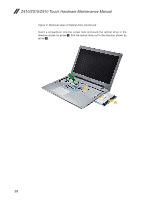
Z410/Z510/Z510 Touch Hardware Maintenance Manual Figure 1. Removal steps of keyboard (continued) Insert the screwdriver into one of the screw hole on the bottom 2. Then pull the keyboard out of the keyboard bezel 3. 2 3 34
-
 1
1 -
2
-
3
-
4
-
5
-
6
-
7
-
8
-
9
-
10
-
11
-
12
-
13
-
14
-
15
-
16
-
17
-
18
-
19
-
20
-
21
-
22
-
23
-
24
-
25
-
26
-
27
-
28
-
29
-
30
-
31
-
32
-
 33
33 -
 34
34 -
 35
35 -
 36
36 -
 37
37 -
 38
38 -
 39
39 -
 40
40 -
 41
41 -
 42
42 -
 43
43 -
44
-
45
-
46
-
47
-
48
-
49
-
50
-
51
-
52
-
53
-
54
-
55
-
56
-
57
-
58
-
59
-
60
-
61
-
62
-
63
-
64
-
65
-
66
-
67
-
68
-
69
-
70
-
71
-
72
-
73
-
74
-
75
-
76
-
77
-
78
-
79
-
80
-
81
-
82
-
83
-
84
-
85
-
86
-
87
-
88
-
89
-
90
-
91
-
92
-
93
-
94
-
95
-
96
-
97
-
98
-
99
-
100
-
101
-
102
-
103
-
104
-
105
-
106
-
107
-
108
-
109
-
110
-
111
-
112
-
113
-
114
 |
 |

34
Z410/Z510/Z510 Touch Hardware Maintenance Manual
Figure 1. Removal steps of keyboard
(continued)
Insert the screwdriver into one of the screw hole on the bottom
2
. Then pull
the keyboard out of the keyboard bezel
3
.
2
3