Lenovo M5400 User Guide - Lenovo B5400, M5400, M5400 Touch - Page 40
o a new hard d, he screws.
 |
View all Lenovo M5400 manuals
Add to My Manuals
Save this manual to your list of manuals |
Page 40 highlights
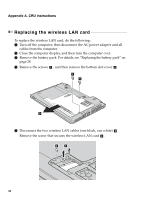
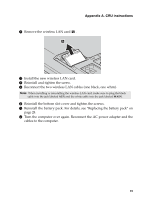
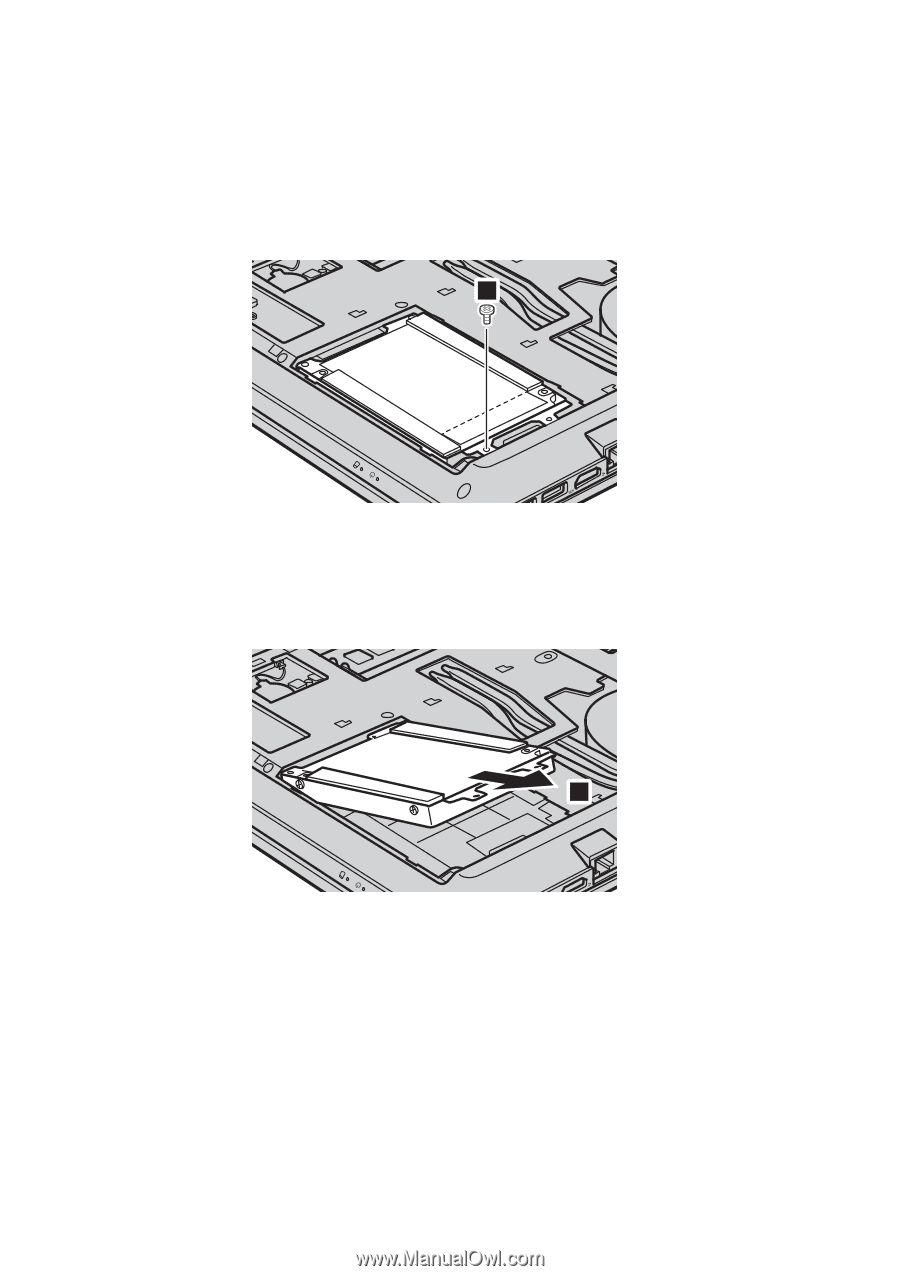
Appendix A. CRU instructions 5 Remove the frame fixing screw c . 3 6 Remove the hard disk drive by gently pulling in the direction of the arrow d . 4 7 Remove the screws and detach the metal frame from the hard disk drive. 8 Attach the metal frame to a new hard disk drive and tighten the screws. 9 Slide the new hard disk drive firmly into place, and then reinstall the frame fixing screw to secure the drive. 0 Reinstall the bottom slot cover and tighten the screws. A Reinstall the battery pack. For details, see "Replacing the battery pack" on page 28. B Turn the computer over again. Reconnect the AC power adapter and the cables to the computer. 34
-
 1
1 -
2
-
3
-
4
-
5
-
6
-
7
-
8
-
9
-
10
-
11
-
12
-
13
-
14
-
15
-
16
-
17
-
18
-
19
-
20
-
21
-
22
-
23
-
24
-
25
-
26
-
27
-
28
-
29
-
30
-
31
-
32
-
33
-
34
-
 35
35 -
 36
36 -
 37
37 -
 38
38 -
 39
39 -
 40
40 -
 41
41 -
 42
42 -
 43
43 -
 44
44 -
 45
45 -
46
-
47
-
48
-
49
-
50
 |
 |
34
Appendix A. CRU instructions
5
Remo
v
e
t
he frame f
i
x
i
n
g
screw
.
6
Remo
v
e
t
he hard d
i
sk dr
iv
e by
g
en
t
ly p
u
ll
i
n
g
i
n
t
he d
i
rec
ti
on of
t
he
arrow
.
7
Remo
v
e
t
he screws and de
t
ach
t
he me
t
al frame from
t
he hard d
i
sk dr
iv
e.
8
A
tt
ach
t
he me
t
al frame
t
o a new hard d
i
sk dr
iv
e and
tig
h
t
en
t
he screws.
9
S
l
i
de
t
he new hard d
i
sk dr
iv
e f
i
rmly
i
n
t
o place, and
t
hen re
i
ns
t
all
t
he
frame f
i
x
i
n
g
screw
t
o sec
u
re
t
he dr
iv
e.
0
Re
i
ns
t
all
t
he bo
tt
om slo
t
co
v
er and
tig
h
t
en
t
he screws.
A
Re
i
ns
t
all
t
he ba
tt
ery pack. For de
t
a
i
ls, see “Replac
i
n
g
t
he ba
tt
ery pack” on
pa
g
e 28.
B
T
u
rn
t
he comp
ut
er o
v
er a
g
a
i
n. Reconnec
t
t
he AC power adap
t
er and
t
he
cables
t
o
t
he comp
ut
er.
c
3
d
4