Lenovo NetVista A20 (English) User guide - Page 100
Enter, My Computer, Control Panel, Display, Settings, Step 3, Is anything displayed on the monitor?
 |
View all Lenovo NetVista A20 manuals
Add to My Manuals
Save this manual to your list of manuals |
Page 100 highlights
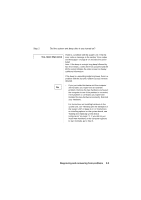
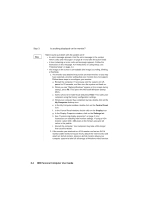
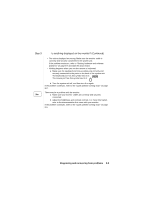
Step 3 Is anything displayed on the monitor? There may be a problem with the system unit if: Yes • An error message appears. Find the error message in the section "Error codes and messages" on page 8-17 and take the action listed. • A box containing an error code and message appears. Follow the instructions in the message. For instructions on using Setup, see "Entering Setup" on page 4-4. • The image on the screen is unreadable (the image is scrolling, blinking, or flashing). 1. The monitor you attached may not be an SVGA monitor or you may have selected a monitor setting that your monitor does not support. Follow these steps to reconfigure your monitor: a. Restart the computer. If necessary, turn the system unit off, pause for 15 seconds, and then turn the system unit back on. b. When you see "Starting Windows" appear on the screen during startup, press F8. This opens the Microsoft Windows Startup Menu. c. Select Choice 3 for Safe Mode and press Enter. This starts your computer using the factory configuration settings. d. When your computer has completed startup, double-click on the My Computer desktop icon. e. In the My Computer window, double-click on the Control Panel icon. f. In the Control Panel window, double-click on the Display icon. g. In the Display Properties window, click on the Settings tab. h. See "Customizing display properties" on page 2-3 for instructions on selecting new monitor settings. If using a VGA monitor, select 640 x 480 pixels in the Screen area and 16 colors in the palette. i. Restart the computer. Your computer may take a little longer than usual to restart. 2. If the monitor you attached is a VGA monitor and not an SVGA monitor (older monitors may be VGA), detach the VGA monitor and attach an SVGA monitor. Using an SVGA monitor allows your computer system to take full advantage of Windows video function. 8-4 IBM Personal Computer User Guide
-
 1
1 -
2
-
3
-
4
-
5
-
6
-
7
-
8
-
9
-
10
-
11
-
12
-
13
-
14
-
15
-
16
-
17
-
18
-
19
-
20
-
21
-
22
-
23
-
24
-
25
-
26
-
27
-
28
-
29
-
30
-
31
-
32
-
33
-
34
-
35
-
36
-
37
-
38
-
39
-
40
-
41
-
42
-
43
-
44
-
45
-
46
-
47
-
48
-
49
-
50
-
51
-
52
-
53
-
54
-
55
-
56
-
57
-
58
-
59
-
60
-
61
-
62
-
63
-
64
-
65
-
66
-
67
-
68
-
69
-
70
-
71
-
72
-
73
-
74
-
75
-
76
-
77
-
78
-
79
-
80
-
81
-
82
-
83
-
84
-
85
-
86
-
87
-
88
-
89
-
90
-
91
-
92
-
93
-
94
-
 95
95 -
 96
96 -
 97
97 -
 98
98 -
 99
99 -
 100
100 -
 101
101 -
 102
102 -
 103
103 -
 104
104 -
 105
105 -
106
-
107
-
108
-
109
-
110
-
111
-
112
-
113
-
114
-
115
-
116
-
117
-
118
-
119
-
120
-
121
-
122
-
123
-
124
-
125
-
126
-
127
-
128
-
129
-
130
-
131
-
132
-
133
-
134
-
135
-
136
-
137
-
138
-
139
-
140
-
141
-
142
-
143
-
144
-
145
-
146
 |
 |