Lenovo NetVista A20 (English) User guide - Page 76
Set the jumper on the new drive to master or slave, depending on the, following conditions
 |
View all Lenovo NetVista A20 manuals
Add to My Manuals
Save this manual to your list of manuals |
Page 76 highlights
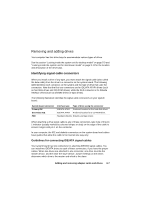
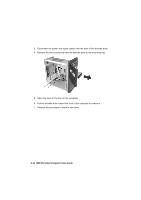
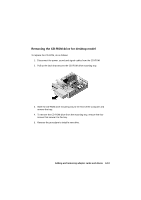
The hard disk that came installed in your computer is attached to IDE connector 1 and is set as a master device. If your computer came with a CD-ROM drive, it is attached to IDE connector 2 and is set as a master device. These are the general guidelines for IDE/ATA signal cable connections: • If only one drive is attached to a connector, it must be set as a master device. • On each connector, there can be only one drive set as the master device and one drive set as the slave device. • If a hard disk shares the same connector with a drive that requires a software device driver (such as a CD-ROM drive), the hard disk must be set as the master device and the CD-ROM must be set as the slave device. If you are installing a second drive to the primary IDE connector, follow these guidelines: 1. Set the new drive as the slave device. See the instructions that were provided with the new drive. 2. Install the new drive and connect the new drive to the spare connector on the cable attached to the primary IDE connector. If you are installing a second drive to the secondary IDE connector, follow these guidelines: 1. Replace the IDE signal cable attached to the secondary IDE connector with an IDE cable that has two drive connectors. 2. Set the jumper on the new drive to master or slave, depending on the following conditions: - If the factory-installed drive is a CD-ROM drive (or any drive type other than a hard disk drive), and the drive you are installing is a hard disk drive, set the new drive as the master device. Then, set the factory-installed drive as a slave device. Jumpers for setting drives as master or slave devices are typically located at the back of the drive. - If the factory-installed drive is a hard disk drive, set the new drive as a slave drive. 3. Install the new drive. 6-8 IBM Personal Computer User Guide
-
 1
1 -
2
-
3
-
4
-
5
-
6
-
7
-
8
-
9
-
10
-
11
-
12
-
13
-
14
-
15
-
16
-
17
-
18
-
19
-
20
-
21
-
22
-
23
-
24
-
25
-
26
-
27
-
28
-
29
-
30
-
31
-
32
-
33
-
34
-
35
-
36
-
37
-
38
-
39
-
40
-
41
-
42
-
43
-
44
-
45
-
46
-
47
-
48
-
49
-
50
-
51
-
52
-
53
-
54
-
55
-
56
-
57
-
58
-
59
-
60
-
61
-
62
-
63
-
64
-
65
-
66
-
67
-
68
-
69
-
70
-
 71
71 -
 72
72 -
 73
73 -
 74
74 -
 75
75 -
 76
76 -
 77
77 -
 78
78 -
 79
79 -
 80
80 -
 81
81 -
82
-
83
-
84
-
85
-
86
-
87
-
88
-
89
-
90
-
91
-
92
-
93
-
94
-
95
-
96
-
97
-
98
-
99
-
100
-
101
-
102
-
103
-
104
-
105
-
106
-
107
-
108
-
109
-
110
-
111
-
112
-
113
-
114
-
115
-
116
-
117
-
118
-
119
-
120
-
121
-
122
-
123
-
124
-
125
-
126
-
127
-
128
-
129
-
130
-
131
-
132
-
133
-
134
-
135
-
136
-
137
-
138
-
139
-
140
-
141
-
142
-
143
-
144
-
145
-
146
 |
 |