Lenovo ThinkPad 560E Thinkpad 560 User's Guide - Page 30
Identifying the Hardware Features, Front View - review
 |
View all Lenovo ThinkPad 560E manuals
Add to My Manuals
Save this manual to your list of manuals |
Page 30 highlights
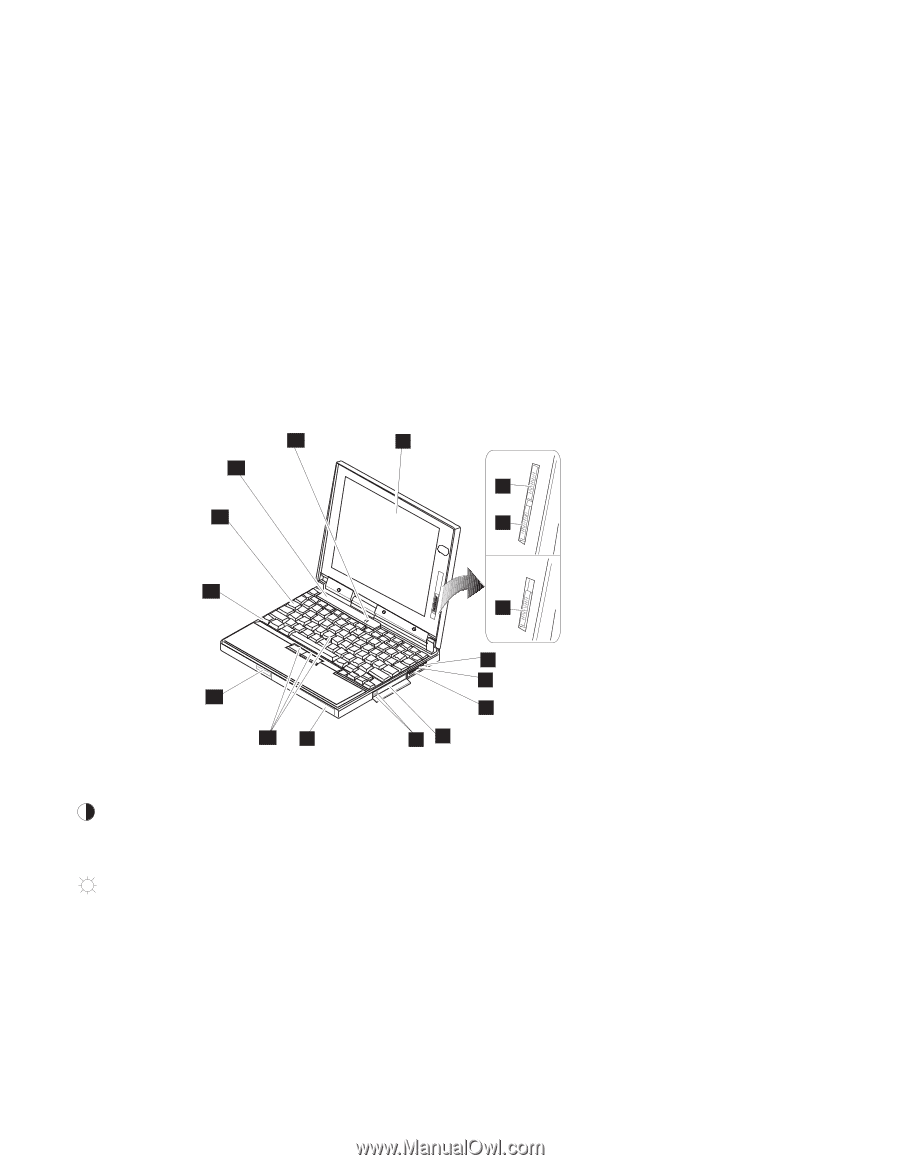
Identifying the Hardware Features Identifying the Hardware Features Front View In this section, you can review the hardware features of your computer. The figures next to the numbers are what you can see on the computer. 15 14 1 DSTN 2 13 3 TFT 12 3 11 10 9 4 5 6 87 1 The color LCD screen displays computer output. (See page 40.) external audio device is connected. (See page 54.) 2 The contrast control moves up or down to adjust the clarity of the picture. (For the 560 DSTN 6 The volume control adjusts the sound level for the built-in speakers. LCD model only.) 7 The PC Card slots accept PC Cards. (To use a PC Card, see 3 The brightness control moves up or down to adjust the page 47. To insert a PC Card, see page 90.) brightness of the display. 8 The PC Card eject buttons eject 4 The headphone jack, a 1/8-inch (3.5-mm) diameter jack, is where the PC Card from the PC Card slot. (See page 92.) you connect a stereo headphone 9 The battery pack is a built-in or external speakers. (See page power source for the computer. 54.) (See page 17.) 5 The microphone/line-in jack, a 1 The TrackPoint III is a built-in 1/8-inch (3.5-mm) diameter jack, is pointing device that provides a where a stereo microphone or function similar to that of a mouse. (See page 18.) 11 The LCD latch opens the LCD when pressed. 12 The Fn key is used with the function keys to activate the Fn key functions. (See page 20.) 13 The keyboard is used to enter data into the computer. (To use the numeric keypad on the keyboard, see page 22.) 14 The indicator panel consists of the system-status indicators and their associated symbols. (See page 15.) 15 The built-in microphone captures sound and voice when it is used with an application program capable of handling an audio. 12 IBM ThinkPad 560 User's Guide
-
 1
1 -
2
-
3
-
4
-
5
-
6
-
7
-
8
-
9
-
10
-
11
-
12
-
13
-
14
-
15
-
16
-
17
-
18
-
19
-
20
-
21
-
22
-
23
-
24
-
 25
25 -
 26
26 -
 27
27 -
 28
28 -
 29
29 -
 30
30 -
 31
31 -
 32
32 -
 33
33 -
 34
34 -
 35
35 -
36
-
37
-
38
-
39
-
40
-
41
-
42
-
43
-
44
-
45
-
46
-
47
-
48
-
49
-
50
-
51
-
52
-
53
-
54
-
55
-
56
-
57
-
58
-
59
-
60
-
61
-
62
-
63
-
64
-
65
-
66
-
67
-
68
-
69
-
70
-
71
-
72
-
73
-
74
-
75
-
76
-
77
-
78
-
79
-
80
-
81
-
82
-
83
-
84
-
85
-
86
-
87
-
88
-
89
-
90
-
91
-
92
-
93
-
94
-
95
-
96
-
97
-
98
-
99
-
100
-
101
-
102
-
103
-
104
-
105
-
106
-
107
-
108
-
109
-
110
-
111
-
112
-
113
-
114
-
115
-
116
-
117
-
118
-
119
-
120
-
121
-
122
-
123
-
124
-
125
-
126
-
127
-
128
-
129
-
130
-
131
-
132
-
133
-
134
-
135
-
136
-
137
-
138
-
139
-
140
-
141
-
142
-
143
-
144
-
145
-
146
-
147
-
148
-
149
-
150
-
151
-
152
-
153
-
154
-
155
-
156
-
157
-
158
-
159
-
160
-
161
-
162
-
163
-
164
-
165
-
166
-
167
-
168
-
169
-
170
-
171
-
172
-
173
-
174
-
175
-
176
-
177
-
178
-
179
-
180
-
181
-
182
-
183
-
184
-
185
-
186
-
187
-
188
-
189
-
190
-
191
-
192
-
193
-
194
-
195
-
196
-
197
-
198
-
199
-
200
-
201
-
202
-
203
-
204
-
205
-
206
-
207
-
208
-
209
-
210
-
211
-
212
-
213
-
214
-
215
-
216
-
217
-
218
-
219
-
220
-
221
-
222
-
223
-
224
-
225
-
226
-
227
-
228
-
229
-
230
-
231
-
232
-
233
-
234
-
235
-
236
-
237
-
238
-
239
-
240
-
241
-
242
-
243
-
244
-
245
-
246
-
247
-
248
-
249
-
250
-
251
-
252
-
253
-
254
-
255
-
256
-
257
-
258
-
259
-
260
-
261
-
262
-
263
 |
 |