Lenovo ThinkPad T450 (English) Hardware Maintenance Manual - ThinkPad T450 - Page 34
Checkingthecoin-cellbattery
 |
View all Lenovo ThinkPad T450 manuals
Add to My Manuals
Save this manual to your list of manuals |
Page 34 highlights
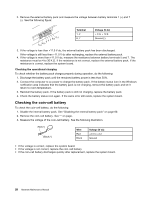
2. Remove the external battery pack and measure the voltage between battery terminals 1 (+) and 7 (-). See the following figure: 3 4 5 6(-) 7(-) 2(+) 1(+) Terminal 1, 2 6, 7 Voltage (V dc) + 0 to + 12.6 Ground (-) 3. If the voltage is less than +11.0 V dc, the external battery pack has been discharged. If the voltage is still less than +11.0 V dc after recharging, replace the external battery pack. 4. If the voltage is more than +11.0 V dc, measure the resistance between battery terminals 5 and 7. The resistance must be 4 to 30 K Ω. If the resistance is not correct, replace the external battery pack. If the resistance is correct, replace the system board. Checking the operational charging To check whether the battery pack charges properly during operation, do the following: 1. Discharge the battery pack until the remained battery power is less than 50%. 2. Connect the computer to ac power to charge the battery pack. If the battery status icon in the Windows notification area indicates that the battery pack is not charging, remove the battery pack and let it return to room temperature. 3. Reinstall the battery pack. If the battery pack is still not charging, replace the battery pack. 4. Check the battery status icon again. If the same error still exists, replace the system board. Checking the coin-cell battery To check the coin-cell battery, do the following: 1. Disable the internal battery pack. See "Disabling the internal battery pack" on page 60. 2. Remove the coin-cell battery. See "" on page . 3. Measure the voltage of the coin-cell battery. See the following illustration. Wire Red Black Voltage (V dc) +2.5 to +3.2 Ground • If the voltage is correct, replace the system board. • If the voltage is not correct, replace the coin-cell battery. • If the coin-cell battery discharges quickly after replacement, replace the system board. 28 Hardware Maintenance Manual
-
 1
1 -
2
-
3
-
4
-
5
-
6
-
7
-
8
-
9
-
10
-
11
-
12
-
13
-
14
-
15
-
16
-
17
-
18
-
19
-
20
-
21
-
22
-
23
-
24
-
25
-
26
-
27
-
28
-
 29
29 -
 30
30 -
 31
31 -
 32
32 -
 33
33 -
 34
34 -
 35
35 -
 36
36 -
 37
37 -
 38
38 -
 39
39 -
40
-
41
-
42
-
43
-
44
-
45
-
46
-
47
-
48
-
49
-
50
-
51
-
52
-
53
-
54
-
55
-
56
-
57
-
58
-
59
-
60
-
61
-
62
-
63
-
64
-
65
-
66
-
67
-
68
-
69
-
70
-
71
-
72
-
73
-
74
-
75
-
76
-
77
-
78
-
79
-
80
-
81
-
82
-
83
-
84
-
85
-
86
-
87
-
88
-
89
-
90
-
91
-
92
-
93
-
94
-
95
-
96
-
97
-
98
-
99
-
100
-
101
-
102
-
103
-
104
-
105
-
106
-
107
-
108
-
109
-
110
-
111
-
112
-
113
-
114
-
115
-
116
-
117
-
118
-
119
-
120
 |
 |
