Lenovo ThinkPad i Series 1300 English - Windows Me Setup Guide - Page 18
Installing or Upgrading to Windows Me
 |
View all Lenovo ThinkPad i Series 1300 manuals
Add to My Manuals
Save this manual to your list of manuals |
Page 18 highlights
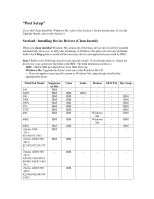
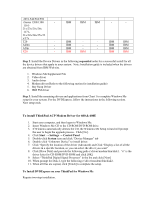
"Installing or Upgrading to Windows Me" If you decided to do the Clean Install, refer to the Section 1 for the instructions. If you decided to do the Upgrade Install, refer to the Section 2. ****IMPORTANT NOTICE**** This document pertains only to ThinkPad's as a standalone system − i.e., UNDOCKED configuration. It is recommended that all attachable devices, except for an external diskette drive, be removed from your ThinkPad before upgrading to Windows Me. This includes all PC Cards (LAN, Modem, ATA, SCSI, etc), docking stations, port replicators, and PC Card Enablers. If any of these devices are attached to your ThinkPad during the upgrade installation, Windows Me may not run as explained in this document. Section 1: Installing Windows Me (Clean Install) This section provides information on how to install Windows Me on your ThinkPad. This information applies to the following situations: • Installing Windows Me on a blank hard drive. • Replacing an existing Windows operating system with Windows Me. If you choose to install Windows Me on hard disk that contains application and personal files, back up all important data files before beginning the installation. If you do not have a Recovery CD or Backup CD with a CD-ROM/DVD-ROM drive, use a diskette backup program to create recovery diskettes of the preinstalled Windows operating system, device drivers, and applications. For more information about installing Windows Me on your ThinkPad computer, please refer to the \Win9x\Setup.txt included on the Windows Me CD. Prior to upgrading ThinkPad 240X and 570E, copy APMINST.INF file in the Start up or Recovery diskette by following the steps: 1. Download the "Windows Me Supplement File" from the IBM ThinkPad support Web site: 2. Unzip "Windows Me Supplement File" on your desktop or the diskette A. 3. Copy the file "APMINST.INF" in APM directory that is unzipped to the Startup/Recovery Diskette. 4. Other files (APA2APM.REG and HIDEHIBE.EXE) should be kept in the diskette to later use. To Install Windows Me on your ThinkPad, follow the instructions below: 1. Insert the Startup Diskette to the diskette drive and Power on the system (If an error message appears, make sure Start Up Option is set to Floppy Drive in the BIOS). 2. Select options to boot with CD-ROM Support if applicable. 3. If the Hard Drive Disk is already partitioned and want to using existing partition, just format the primary partition by typing the following: "format c:" Press Enter. 4. If the Hard disk Drive is not partitioned or want to create new partitions follow the instructions below: a. Type the following: "fdisk", Press Enter b. Enter "4" to view any existing partitions and Press Enter.
-
 1
1 -
2
-
3
-
4
-
5
-
6
-
7
-
8
-
9
-
10
-
11
-
12
-
 13
13 -
 14
14 -
 15
15 -
 16
16 -
 17
17 -
 18
18 -
 19
19 -
 20
20 -
 21
21 -
 22
22 -
 23
23 -
24
-
25
-
26
-
27
-
28
-
29
-
30
-
31
-
32
-
33
-
34
-
35
-
36
-
37
-
38
-
39
-
40
-
41
-
42
-
43
-
44
-
45
-
46
 |
 |