Lenovo X200 Service Guide - Page 58
BIOS Setup Utility.
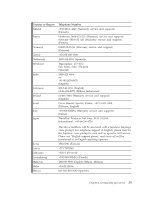
 |
UPC - 884343170077
View all Lenovo X200 manuals
Add to My Manuals
Save this manual to your list of manuals |
Page 58 highlights
To make sure that the SO-DIMM is installed correctly, do as follows: 1. Turn on the computer. 2. When the ThinkPad logo comes up, immediately press F1 to enter the BIOS Setup Utility. 3. The "Installed memory" item shows the total amount of memory installed in your computer. 50 ThinkPad® X200 Tablet Service and Troubleshooting Guide
-
 1
1 -
2
-
3
-
4
-
5
-
6
-
7
-
8
-
9
-
10
-
11
-
12
-
13
-
14
-
15
-
16
-
17
-
18
-
19
-
20
-
21
-
22
-
23
-
24
-
25
-
26
-
27
-
28
-
29
-
30
-
31
-
32
-
33
-
34
-
35
-
36
-
37
-
38
-
39
-
40
-
41
-
42
-
43
-
44
-
45
-
46
-
47
-
48
-
49
-
50
-
51
-
52
-
 53
53 -
 54
54 -
 55
55 -
 56
56 -
 57
57 -
 58
58 -
 59
59 -
 60
60 -
 61
61 -
 62
62 -
 63
63 -
64
-
65
-
66
-
67
-
68
-
69
-
70
-
71
-
72
-
73
-
74
-
75
-
76
-
77
-
78
-
79
-
80
-
81
-
82
-
83
-
84
-
85
-
86
-
87
-
88
-
89
-
90
 |
 |

To make sure that the SO-DIMM is installed correctly, do as follows:
1.
Turn on the computer.
2.
When the ThinkPad logo comes up, immediately press F1 to enter the
BIOS Setup Utility.
3.
The “Installed memory” item shows the total amount of memory installed
in your computer.
50
ThinkPad
®
X200 Tablet Service and Troubleshooting Guide