Lexmark 9350 User's Guide - Page 43
Using Copy and the Copy Mode menu, Copy Mode, Copies
 |
UPC - 734646031202
View all Lexmark 9350 manuals
Add to My Manuals
Save this manual to your list of manuals |
Page 43 highlights
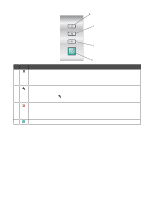
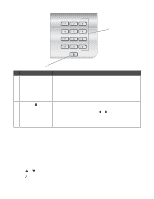
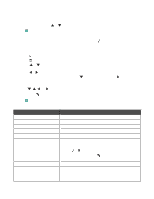
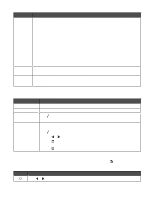
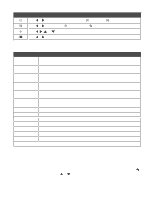
Using Copy and the Copy Mode menu To access and navigate: 1 From the control panel, press or repeatedly until Copy is highlighted. 2 Press or for Quick Copy if you do not want to make any changes for this copy job. If you want to make changes in the way this copy job is processed, press . The Copy Mode menu appears. 3 From the Copy Mode menu, you can: • Press to preview the job. • Press to return to the Copy Mode menu from the preview. • Press or change. • Press or repeatedly to scroll through the submenus or menu items until you reach the one you want to repeatedly to reach the value you want. For example, to change the number of copies, press number of copies you want appears. to reach Copies. Then, press repeatedly until the 4 To go into other submenus, menu items, and values to make additional changes, continue to use the navigation buttons ( , , , and ). 5 If needed, press repeatedly to return to the previous menu. 6 Press to start the copy job. The following table explains the function of each submenu or menu item in the Copy Mode menu. Use this Color Copies Reduce/Enlarge Quality Lighter / Darker Paper Handling Collate 2-Sided Copies To Specify to print in Color or in Black & White. Specify how many copies to print. Specify the percentage for enlarging or reducing a copy. Adjust the quality of a copy. Adjust the brightness of a copy. Access the Paper Handling submenu. It appears with different menu items depending on whether the optional Tray 2 is installed. See the following table for all of its menu items. • Press or to enter this submenu. • After changing values, press to save these values and exit this submenu. Collate copies as they exit. • Specify if you have a one-sided original document and want to copy on both sides of an output sheet. • Specify if you have a two-sided original document and want to copy on just one side of an output sheet. 43
-
 1
1 -
2
-
3
-
4
-
5
-
6
-
7
-
8
-
9
-
10
-
11
-
12
-
13
-
14
-
15
-
16
-
17
-
18
-
19
-
20
-
21
-
22
-
23
-
24
-
25
-
26
-
27
-
28
-
29
-
30
-
31
-
32
-
33
-
34
-
35
-
36
-
37
-
 38
38 -
 39
39 -
 40
40 -
 41
41 -
 42
42 -
 43
43 -
 44
44 -
 45
45 -
 46
46 -
 47
47 -
 48
48 -
49
-
50
-
51
-
52
-
53
-
54
-
55
-
56
-
57
-
58
-
59
-
60
-
61
-
62
-
63
-
64
-
65
-
66
-
67
-
68
-
69
-
70
-
71
-
72
-
73
-
74
-
75
-
76
-
77
-
78
-
79
-
80
-
81
-
82
-
83
-
84
-
85
-
86
-
87
-
88
-
89
-
90
-
91
-
92
-
93
-
94
-
95
-
96
-
97
-
98
-
99
-
100
-
101
-
102
-
103
-
104
-
105
-
106
-
107
-
108
-
109
-
110
-
111
-
112
-
113
-
114
-
115
-
116
-
117
-
118
-
119
-
120
-
121
-
122
-
123
-
124
-
125
-
126
-
127
-
128
-
129
-
130
-
131
-
132
-
133
-
134
-
135
-
136
-
137
-
138
-
139
-
140
-
141
-
142
-
143
-
144
-
145
-
146
-
147
-
148
-
149
-
150
-
151
-
152
-
153
-
154
-
155
-
156
-
157
-
158
-
159
-
160
-
161
-
162
-
163
-
164
-
165
-
166
-
167
-
168
-
169
-
170
-
171
-
172
-
173
-
174
-
175
-
176
-
177
-
178
-
179
-
180
-
181
-
182
-
183
-
184
-
185
-
186
-
187
-
188
-
189
-
190
-
191
-
192
-
193
-
194
-
195
-
196
-
197
-
198
 |
 |
