Lexmark C762 Setup Guide - Page 30
Step 8: Attach cables and power cord
 |
View all Lexmark C762 manuals
Add to My Manuals
Save this manual to your list of manuals |
Page 30 highlights
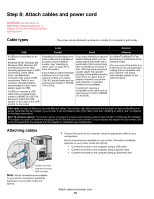
Step 8: Attach cables and power cord CAUTION: Do not connect or disconnect a communication port, a teleport, or any other connector during a lightning storm. Cable types The printer can be attached to a network or directly to a computer to print locally. Local Network USB Parallel Serial Ethernet A USB port is standard on all models. Windows 98 SE, Windows Me, Windows 2000, Windows XP, and Windows Server 2003 operating systems support USB connections. Some UNIX, Linux, and Macintosh computers also support USB connections. Refer to your computer operating system documentation to see if your system supports USB. A USB port requires a USB cable such as Lexmark part number 12A2405 (2 m [6.5 ft]). Be sure to match the USB symbol on the cable to the USB symbol on the printer. A parallel port is standard on the base model and is available on an option card for network models. See "Installing an option card" on page 24 for more information. If you install an optional Parallel Interface Card in any of the network models, you need a 1284 A-C parallel cable such as Lexmark part number 11K4078 (1.8 m [6 ft]). If you have installed an optional Serial Interface Card, you can locally attach the printer with a serial cable. With serial printing, data is transferred one bit at a time. Although serial printing is usually slower than parallel printing, it is the preferred option when there is a great deal of distance between your printer and computer or a parallel interface is not available. A serial port requires a compatible serial cable such as Lexmark part number 1038693 (15 m [50 ft]). A 10BaseT/100BaseTX Fast Ethernet port is standard on the network model. You can connect the printer to a LAN drop or hub using standard cabling that is compatible with your network. The printer automatically adjusts for the network speed. Fiber optic is a type of Ethernet, but uses different cables. Various fiber optic Ethernet ports are available on optional MarkNet print server cards that can be installed in your printer. If you purchased a fiber optic option card, see "Installing an option card" on page 24 for hardware instructions. 802.11b wireless options: Your printer can be converted to wireless networking by using an optional 802.11b Wireless Print Adapter. This adapter is a piece of hardware that plugs into the Ethernet port on your printer. If you purchased this adapter for your printer, refer to the documentation that shipped with the adapter for installation and configuration. Attaching cables 1 Connect the printer to the computer using the appropriate cable for your configuration. Not all connections are available on your printer. Connection availability depends on your printer model and options. • Connect the printer to the computer using a USB cable. • Connect the printer to the computer using a parallel cable. • Connect the printer to the computer using an Ethernet cable. Parallel connector Ethernet connector USB connector Note: Not all connections are available on your printer. Connection availability depends on your printer model and options. Attach cables and power cord 30
-
 1
1 -
2
-
3
-
4
-
5
-
6
-
7
-
8
-
9
-
10
-
11
-
12
-
13
-
14
-
15
-
16
-
17
-
18
-
19
-
20
-
21
-
22
-
23
-
24
-
 25
25 -
 26
26 -
 27
27 -
 28
28 -
 29
29 -
 30
30 -
 31
31 -
 32
32 -
 33
33 -
 34
34 -
 35
35 -
36
-
37
-
38
-
39
 |
 |
