Lexmark C762 Setup Guide - Page 8
Macintosh - driver windows 7
 |
View all Lexmark C762 manuals
Add to My Manuals
Save this manual to your list of manuals |
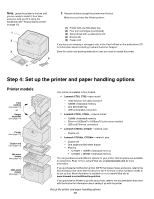
Page 8 highlights
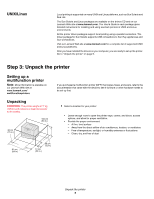
Note: Some Windows operating systems require that you have administrative access to install printer drivers on your computer. 3 Click Printer and Software. 4 Click Agree to accept the license agreement. 5 Select Suggested, and then click Next. The Suggested option is the default installation for local and network-attached setup. If you need to install utilities, change settings, or customize device drivers, select Custom, and follow the instructions on your screen. 6 Select Local Attached, and then click Finish. It may take some time for the drivers to load. 7 Close the drivers CD. 8 Go to "Unpack the printer" on page 9. Using Windows 95 and Windows 98 (first edition) Refer to the User's Guide on the publications CD for information to install Windows 95 and Windows 98 (first edition) drivers. Serial printing For information about serial printing, refer to the User's Guide on the publications CD. Macintosh Creating a queue in Print Center (Macintosh OS X) Note: A PPD file provides detailed information about the capabilities of a printer to your Macintosh computer. Note: A PPD for your printer is also available in a downloadable software package on our Lexmark Web site at www.lexmark.com. Refer to the User's Guide on the publications CD for information to install Macintosh drivers and to create a desktop printer icon for Macintosh 8.6-9.x. 1 Install a printer PostScript Printer Description (PPD) file on your computer. a Insert the drivers CD. b Double-click the installer package for your printer. c Click Continue on the Welcome screen and again after you view the Readme file. d Click Continue after you view the license agreement, and then click Agree to accept the terms of the agreement. e Select a Destination, and then click Continue. f Enter your password, and then click OK. g On the Easy Install screen, click Install. All the necessary software is installed on your computer. h Click Close when installation is complete. 2 Open Finder, click Applications, and then click Utilities. 3 Double-click Print Center or Printer Setup Utility. 4 Do one of the following: If your USB-attached printer appears in the Printer List, you can quit Print Center or Printer Setup Utility. A queue has been created for your printer. If your USB-attached printer does not appear in the Printer List, make sure the USB cable is properly connected and the printer is turned on. After the printer appears in the Printer List, you can quit Print Center or Printer Setup Utility. 5 After you have installed the drivers on your computer, you are ready to set up the printer. Go to "Unpack the printer" on page 9. Install drivers for local printing 8
-
 1
1 -
2
-
 3
3 -
 4
4 -
 5
5 -
 6
6 -
 7
7 -
 8
8 -
 9
9 -
 10
10 -
 11
11 -
 12
12 -
 13
13 -
14
-
15
-
16
-
17
-
18
-
19
-
20
-
21
-
22
-
23
-
24
-
25
-
26
-
27
-
28
-
29
-
30
-
31
-
32
-
33
-
34
-
35
-
36
-
37
-
38
-
39
 |
 |