Lexmark CX310 Quick Reference - Page 2
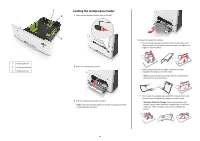
Loading the 250, sheet tray
 |
View all Lexmark CX310 manuals
Add to My Manuals
Save this manual to your list of manuals |
Page 2 highlights
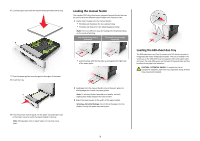
Loading the 250‑sheet tray The printer has a 250-sheet tray (Tray 1) with an integrated manual feeder. The 250-sheet tray and the 650-sheet duo tray support the same paper sizes and types and are loaded in the same way. CAUTION-POTENTIAL INJURY: To reduce the risk of equipment instability, load each tray separately. Keep all other trays closed until needed. 1 Pull out the tray completely. Note: Do not remove trays while a job is printing or while Busy appears on the display. Doing so may cause a jam. 2 If the paper is longer than letter‑size paper, then squeeze and then slide the length guide at the back of the tray to extend it. 4 Squeeze, and then slide the width guide tab to the correct position for the size of the paper being loaded. 3 Squeeze, and then slide the length guide tab to the correct position for the size of the paper being loaded. Note: Use the paper size indicators on the bottom of the tray to help position the guides. 5 Flex the sheets back and forth to loosen them, and then fan them. Do not fold or crease the paper. Straighten the edges on a level surface. Note: Use the paper size indicators on the bottom of the tray to help position the guide. 2
-
 1
1 -
 2
2 -
 3
3 -
 4
4 -
 5
5 -
 6
6 -
 7
7 -
 8
8 -
9
-
10
-
11
-
12
-
13
-
14
-
15
-
16
 |
 |
