Lexmark MS310 User's Guide - Page 22
Installing the printer on an Ethernet network, For Windows users, For Macintosh users - user s manual
 |
View all Lexmark MS310 manuals
Add to My Manuals
Save this manual to your list of manuals |
Page 22 highlights
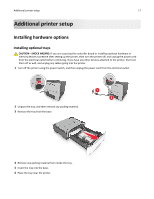
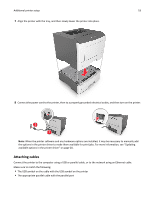
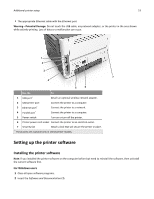
Additional printer setup 22 You will need an Ethernet cable to connect the printer to the network and an available port where the printer can physically connect to the network. Use a new network cable when possible to avoid potential problems caused by a damaged cable. Installing the printer on an Ethernet network For Windows users 1 Insert the Software and Documentation CD. If the installation dialog does not appear after a minute, then launch the CD manually: a Click , or click Start and then click Run. b In the Start Search or Run dialog, type D:\setup.exe, where D is the letter of the CD or DVD drive. c Press Enter, or click OK. 2 Click Install, and then follow the instructions on the computer screen. 3 Select Ethernet connection, and then click Continue. 4 Attach the Ethernet cable when instructed to do so. 5 Select the printer from the list, and then click Continue. Note: If the configured printer does not appear in the list, then click Modify Search. 6 Follow the instructions on the computer screen. For Macintosh users 1 Allow the network DHCP server to assign an IP address to the printer. 2 Obtain the printer IP address either: • From the printer control panel • From the TCP/IP section in the Network/Ports menu • By printing a network setup page or menu settings page, and then finding the TCP/IP section Note: You will need the IP address if you are configuring access for computers on a different subnet than the printer. 3 Install the printer driver on the computer. a Insert the Software and Documentation CD, and then double‑click the installer package for the printer. b Follow the instructions on the computer screen. c Select a destination, and then click Continue. d From the Easy Install screen, click Install. e Type the user password, and then click OK. All the necessary applications are installed on the computer. f Click Close when installation is complete.
-
 1
1 -
2
-
3
-
4
-
5
-
6
-
7
-
8
-
9
-
10
-
11
-
12
-
13
-
14
-
15
-
16
-
 17
17 -
 18
18 -
 19
19 -
 20
20 -
 21
21 -
 22
22 -
 23
23 -
 24
24 -
 25
25 -
 26
26 -
 27
27 -
28
-
29
-
30
-
31
-
32
-
33
-
34
-
35
-
36
-
37
-
38
-
39
-
40
-
41
-
42
-
43
-
44
-
45
-
46
-
47
-
48
-
49
-
50
-
51
-
52
-
53
-
54
-
55
-
56
-
57
-
58
-
59
-
60
-
61
-
62
-
63
-
64
-
65
-
66
-
67
-
68
-
69
-
70
-
71
-
72
-
73
-
74
-
75
-
76
-
77
-
78
-
79
-
80
-
81
-
82
-
83
-
84
-
85
-
86
-
87
-
88
-
89
-
90
-
91
-
92
-
93
-
94
-
95
-
96
-
97
-
98
-
99
-
100
-
101
-
102
-
103
-
104
-
105
-
106
-
107
-
108
-
109
-
110
-
111
-
112
-
113
-
114
-
115
-
116
-
117
-
118
-
119
-
120
-
121
-
122
-
123
-
124
-
125
-
126
-
127
-
128
-
129
-
130
-
131
-
132
-
133
-
134
-
135
-
136
-
137
-
138
-
139
-
140
-
141
-
142
-
143
-
144
-
145
-
146
-
147
-
148
-
149
-
150
-
151
-
152
-
153
-
154
-
155
-
156
-
157
-
158
-
159
-
160
-
161
-
162
-
163
-
164
-
165
-
166
-
167
-
168
-
169
-
170
-
171
-
172
-
173
-
174
-
175
-
176
-
177
-
178
-
179
-
180
-
181
-
182
-
183
-
184
-
185
-
186
-
187
-
188
-
189
-
190
-
191
-
192
-
193
-
194
-
195
-
196
-
197
-
198
-
199
-
200
-
201
-
202
-
203
-
204
-
205
 |
 |