Lexmark MarkNet N7000e User's Guide for Macintosh - Page 5
Understanding the print server LCD, buttons, and indicator lights
 |
View all Lexmark MarkNet N7000e manuals
Add to My Manuals
Save this manual to your list of manuals |
Page 5 highlights
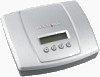
Understanding the print server LCD, buttons, and indicator lights LCD The printer type(s) will appear on the Liquid Crystal Display (LCD), and you can use the left or right navigation buttons to scroll to a Menu option. If your print server is a four-port model, the LCD displays the printer model that is connected to each port. When the network link is not established, the backlight will blink. Printer status messages are also displayed on the LCD, including: • No Network Connection • Ready • Paper Jam • Busy Buttons Back ( ) This button allows users to go back one level in the menu. When you press , changes made in a screen (such as scrolling through setting values) are not applied. Holding down for 1 second returns you to either the top level of the menu toggle sequence, if menus are being navigated, or to the root of the media drive, if a drive is being browsed. Select ( ) This button lets you: • Follow a link • Submit a configuration item • Submit a job (from a media drive) Pressing from a Device Status screen takes you to the Menu home screen. Pressing Media Drive screen opens the drive for browsing. from a Left/Right Navigation ( ) This buttons let you navigate within the screens. Use and screens and to navigate within the administration menus. to scroll through the printer status Indicator lights The network indicator lights are located on the network port on the back of the print server. Event Network link is established. There is receive traffic on the network. There is no network link. Lighting One indicator light is solid on. One indicator light is blinking. Both indicator lights are off. Setup 5
-
 1
1 -
 2
2 -
 3
3 -
 4
4 -
 5
5 -
 6
6 -
 7
7 -
 8
8 -
 9
9 -
 10
10 -
 11
11 -
12
-
13
-
14
-
15
-
16
-
17
-
18
-
19
 |
 |
