Lexmark Network Printer Device MarkNet Internal Print Server Quick Start - Page 6
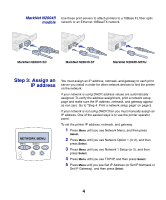
Step 3: Assign an, IP address
 |
View all Lexmark Network Printer Device manuals
Add to My Manuals
Save this manual to your list of manuals |
Page 6 highlights
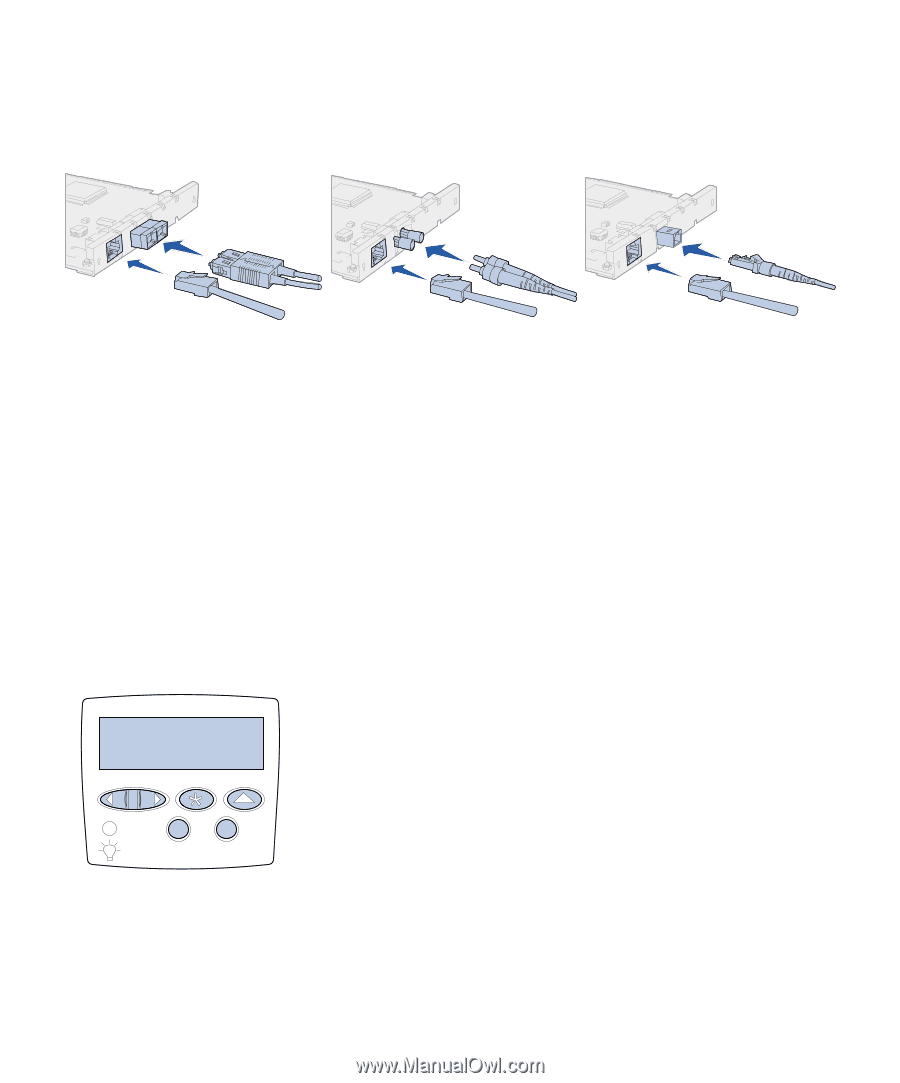
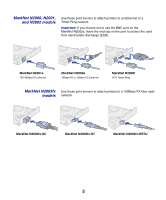
MarkNet N2004fl Use these print servers to attach printers to a 10Base FL fiber optic models network or an Ethernet 10BaseTX network. MarkNet N2004fl-SC MarkNet N2004fl-ST MarkNet N2004fl-MTRJ Step 3: Assign an IP address NETWORK MENU Menu Select You must assign an IP address, netmask, and gateway to each print server you install in order for other network devices to find the printer on the network. If your network is using DHCP, address values are automatically assigned. To verify the address assignment, print a network setup page and make sure the IP address, netmask, and gateway appear as non zero. Go to "Step 4: Print a network setup page" on page 5. If your network is not using DHCP, then you must manually assign an IP address. One of the easiest ways is to use the printer operator panel. To set the printer IP address, netmask, and gateway: 1 Press Menu until you see Network Menu, and then press Select. 2 Press Menu until you see Network Option 1 (or 2), and then press Select. 3 Press Menu until you see Network 1 Setup (or 2), and then press Select. 4 Press Menu until you see TCP/IP, and then press Select. 5 Press Menu until you see Set IP Address (or Set IP Netmask or Set IP Gateway), and then press Select. 4
-
 1
1 -
 2
2 -
 3
3 -
 4
4 -
 5
5 -
 6
6 -
 7
7 -
 8
8 -
 9
9 -
 10
10 -
 11
11 -
 12
12 -
13
-
14
-
15
-
16
-
17
-
18
-
19
-
20
-
21
-
22
-
23
-
24
-
25
-
26
-
27
-
28
-
29
-
30
-
31
-
32
-
33
-
34
-
35
-
36
-
37
-
38
-
39
-
40
-
41
-
42
-
43
-
44
-
45
-
46
-
47
-
48
-
49
-
50
-
51
-
52
-
53
-
54
-
55
-
56
-
57
-
58
-
59
-
60
-
61
-
62
-
63
-
64
-
65
-
66
-
67
-
68
-
69
-
70
-
71
-
72
-
73
-
74
 |
 |