Lexmark OptraImage 242 OptraImage 242/232 Setup Guide (2.5 MB) - Page 6
Step 2, Install the MarkNet print, server
 |
View all Lexmark OptraImage 242 manuals
Add to My Manuals
Save this manual to your list of manuals |
Page 6 highlights
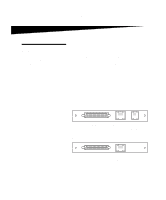
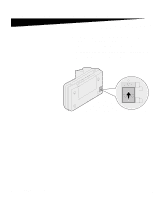
Step 2: Install the MarkNet print server CAUTION! Before installing the MarkNet N2501e print server in your printer, make sure the fax/phone cable is not plugged into the card or the wall outlet. Make sure your printer is unplugged. See "Safety information" on page 4 for additional caution information. If your printer shipped with the MarkNet N2501e or N2401e print server already installed, skip to the next step. Install the MarkNet N2501e or N2401e print server in an available optional card slot inside your printer. (MarkNet internal print servers are sometimes called printer option cards.) For detailed instructions about installing your print server, refer to your printer setup documentation. MarkNet N2501e print server ports SCSI port (OptraImage scan unit attaches here) Ethernet 10/100 Fax Modem port (uses RJ-45 port (uses RJ- cable) 11 cable) MarkNet 2401e print server ports SCSI port (OptraImage scan unit attaches here) Ethernet 10/100 port (uses RJ-45 cable) 6 OptraImage Setup Guide
-
 1
1 -
 2
2 -
 3
3 -
 4
4 -
 5
5 -
 6
6 -
 7
7 -
 8
8 -
 9
9 -
 10
10 -
 11
11 -
 12
12 -
13
-
14
-
15
-
16
-
17
-
18
-
19
-
20
-
21
-
22
-
23
-
24
-
25
-
26
-
27
-
28
-
29
-
30
-
31
-
32
-
33
-
34
-
35
-
36
-
37
-
38
-
39
-
40
-
41
-
42
-
43
-
44
-
45
-
46
-
47
-
48
-
49
-
50
-
51
-
52
-
53
-
54
-
55
-
56
-
57
-
58
-
59
-
60
-
61
-
62
-
63
-
64
-
65
-
66
-
67
-
68
-
69
-
70
-
71
-
72
-
73
-
74
-
75
-
76
-
77
-
78
-
79
-
80
-
81
-
82
-
83
-
84
-
85
-
86
-
87
-
88
-
89
-
90
-
91
-
92
-
93
-
94
-
95
-
96
-
97
-
98
-
99
-
100
-
101
-
102
-
103
-
104
-
105
-
106
-
107
-
108
-
109
-
110
-
111
-
112
-
113
-
114
-
115
-
116
-
117
-
118
-
119
-
120
-
121
-
122
-
123
-
124
-
125
-
126
-
127
-
128
-
129
-
130
-
131
-
132
-
133
-
134
-
135
-
136
-
137
-
138
-
139
-
140
-
141
-
142
-
143
-
144
-
145
-
146
-
147
-
148
-
149
-
150
-
151
-
152
-
153
-
154
-
155
-
156
-
157
-
158
-
159
-
160
-
161
-
162
-
163
-
164
-
165
-
166
-
167
-
168
-
169
-
170
-
171
-
172
-
173
-
174
-
175
-
176
-
177
-
178
-
179
-
180
-
181
-
182
-
183
-
184
-
185
-
186
-
187
-
188
-
189
-
190
-
191
-
192
-
193
-
194
-
195
-
196
-
197
-
198
-
199
-
200
-
201
-
202
-
203
-
204
-
205
-
206
-
207
 |
 |
