Lexmark X925 Lexmark Document Distributor - Page 103
Installing client software on a Microsoft Cluster Server, Installing client software remotely
 |
View all Lexmark X925 manuals
Add to My Manuals
Save this manual to your list of manuals |
Page 103 highlights
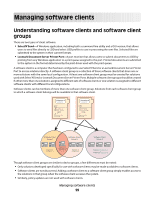
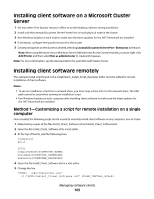
Installing client software on a Microsoft Cluster Server 1 Set any online Print Spooler resource offline to avoid initiating a failover during installation. 2 Install only the Lexmark Document Server Printer Port on each physical node in the cluster. 3 Run Windows Update on each node to make sure the latest updates for the .NET framework are installed. 4 If necessary, configure the spooler resource for the cluster. 5 Create print queues on the cluster as desired, selecting Lexmark Document Server Port - Enterprise as the port. Note: When using Windows Vista or Windows Server 2008 with User Access Control enabled, you must right-click Add Printer and then select Run as administrator to create print queues. Note: For more information, see the documentation for your Microsoft Cluster Server. Installing client software remotely The example install script found in the install\Silent_Install_Script_Examples folder must be edited for remote installation of client software. Notes: • To run an installation script from a network share, you must map a drive letter to the network share. The UNC path cannot be used when running an installation script. • Run Windows Update on each computer after installing client software to make sure the latest updates for the .NET framework are installed. Method 1-Customizing a script for remote installation on a single computer Once created, the following script can be reused to remotely install client software on any computer, one at a time. 1 Make backup copies of the files Install_Client_Software.isf and Install_Client_Software.bat. 2 Open the file Install_Client_Software.isf in a text editor. 3 At the top of the file, add the following lines: [Computer] PC1=1 [PC1] ComputerName=$COMPUTER_NAME$ UserName=$COMPUTER_USERNAME$ Password=$COMPUTER_PASSWORD$ 4 Open the file Install_Client_Software.bat in a text editor. 5 Change the line "%CD%\..\x86\InstallGui.exe" /I:"%CD%\Install_Client_Software.isf" SOLNS_INSTALL_DIR=%1 Managing software clients 103
-
 1
1 -
2
-
3
-
4
-
5
-
6
-
7
-
8
-
9
-
10
-
11
-
12
-
13
-
14
-
15
-
16
-
17
-
18
-
19
-
20
-
21
-
22
-
23
-
24
-
25
-
26
-
27
-
28
-
29
-
30
-
31
-
32
-
33
-
34
-
35
-
36
-
37
-
38
-
39
-
40
-
41
-
42
-
43
-
44
-
45
-
46
-
47
-
48
-
49
-
50
-
51
-
52
-
53
-
54
-
55
-
56
-
57
-
58
-
59
-
60
-
61
-
62
-
63
-
64
-
65
-
66
-
67
-
68
-
69
-
70
-
71
-
72
-
73
-
74
-
75
-
76
-
77
-
78
-
79
-
80
-
81
-
82
-
83
-
84
-
85
-
86
-
87
-
88
-
89
-
90
-
91
-
92
-
93
-
94
-
95
-
96
-
97
-
 98
98 -
 99
99 -
 100
100 -
 101
101 -
 102
102 -
 103
103 -
 104
104 -
 105
105 -
 106
106 -
 107
107 -
 108
108 -
109
-
110
-
111
-
112
-
113
-
114
-
115
-
116
-
117
-
118
-
119
-
120
-
121
-
122
-
123
-
124
-
125
-
126
-
127
-
128
-
129
-
130
-
131
-
132
-
133
-
134
-
135
-
136
-
137
-
138
-
139
-
140
-
141
 |
 |
