LiftMaster CSW200UL CSW200UL W/ SURGE SUPPRESSION & RADIO RECEIVER Manual - Page 25
Plug-In Loop Detector Wiring, Caution, Inside, Outside, Series Connected
 |
View all LiftMaster CSW200UL manuals
Add to My Manuals
Save this manual to your list of manuals |
Page 25 highlights
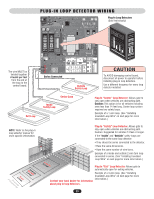
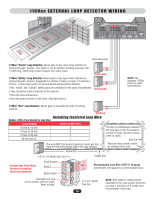
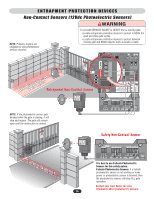
P LUG - I N L O O P D E T E C T O R W I R I N G Plug-In Loop Detectors (Sold Individually) The wire MUST be twisted together 6 twists per foot from the end of the loop to the control board. Exit Loop NOTE: Refer to the plug-in loop detector manual for more specific information. Series Connected Outside Safety Loop To AVOID damaging control board, disconnect all power to operator before installing plug-in loop detectors. Use a different frequency for every loop detector installed. Center Loop Inside Safety Loop Plug-In "Center" Loop Detector: Allows gate to stay open when vehicles are obstructing path. Caution: This option is for all vehicles including ones less than 14 feet long. Center loop system requires two safety loops. Example of a 1 wire loop. (See "Installing Insulated Loop Wire" on next page for more information.) Plug-In "Safety" Loop Detector: Allows gate to stay open when vehicles are obstructing path. Caution: Suggested for vehicles 14 feet or longer. If the "Inside" and "Outside" safety loops are connected to the same loop detector: • They should be series connected to the detector. • Have the same dimensions. • Have the same number of wire turns. Example of a inside and outside 2 wire turn loop connected in series. (See "Installing Insulated Loop Wire" on next page for more information.) Plug-In "Exit" Loop Detector: Allows gate to automatically open for exiting vehicles. Example of a 3 wire loop. (See "Installing Insulated Loop Wire" on next page for more information.) Contact your local dealer for information about plug-in loop detectors. 23
-
 1
1 -
2
-
3
-
4
-
5
-
6
-
7
-
8
-
9
-
10
-
11
-
12
-
13
-
14
-
15
-
16
-
17
-
18
-
19
-
 20
20 -
 21
21 -
 22
22 -
 23
23 -
 24
24 -
 25
25 -
 26
26 -
 27
27 -
 28
28 -
 29
29 -
 30
30 -
31
-
32
-
33
-
34
-
35
-
36
-
37
-
38
-
39
-
40
-
41
-
42
-
43
-
44
-
45
-
46
-
47
-
48
-
49
-
50
-
51
-
52
-
53
-
54
-
55
-
56
 |
 |
