LiftMaster RSL12U RSL12U Installation Manual - Page 30
Maintenance, Important Safety Information, Maintenance Chart, Batteries, Drive Chain
 |
View all LiftMaster RSL12U manuals
Add to My Manuals
Save this manual to your list of manuals |
Page 30 highlights
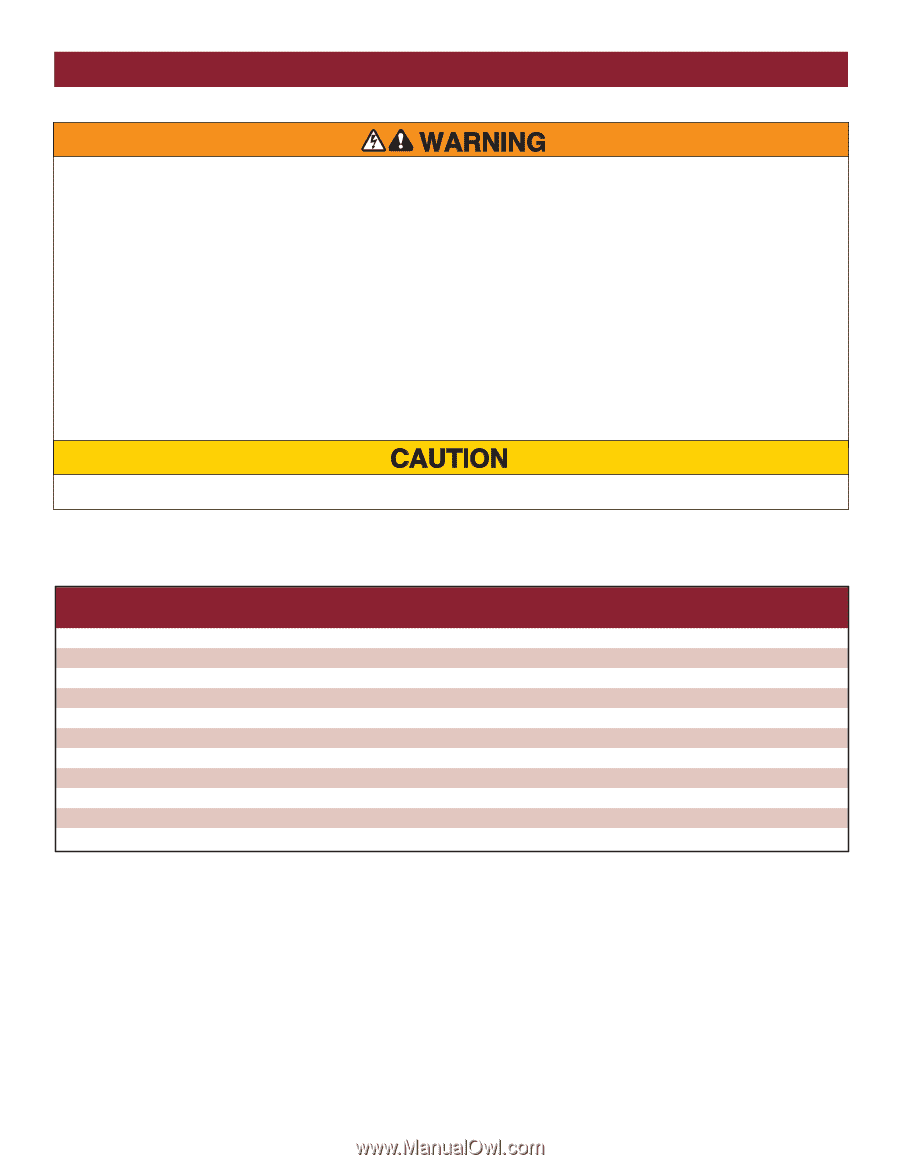
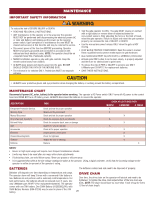
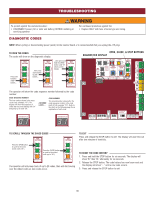
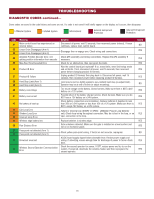
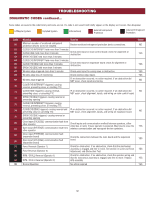
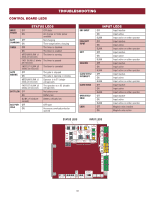
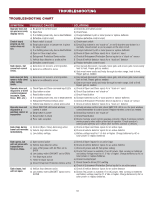
MAINTENANCE IMPORTANT SAFETY INFORMATION To reduce the risk of SEVERE INJURY or DEATH: • READ AND FOLLOW ALL INSTRUCTIONS. • ANY maintenance to the operator or in the area near the operator MUST NOT be performed until disconnecting the electrical power (AC or solar and battery) and locking-out the power via the operator power switch. Upon completion of maintenance the area MUST be cleared and secured, at that time the unit may be returned to service. • Disconnect power at the fuse box BEFORE proceeding. Operator MUST be properly grounded and connected in accordance with national and local electrical codes. NOTE: The operator should be on a separate fused line of adequate capacity. • NEVER let children operate or play with gate controls. Keep the remote control away from children. • ALWAYS keep people and objects away from the gate. NO ONE SHOULD CROSS THE PATH OF THE MOVING GATE. • The entrance is for vehicles ONLY. Pedestrians MUST use separate entrance. • Test the gate operator monthly. The gate MUST reverse on contact with a rigid object or reverse when an object activates the non-contact sensors. After adjusting the force or the limit of travel, retest the gate operator. Failure to adjust and retest the gate operator properly can increase the risk of INJURY or DEATH. • Use the manual disconnect release ONLY when the gate is NOT moving. • KEEP GATES PROPERLY MAINTAINED. Read the owner's manual. Have a qualified service person make repairs to gate hardware. • ALL maintenance MUST be performed by a LiftMaster professional. • Activate gate ONLY when it can be seen clearly, is properly adjusted and there are no obstructions to gate travel. • To reduce the risk of FIRE or INJURY to persons use ONLY LiftMaster part 29-NP712 for replacement batteries. • SAVE THESE INSTRUCTIONS. • ALWAYS wear protective gloves and eye protection when changing the battery or working around the battery compartment. MAINTENANCE CHART Disconnect all power (AC, solar, battery) to the operator before servicing. The operator's AC Power switch ONLY turns off AC power to the control board and DOES NOT turn off battery power. ALWAYS disconnect the batteries to service the operator. DESCRIPTION Entrapment Protection Devices Warning Signs Manual Disconnect Drive Chain and Sprockets Belt and Pulley Gate Accessories Electrical Chassis Mounting Bolts Operator Batteries TASK Check and test for proper operation Make sure they are present Check and test for proper operation Check for excessive slack and lubricate Check for excessive slack, wear or damage Inspect for wear or damage Check all for proper operation Inspect all wire connections Check for tightness Inspect for wear or damage Replace CHECK AT LEAST ONCE EVERY MONTH 6 MONTHS 3 YEARS X X X X X X X X X X X NOTES: • Severe or high cycle usage will require more frequent maintenance checks. • Limits may have to be reset after any major drive chain adjustments. • If lubricating chain, use only lithium spray. Never use grease or silicone spray. • It is suggested that while at the site voltage readings be taken at the operator. Using a digital voltmeter, verify that the incoming voltage to the operator is within ten percent of the operator's rating. BATTERIES Batteries will degrade over time depending on temperature and usage. The operator alarm will beep 3 times with a command if the battery is low. Batteries do not perform well in extremely cold temperatures. For best performance, the batteries should be replaced every 3 years. Use only LiftMaster part 29-NP712 for replacement batteries. The operator comes with one 7AH battery. One 33AH Battery (A12330SGLPK), with 33AH Battery Harness (K94-37236) may be used in place of the 7AH battery. The batteries contain lead and need to be disposed of properly. DRIVE CHAIN Over time, the drive chain on the operator will stretch and need to be tightened. To tighten the drive chain adjust either of the two chain eye bolts. NOTE: The chain should have no more than 1 inch of sag for every 10 feet of chain length. 29
-
 1
1 -
2
-
3
-
4
-
5
-
6
-
7
-
8
-
9
-
10
-
11
-
12
-
13
-
14
-
15
-
16
-
17
-
18
-
19
-
20
-
21
-
22
-
23
-
24
-
 25
25 -
 26
26 -
 27
27 -
 28
28 -
 29
29 -
 30
30 -
 31
31 -
 32
32 -
 33
33 -
 34
34 -
 35
35 -
36
-
37
-
38
-
39
-
40
-
41
-
42
-
43
-
44
-
45
-
46
-
47
-
48
 |
 |