LiftMaster SW470 SW490 GL BOARD Manual - Page 17
Adjustment, Programming the Radio Receiver, SET SECURITY MODE, SET OUTPUT DURATION, - gate parts
 |
View all LiftMaster SW470 manuals
Add to My Manuals
Save this manual to your list of manuals |
Page 17 highlights
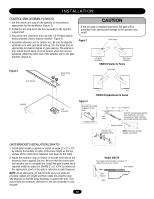
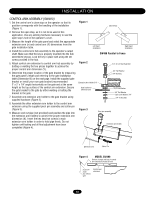
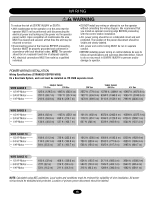
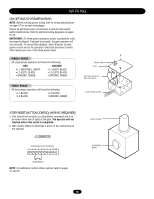
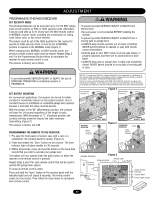
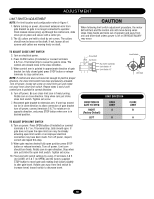
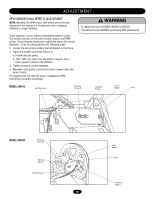
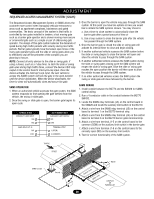
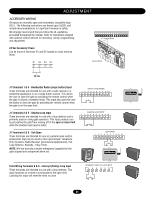
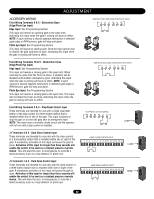
WARNING ADJUSTMENT WARNING PROGCRAAMUMITNGIOTHNE RADIO RECEIVER SET SECURITY MODE The Universal Receiver can be used with up to 15 315 MHz rolling code remote controls or PINs in HIGH security mode. Alternately, it can be used with up to 31 of any type 315 MHz remote control in NORMAL security mode, including any combination of rolling code, billion code, or dip switch remotes. The jumper must be set at the HIGH position for the receiver to operate in HIGH security mode. It must be set at NORMAL position to operate at the NORMAL mode (Figure 1). When changing from NORMAL to HIGH security mode, any previous remote control codes must be erased. Repeat Steps 2 and 3 in the Programming Section below to reprogram the rAeceViveEr foRr eTachISremSotEe cMontrEol Nin uTse. The receiver is factory set at HIGH. ATTENTIONWARNING To prevent possible SERIOUS INJURY or DEATH, the use of CAUTION CONSTANT OPERATION on residential openers is PROHIBITED. SET OUTPUT DURATION For commercial applications, the receiver can be set for either constant or momentary closure on the output contacts. Use of constant closure is prohibited on residential garage door openers because it overrides the safety reversal devices. With the jumper in the "M" (Momentary) position, the contacts will close for 1/4 second regardless of the length of radio transmission. With the jumper in "C" (Constant) position, the contacts will stay closed as long as the radio continues tTrhaenAsrmeDciettiivVnegrE(isFifgRaucrtATeor2yEV).seNEt aCRt MIT. AISSEMENT PROGRAMMING THE REMOTE TO THE RECEIVER PRECAUCAIÓTTNENTION 1. Pry open the front panel of receiver case with a coin or a screwdriver. Re-connect power to opener (Figure 3). 2. Press and release the "learn" button on the receiver. The learn indicator light will glow steadily for 30 seconds. 3. Within 30 seconds, press and hold the button on the hand-held remote that you wish to operate your garage door. The opener will now operate when the push button on either the receiver or the remote control is pressed. Repeat Steps 2 and 3 for each remote control that will be used to operate the garage door opener. To erase all remote control codes: Press and hold the "learn" button on the receiver panel until the indicator light turns off (about 6 seconds). All remote control codes are now erased. Then follow the steps above to reprogram each remote control. WARNING To prevent possible SERIOUS INJURY or DEATH from electrocution: • Be sure power is not connected BEFORE installing the receiver. To prevent possible SERIOUS INJURY or DEATH from a moving gate or garage door: • ALWAYS keep remote controls out of reach of children. NEVER permit children to operate, or play with remote control transmitters. • Activate gate or door ONLY when it can be seen clearly, is properly adjusted, and there are no obstructions to door AVERTISSEMENT travel. • ALWAYS keep gate or garage door in sight until completely closed. NEVER permit anyone to cross path of moving gate or door. AVERTISSEWMAERNNTING NOTICE: To comply with FCC and or Industry Canada (IC) rules, adjustment or modifications of this receiver and/or transmitter are prohibited, except for changing the code setting or replacing the battery. THERE ARE NO OTHER USER SERVICEABLE PARTS. WARNING Tested to Comply with FCC Standards FOR HOME OR OFFICE USE. Operation is subject to the following two conditions: (1) this device may not cause harmful interference, and (2) this device must accept any interference received, including interference that may cause undesired operation. Security Mode Terminals Jumper Figure 1 Security Mode Terminals Jumper HIGH SECURITY MODE NORMAL SECURITY MODE ADVERATEVNERCTIAISSEMENT CONSTANT Jumper Figure 2 MOMENTARY Jumper OPERATION OPERATION Output Duration Terminals Output ADVERATVEENRDTCeurrmatTiIinoanAlsISSEMENT M HIGH NORM M OPENING RECEIVER Connect Antenna Figure 3 OPEN RECEIVER Indicator Light Learn Button C P2 M 24V 12V Output Duration Terminals Security Mode Power Supply Jumper ADVERTENCIA 17 ADVERTENCIA
-
 1
1 -
2
-
3
-
4
-
5
-
6
-
7
-
8
-
9
-
10
-
11
-
 12
12 -
 13
13 -
 14
14 -
 15
15 -
 16
16 -
 17
17 -
 18
18 -
 19
19 -
 20
20 -
 21
21 -
 22
22 -
23
-
24
-
25
-
26
-
27
-
28
-
29
-
30
-
31
-
32
-
33
-
34
-
35
-
36
-
37
-
38
-
39
-
40
 |
 |
