Linksys WET11 User Guide - Page 23
Advanced, Wireless, MAC Address
 |
UPC - 745883552221
View all Linksys WET11 manuals
Add to My Manuals
Save this manual to your list of manuals |
Page 23 highlights
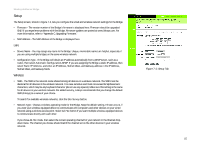
Wireless-B Ethernet Bridge Advanced Use the Advanced Settings screen, shown in Figure 7-6, to customize advanced wireless settings and clone a MAC address onto the Bridge. Wireless • Transmission Rate - The default setting is Auto. The range is from 1 to 11Mbps. The rate of data transmission should be set depending on the speed of your wireless network. You can select from a range of transmission speeds, or you can keep the default setting, Auto, to have the Bridge automatically use the fastest possible data rate and enable the Auto-Fallback feature. Auto-Fallback will negotiate the best possible connection speed between the Bridge and another wireless-equipped device. • Authentication Type - The default setting is Open System. The choices are Open System and Shared Key. This setting allows the Bridge to authenticate communication with the wireless devices in your network. With the Shared Key setting, all wireless devices must use the same WEP key so that the Bridge and the client can authenticate each other and start transmitting data. With the Open System setting, any device can join a network without performing any security check. Select the authentication type used by your wireless network. MAC Address • Cloning Mode - You can clone the MAC address of any network device onto the Bridge. To disable MAC address cloning, keep the default setting, Disable. To use the MAC cloning feature, select Enable. If you have enabled MAC cloning, then select Auto if you want to clone the MAC address of the device currently connected to the Bridge's LAN port. The Bridge will actively scan for a new MAC address to be cloned whenever you disconnect and re-connect the Bridge through its LAN port. Select Manual if you want to specify a MAC address in the Enter MAC Address field. This is useful when the Bridge is connected to multiple devices through a switch or a hub. Click the Apply button to save your changes. If your page doesn't automatically refresh itself, then click the Refresh button of your web browser. Click the Cancel button to cancel your changes. Click the Help button for additional on-screen information. Chapter 7: Using the Wireless-B Ethernet Bridge Web-based Utility Advanced Figure 7-6: Advanced Settings Tab 18
-
 1
1 -
2
-
3
-
4
-
5
-
6
-
7
-
8
-
9
-
10
-
11
-
12
-
13
-
14
-
15
-
16
-
17
-
 18
18 -
 19
19 -
 20
20 -
 21
21 -
 22
22 -
 23
23 -
 24
24 -
 25
25 -
 26
26 -
 27
27 -
 28
28 -
29
-
30
-
31
-
32
-
33
-
34
-
35
-
36
-
37
-
38
-
39
-
40
-
41
-
42
-
43
-
44
-
45
-
46
-
47
-
48
-
49
-
50
-
51
 |
 |
