Logitech 966167-0403 Manual - Page 9
Establish a Connection - Important, Using the Presentation Device
 |
UPC - 097855013507
View all Logitech 966167-0403 manuals
Add to My Manuals
Save this manual to your list of manuals |
Page 9 highlights
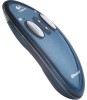
Establish a Connection - Important! 1 1. Make sure you have connected the mini-receiver to the USB port of your computer, installed the batteries in the presentation device, and have installed the software. 2. Turn on the presentation device by moving the Mode switch to either Mouse Mode or Presentation Mode. Press connect button 3. Press and release the Connect button on the presentation device (picture 1). The presentation device emits a "beep." The Connection Status LED above the Forward (left) button is red and blinks fast until a connection is made; then it turns green and blinks slowly. You have now established a connection between the presentation device and the mini-receiver. 4. If a connection has not been made and the Connection Status LED on the presentation device is slowly blinking red, press the Connect button on the bottom of the mini-receiver (picture 2), then press the Connect button on the presentation device. 2 Connection Status LED and Communication Range • After connection, the Connection Status LED blinks green to indicate each time a data packet has been sent from the presentation device to the mini-receiver. Connect button on bottom of mini-receiver • Should the presentation device move out of range from the mini-receiver, the Connection Status LED on the presentation device turns red and blinks fast as long as the presentation device is out of range. Using the Presentation Device The Logitech® Cordless Presenter™ has two modes: Presentation Mode and Mouse Mode. Use the Mode switch on the bottom of the presentation device to turn on the device and to switch between these two modes. 5 English
-
 1
1 -
2
-
3
-
 4
4 -
 5
5 -
 6
6 -
 7
7 -
 8
8 -
 9
9 -
 10
10 -
 11
11 -
 12
12 -
 13
13 -
 14
14 -
15
-
16
-
17
-
18
-
19
-
20
-
21
-
22
-
23
-
24
-
25
-
26
-
27
-
28
-
29
-
30
-
31
-
32
-
33
-
34
-
35
-
36
-
37
-
38
-
39
-
40
-
41
-
42
-
43
-
44
-
45
-
46
-
47
-
48
 |
 |
