Logitech 980130-0403 Manual - Page 3
Macintosh, OS 9.04, 9.1, 9.2, 10.1.3 and higher
 |
UPC - 097855013019
View all Logitech 980130-0403 manuals
Add to My Manuals
Save this manual to your list of manuals |
Page 3 highlights
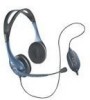
3 Troubleshooting - PC 1. Make sure your headset is plugged in to an available USB port. Try unplugging and plugging it in. 2. Verify that your Volume and Playback settings are not muted and that the volume for these devices is at least halfway up. Refer to the Volume Adjustment section in this manual. 3. Check that the application you are using has USB Audio Device selected as the recording device. 4. In Multimedia Properties under Start, Settings, Control Panel, Multimedia, check that your recording preferred device is USB Audio Device and "Use only preferred devices" box is checked. 5. Check that the device is listed in the Device Manager. Go to Start, Settings, Control Panel, System, and select Device Manager tab (Hardware tab, Device Manager for Windows® Me and 2000). Choose "View devices by type". Select Sound, Video and Game Controllers. You should see "USB Audio Device" listed. Also, select Universal Serial Bus Controllers. You should see "USB Composite Device" listed. If not, unplug and replug device. Reboot computer. 6. On a computer system that does not follow proper USB conventions, there is a chance that the system may lock up when you plug in the device. If this occurs on your system, contact your computer's manufacturer. 7. If you are having problems with the quality of your sound recordings, then change your recording to 16 bit quality in sound recorder by going to File, Properties, Convert Now. Under Name, choose CD Quality. Macintosh® OS 9.04, 9.1, 9.2, 10.1.3 and higher 1 Installation - Mac® Install the product by plugging it into an available USB port. Note: If a USB keyboard is being used, make sure that the keyboard is plugged into USB port number 1. 1. Plug the USB connector into a USB port on your computer or USB compatible keyboard. 2. You must specify the input device to your computer. OS 9: Click the Apple menu and choose Control Panels, Sound to activate the sound option window. Input source should be External Mic. Close the sound option window when you are finished. OS 10.1.3+: Click System Preferences, choose Sound to activate Sound Option Window for Headphone. Choose Speech to activate microphone. Select input and choose USB audio as your device for sound input. 2 How to use - Mac® Record an Audio File - OS 9: 1. OS 9.04: Open the application SimpleSound on your hard drive. OS 9.1: Go to the Apple menu, Control Panel, Sound application. Click the Alerts tab, then New Sound. 2. Click Add to bring up the record window. Click RECORD and create a voice file. When finished, click STOP. 3. To hear what you recorded, click PLAY. If you hear your voice, the installation was successful. Volume Adjustment - OS 9: Click the Apple menu and choose Control Panels, Sound to activate the sound option window. Select Output and choose the output device you are using. Verify that Mute is not selected and the volume slider is at least halfway up. Record an Audio File - OS 10.1.3+: 1. Click System Preferences, Speech and turn Apple Speakable Items to on. Volume Adjustment - OS 10.1.3: Click System Preferences, Sound and use sliders to adjust listening volume in OS 10.1.3 and higher. No microphone adjust is available. 3Troubleshooting - Mac® 1. Check that your USB keyboard is plugged into USB port number 1 only. 2. Verify that your operating system is OS 9.0.4, 9.1, 9.2, 10.1.3 or greater. Operating systems below OS 9.0.4 do not support this device. 3. Check that USB audio is selected as your input device. Follow the Mac installation instructions in this manual. 4. Check the volume level as described in the previous section. Note: This equipment has been tested and found to comply with the limits for a Class B digital device, pursuant to part 15 of the FCC harmful interference in a residential installation. This equipment generates, uses and can radiate radio frequency energy and, if not installed and used in accordance with the instructions, may cause harmful interference to radio communication. However, there is no guarantee that interference will not occur in a particular installation. If this equipment does cause harmful interference to radio or television reception, which can be determined by turning the equipment off and on, the user is encouraged to correct the interference by one or more of the following measures: (1) Reorient or relocate the receiving antenna. (2) Increase the separation between the equipment and receiver. (3) Connect the equipment into an outlet on a circuit different from that to which the receiver is connected. (4) Consult the dealer or and experienced radio/TV technician for help. This Class B digital device complies with Canadian ICES-003.
-
 1
1 -
 2
2 -
 3
3 -
 4
4 -
 5
5 -
 6
6 -
 7
7 -
 8
8 -
 9
9 -
10
 |
 |
