Logitech G430 User Manual - Page 114
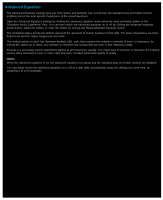
To adjust audio experience levels, Customize Audio Experience, Volume, Microphone, Sidetone, Treble
 |
View all Logitech G430 manuals
Add to My Manuals
Save this manual to your list of manuals |
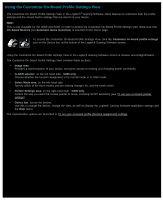
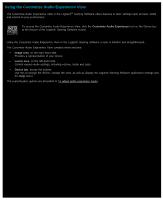
Page 114 highlights
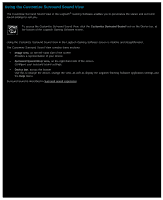
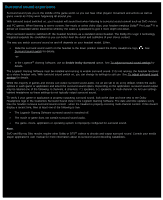
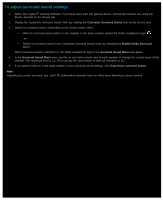
To adjust audio experience levels 1. Within the Logitech® Gaming Software, if you have more than one gaming device, choose the relevant one using the Device Selector on the Device bar. 2. Display the Customize Audio Experience View (by clicking the Customize Audio Experience icon on the Device bar). 3. Slide the Volume slider to adjust the total listening volume of the headset. The volume roller also controls this volume level. Click the speaker mute button to mute and unmute audio to the headset. This does not mute the microphone. 4. Slide the Microphone slider to adjust the gain (volume) of the microphone. Increasing the microphone gain makes your voice sound louder to others but may also cause the microphone to pick up unwanted background noises. Check your voice clarity with Voice preview. 5. Slide the Sidetone slider to adjust the loudness of your voice as heard in the headset. Sidetone helps you speak at more natural volumes and relieves a common 'plugged ears' sensation. Sidetone does not affect how others hear you. This field is not available for all headset models. 6. Slide the Bass and Treble sliders to adjust the volume of low frequency sounds (bass) and high frequency sounds (treble). 7. If you want to hear a sound when you switch on the mute button, select On in the Audible mute indication box. This field is only available to certain headsets. 8. In the Mic light field, choose one of the following: Always on - Light will remain on at all times when the headset is plugged in. Follow mute - Light will turn on only when the microphone is muted by pressing the mute button on the headset or rotating the microphone boom upright. Always off - Light will remain off at all times, even when the microphone is muted. This field is not available for all headset models. 9. Optionally, if you want to fine-tune frequency bands, you can click the advanced equalizer arrow to access the Advanced Equalizer settings. See Advanced Equalizer. Note: Several of these options can easily be switched on or off at a later date, by assigning them to a G-key/button.
-
 1
1 -
2
-
3
-
4
-
5
-
6
-
7
-
8
-
9
-
10
-
11
-
12
-
13
-
14
-
15
-
16
-
17
-
18
-
19
-
20
-
21
-
22
-
23
-
24
-
25
-
26
-
27
-
28
-
29
-
30
-
31
-
32
-
33
-
34
-
35
-
36
-
37
-
38
-
39
-
40
-
41
-
42
-
43
-
44
-
45
-
46
-
47
-
48
-
49
-
50
-
51
-
52
-
53
-
54
-
55
-
56
-
57
-
58
-
59
-
60
-
61
-
62
-
63
-
64
-
65
-
66
-
67
-
68
-
69
-
70
-
71
-
72
-
73
-
74
-
75
-
76
-
77
-
78
-
79
-
80
-
81
-
82
-
83
-
84
-
85
-
86
-
87
-
88
-
89
-
90
-
91
-
92
-
93
-
94
-
95
-
96
-
97
-
98
-
99
-
100
-
101
-
102
-
103
-
104
-
105
-
106
-
107
-
108
-
 109
109 -
 110
110 -
 111
111 -
 112
112 -
 113
113 -
 114
114 -
 115
115 -
 116
116 -
 117
117 -
 118
118 -
 119
119 -
120
-
121
-
122
-
123
-
124
-
125
-
126
-
127
-
128
-
129
-
130
 |
 |
