Logitech Harmony 890 User's Guide - Page 10
Viewing the Status and Navigation Bars, Displaying Help on Your Harmony Remote - battery
 |
View all Logitech Harmony 890 manuals
Add to My Manuals
Save this manual to your list of manuals |
Page 10 highlights
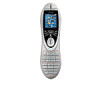
User Manual Harmony 890 Viewing the Status and Navigation Bars The status bar provides users with important information such as: • A: Date and time ƒ To set the time-display format click Remote Preferences (from home in the Harmony software) and then click Settings. • B: Indicator if the USB is attached • C: Indicator when infrared (IR) commands are being sent to your devices • D: Battery indicator (battery's power) • E: Activity you are in (if applicable) The navigation bar displays information such as: • F: The number of screens available in a menu, and the screen currently displayed Displaying Help on Your Harmony Remote From time to time when you select an Activity, the Activity may not work. This can happen when the Harmony remote sends many infrared commands to set up all your devices for an Activity, but one or more devices are not receiving some commands. The Harmony remote is then "out of sync" with your devices (e.g. it thinks one of your devices is on, but it is turned off). Some of the reasons the Harmony remote can become "out of sync" with your system are: • Someone walks between the Harmony remote and your entertainment system while an Activity is starting. • You point your Harmony remote away from your system while an Activity is starting. • There is an object blocking the line-of-sight between your Harmony remote and the system. • You are very far away from your entertainment system. You will need to use the Help button on your Harmony remote to resynchronize the remote with your devices. Before resynchronizing, ensure the cause of the problem has been addressed. Example Remove all obstructions so that the entertainment devices can receive the infrared commands from the Harmony remote. Note: If your devices are no longer responding consistently to your Harmony remote, but were doing so before, you may need to recharge the battery. To resynchronize: 1. Press the Help button. v. 1.1 page 8
-
 1
1 -
2
-
3
-
4
-
 5
5 -
 6
6 -
 7
7 -
 8
8 -
 9
9 -
 10
10 -
 11
11 -
 12
12 -
 13
13 -
 14
14 -
 15
15 -
16
-
17
-
18
 |
 |
