Lowrance HDS-7 Gen3 Installation Manual US - Page 48
Wifi, setup
 |
View all Lowrance HDS-7 Gen3 manuals
Add to My Manuals
Save this manual to your list of manuals |
Page 48 highlights
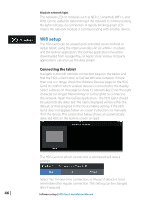
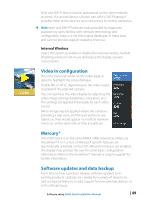
Module network light The network LED on modules such as NEP-2, SonarHub, WIFI-1, and RI10, can be useful for determining if the network is communicating. No light indicates no connection. A rapidly blinking green LED means the network module is communicating with another device. Wifi setup The HDS Gen3 can be veiwed and controlled via an Android or Apple tablet, using the internal wireless AP (or a WIFI-1 module) and the GoFree application. The GoFree application should be downloaded from Google Play, or Apple Store. Various 3rd party applications can also use the data stream. Connecting the tablet Navigate to the wifi network connection page on the tablet, and find the 'HDS-x Gen3 xxxx', or 'GoFree Wifi xxxx' network. If more than one is in range, check the 'Wireless Devices' page on the HDS Gen3 to confirm which wireless device is connected to the display. Select a device on this page to show it's network key. Enter the eight character (or longer) 'Network Key' in to the tablet to connect to the network. Open the GoFree application - the HDS Gen3 should be automatically detected. The name displayed will be either the default, or that assigned in the Device Name setting. If the HDS Gen3 does not appear, follow on screen instructions to manually 'find' the device. The screen shot below shows an automatically detected HDS on the GoFree screen on Ipad. The HDS Gen3 to which connection is attempted will raise a prompt. 46 | Select 'Yes' for one-time connection, or 'Always' if device is to be remembered for regular connection. This setting can be changed later if required. Software setup | HDS Gen3 Installation Manual
-
 1
1 -
2
-
3
-
4
-
5
-
6
-
7
-
8
-
9
-
10
-
11
-
12
-
13
-
14
-
15
-
16
-
17
-
18
-
19
-
20
-
21
-
22
-
23
-
24
-
25
-
26
-
27
-
28
-
29
-
30
-
31
-
32
-
33
-
34
-
35
-
36
-
37
-
38
-
39
-
40
-
41
-
42
-
 43
43 -
 44
44 -
 45
45 -
 46
46 -
 47
47 -
 48
48 -
 49
49 -
 50
50 -
 51
51 -
 52
52 -
 53
53 -
54
-
55
-
56
-
57
-
58
-
59
-
60
-
61
-
62
-
63
-
64
-
65
-
66
 |
 |
