Lowrance HDS-9 Gen2 Touch Installation Manual - Page 17
Attaching the transducer
 |
View all Lowrance HDS-9 Gen2 Touch manuals
Add to My Manuals
Save this manual to your list of manuals |
Page 17 highlights
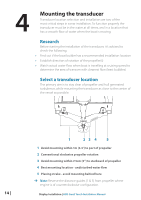
¼¼ Note: Boats with strakes or ribs on the hull can create large amounts of turbulence at higher speeds. A good transducer location on these types of boats is between the ribs closest to the engine. ¼¼ Note: If the transducer is not placed in a smooth flow of water, interference caused by bubbles and turbulence may show onscreen in the form of random lines or dots. The unit could also lose bottom signal when the boat is on plane. ¼¼ Note: Trim tabs will vary in the amount of turbulence they create as they are adjusted, stay clear of these. Attaching the transducer The transducer should be installed parallel with the transom's waterline, not the bottom of the boat (deadrise). ¼¼ Note: Ensure the entire bottom surface of the transducer hangs at least couple of millimetres (1/16ths of an inch) lower than the bottom of the hull. Hold the transducer with bracket up to the transom of the boat and trace the slotted screw hole locations (two on the 83/200 KHz transducer, and four on the 50/200 KHz transducer). Mark drilling points in the middle of each outline, to allow for transducer height adjustment. Drill pilot holes to suit fasteners. ¼¼ Note: Check that there is nothing on the other side of the mounting surface that may be damaged by drilling. Attach transducer to transom, using supplied stainless steel fasteners. Drill a 25mm (1") hole above the waterline, large enough to pass the plug through. Display Installation | HDS Gen2 Touch Installation Manual | 15
-
 1
1 -
2
-
3
-
4
-
5
-
6
-
7
-
8
-
9
-
10
-
11
-
 12
12 -
 13
13 -
 14
14 -
 15
15 -
 16
16 -
 17
17 -
 18
18 -
 19
19 -
 20
20 -
 21
21 -
 22
22 -
23
-
24
-
25
-
26
-
27
-
28
-
29
-
30
-
31
-
32
-
33
-
34
-
35
-
36
-
37
-
38
-
39
-
40
 |
 |
