MSI X570-A PRO User Manual - Page 30
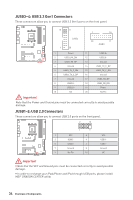
M2_1~2: M.2 Slots (Key M), M.2 installation
 |
View all MSI X570-A PRO manuals
Add to My Manuals
Save this manual to your list of manuals |
Page 30 highlights
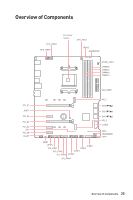
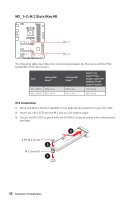
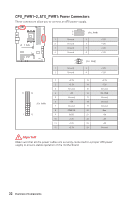
M2_1~2: M.2 Slots (Key M) M2_1 M2_2 The following table describes the relationship between the M.2 slots and the PCIe bandwidth of the processors. Slots 3rd Gen AMD Ryzen™ M2_1 (CPU) PCIe 4.0 x4 M2_2 (PCH) PCIe 3.0 x4 2nd Gen AMD Ryzen™ PCIe 3.0 x4 PCIe 3.0 x4 Ryzen™ with Radeon™ Vega Graphics and 2nd Gen AMD Ryzen™ with Radeon™ Graphics PCIe 3.0 x4 PCIe 3.0 x4 M.2 installation 1. Move and fasten the M.2 standoff to the appropriate position for your M.2 SSD. 2. Insert your M.2 SSD into the M.2 slot at a 30-degree angle. 3. Secure the M.2 SSD in place with the 8.5H M.2 screw provided with motherboard package. 8.5H M.2 screw 3 M.2 standoff 1 2 30º 30 Overview of Components
-
 1
1 -
2
-
3
-
4
-
5
-
6
-
7
-
8
-
9
-
10
-
11
-
12
-
13
-
14
-
15
-
16
-
17
-
18
-
19
-
20
-
21
-
22
-
23
-
24
-
 25
25 -
 26
26 -
 27
27 -
 28
28 -
 29
29 -
 30
30 -
 31
31 -
 32
32 -
 33
33 -
 34
34 -
 35
35 -
36
-
37
-
38
-
39
-
40
-
41
-
42
-
43
-
44
-
45
-
46
-
47
-
48
-
49
-
50
-
51
-
52
-
53
-
54
-
55
-
56
-
57
-
58
-
59
-
60
-
61
-
62
-
63
-
64
-
65
-
66
-
67
-
68
-
69
-
70
-
71
-
72
 |
 |

30
Overview of Components
M2_1~2: M.2 Slots (Key M)
M2_1
M2_2
The following table describes the relationship between the M.2 slots and the PCIe
bandwidth of the processors.
Slots
3rd Gen AMD
Ryzen™
2nd Gen AMD
Ryzen™
Ryzen™ with
Radeon™ Vega
Graphics and 2nd Gen
AMD Ryzen™ with
Radeon™ Graphics
M2_1 (CPU)
PCIe 4.0 x4
PCIe 3.0 x4
PCIe 3.0 x4
M2_2 (PCH)
PCIe 3.0 x4
PCIe 3.0 x4
PCIe 3.0 x4
M.2 installation
1.
Move and fasten the M.2 standoff
to the appropriate position for your M.2 SSD.
2.
Insert your M.2 SSD into the M.2 slot at a 30-degree angle.
3.
Secure the M.2 SSD in place with the 8.5H M.2 screw provided with motherboard
package.
30º
30º
1
3
8.5H M.2 screw
M.2 standoff
2