MSI X570-A PRO User Manual - Page 66
Deleting Arrays, To delete an array
 |
View all MSI X570-A PRO manuals
Add to My Manuals
Save this manual to your list of manuals |
Page 66 highlights
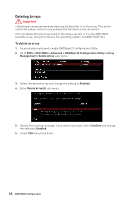
Deleting Arrays Important y Deleting an array permanently destroys all data that is on the array. This action cannot be undone and it is very unlikely that the data can be recovered. y Do not delete the first array listed in the Arrays section, if it is the AMD-RAID bootable array. Doing this deletes the operating system and AMD-RAID files. To delete an array 1. As previously mentioned, enable RAIDXpert2 Configuration Utility. 2. Go to BIOS > SETTINGS > Advanced > RAIDXpert2 Configuration Utility > Array Management > Delete Array sub-menu. 3. Select the desired array and change the setting to Enabled. 4. Enter Delete Array(s) sub-menu. 5. Review the warning message, if you want to proceed, Select Confirm and change the setting to Enabled. 6. Select YES then press Enter. 66 AMD RAID Configuration
-
 1
1 -
2
-
3
-
4
-
5
-
6
-
7
-
8
-
9
-
10
-
11
-
12
-
13
-
14
-
15
-
16
-
17
-
18
-
19
-
20
-
21
-
22
-
23
-
24
-
25
-
26
-
27
-
28
-
29
-
30
-
31
-
32
-
33
-
34
-
35
-
36
-
37
-
38
-
39
-
40
-
41
-
42
-
43
-
44
-
45
-
46
-
47
-
48
-
49
-
50
-
51
-
52
-
53
-
54
-
55
-
56
-
57
-
58
-
59
-
60
-
 61
61 -
 62
62 -
 63
63 -
 64
64 -
 65
65 -
 66
66 -
 67
67 -
 68
68 -
 69
69 -
 70
70 -
 71
71 -
72
 |
 |
