Mackie SR408 / SR568 Owner's Manual - Page 46
SNAPSHOT MODE, Programming Snapshots, Clearing all Snapshots from memory., Selecting Snapshots
 |
View all Mackie SR408 / SR568 manuals
Add to My Manuals
Save this manual to your list of manuals |
Page 46 highlights
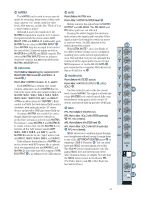
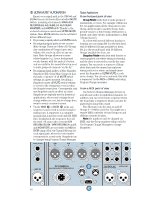
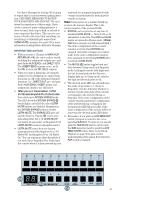
SNAPSHOT MODE Programming Snapshots 1. Before creating and storing a Snapshot, you may want to "clear the board" of any active mutes. One easy way to do this is by pressing and holding the CLEAR button for two seconds, or engage Snapshot 00 if it is preprogrammed with "no mutes." 2. Make sure you are in Snapshot mode (both digits and the right decimal point are displayed). Use the Up/Down Arrow buttons or the 0-9 buttons to select the Snapshot that you want to program. The Numeric Display begins blinking when you arrow up or down to a Snapshot that isn't currently engaged. There are 100 Snapshots available, represented by the numbers 00 through 99 in the Numeric Display. You can engage the Snapshot you've selected by pressing the DO IT button. If the Snapshot had been programmed before, the mute configuration stored in its memory engages. Otherwise, it defaults to "no mutes." 3. Using the local MUTE switches, mute the signal paths you want included in the Snapshot. For instance, if you want Channels 1, 2, 3, and 4 included, press the MUTE switches on those channels. 4. The STORE button saves a mute configuration as a Snapshot. If the Snapshot had been previously programmed, the store operation erases and overwrites the old mute configuration and the new one is written to memory. Press STORE . The LED above this button begins blinking. The decimal point LED lights steadily. The Numeric Display begins blinking (if it wasn't blinking already). 5. At this point, you can still make changes in the mute configuration by either adding mutes or turning mutes off. You can also use the Up/Down Arrow buttons or the 0-9 buttons to select a different Snapshot number in which to store the mute configuration. 6. Press STORE again. The STORE LED turns off, the Numeric Display stops flashing and the mute configuration you selected is now stored in the Snapshot. 7. You can exit STORE mode by pressing the CLEAR button at any time. If you had muted some channels, the Numeric Display continues blinking. You can either manually turn off the MUTE switches or press 46 and hold the CLEAR button to unmute all the channels, or you can select a different Snapshot by pressing the Up/Down Arrow button and then pressing the DO IT button. Clearing all Snapshots from memory. The following procedure completely and irretrievably erases all of the Snapshots programmed into ULTRA MUTE. You may want to save the Snapshot configuration to external memory using the MIDI or DATA ports prior to performing this procedure, if there is a chance you will want to use any of the programmed Snapshots again. See "Using The MIDI Ports" on page 10 or "Using The DATA Port" on page 12. 1. Be sure ULTRA MUTE is in Snapshot mode. 2. Press and hold the CLEAR and MODE buttons for 2 seconds. ULTRA MUTE cycles through all the Snapshots, clearing each memory location. You may release the buttons as soon as the cycle begins. When the cycle ends, you are ready to reprogram the Snapshots. Selecting Snapshots There are 100 Snapshots available. You can only select one Snapshot at a time. When you first enter Snapshot mode by pressing the MODE button, the Snapshot number that was last selected comes up in the display. The decimal point LED in the display blinks, indicating that the current mute state of the console is different than the selected Snapshot (unless the current state coincidentally happens to match the selected Snapshot, in which case the decimal point LED lights steadily). You must press DO IT to engage the Snapshot - it doesn't automatically engage when you first enter Snapshot mode. This is a fail-safe measure to prevent someone from inadvertently changing the mute configuration if the MODE button is pressed by mistake. You can select a different Snapshot by pressing the Up/Down Arrow buttons. You can press and hold the Arrow Up or Down buttons to quickly scan through the Snapshots. The Snapshot you select will not engage until you press the DO IT button. At that point the Numeric Display stops blinking and the new mute configuration is written to the console. Another method for selecting Snapshots is to enter the Snapshot number using the number buttons . For example, if you're at Snapshot 10 and you want to jump to Snapshot
-
 1
1 -
2
-
3
-
4
-
5
-
6
-
7
-
8
-
9
-
10
-
11
-
12
-
13
-
14
-
15
-
16
-
17
-
18
-
19
-
20
-
21
-
22
-
23
-
24
-
25
-
26
-
27
-
28
-
29
-
30
-
31
-
32
-
33
-
34
-
35
-
36
-
37
-
38
-
39
-
40
-
 41
41 -
 42
42 -
 43
43 -
 44
44 -
 45
45 -
 46
46 -
 47
47 -
 48
48 -
 49
49 -
 50
50 -
 51
51 -
52
-
53
-
54
-
55
-
56
-
57
-
58
-
59
-
60
-
61
-
62
-
63
-
64
-
65
-
66
-
67
-
68
-
69
-
70
-
71
-
72
-
73
-
74
-
75
-
76
-
77
-
78
-
79
-
80
-
81
-
82
-
83
-
84
-
85
-
86
 |
 |
