Magellan RoadMate 1700 Manual - English - Page 24
Previous Destinations - software
 |
UPC - 763357123494
View all Magellan RoadMate 1700 manuals
Add to My Manuals
Save this manual to your list of manuals |
Page 24 highlights
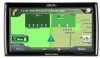
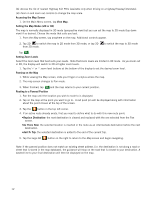
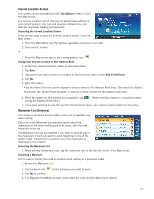
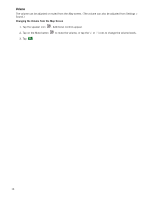
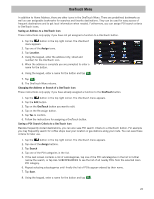
• To enter a ZIP code: if needed, tap the Zip Code button. Enter the ZIP code. Tap cities with the zip code entered. to bring up a list of Tap on the city name to select it from the list. 4. A screen appears with the address of the selected location, the estimated time of arrival (ETA), the distance to travel, and the routing method (e.g. Fastest Time). 5. (optional) Tap Options if you want to change the routing method. 6. Tap the large GO button on the right to return to the Map screen and start navigating. Tips on Entering Addresses Quickly • When you are entering the name of a city or a street, Magellan software only displays those characters that appear in possible search results. The other characters are grayed out. • When entering city names or street names, tap the List button after a couple of letters; Magellan software lists the items that contain the specified characters. • You can also search by ZIP codes. This narrows the number of matching cities to normally less then four. Previous Destinations Routing to a Previous Destination (Method 1) 1. From the Main Menu, tap the Go To icon. 2. Tap the Previous icon. 3. Select the destination from the list of previous destinations. 4. A screen appears with the address of the selected location, the estimated time of arrival (ETA), the distance to travel, and the routing method (e.g. Fastest). 5. (optional) Tap Options if you want to change the routing method. 6. Tap the large GO button on the right to return to the Map screen and start navigating Routing to a Previous Destination (Method 2) 1. From the Main Menu, tap the button in the top right corner. The OneTouch menu appears. 2. Tap the Previous icon. 3. Select the destination from the list of previous destinations. 4. A screen appears with the address of the selected location, the estimated time of arrival (ETA), the distance to travel, and the routing method (e.g. Fastest). 5. (optional) Tap Options if you want to change the routing method. 6. Tap the large GO button on the right to return to the Map screen and start navigating. Saving a Previous Destination to Your Address Book 1. Access the list of Previous Destinations as described above. 2. Select the desired location from the list of previous destinations. 3. On the Route screen, tap Save. 4. (optional) If you want to save this location to the OneTouch menu, select Add to OneTouch. 5. Tap the . 6. Edit information: • Tap the Name field and use the keypad to enter a name for the address book entry. • (optional) Tap to specify a phone number for the address book entry. 7. When the details for this address are acceptable, tap the . 17
-
 1
1 -
2
-
3
-
4
-
5
-
6
-
7
-
8
-
9
-
10
-
11
-
12
-
13
-
14
-
15
-
16
-
17
-
18
-
 19
19 -
 20
20 -
 21
21 -
 22
22 -
 23
23 -
 24
24 -
 25
25 -
 26
26 -
 27
27 -
 28
28 -
 29
29 -
30
-
31
-
32
-
33
-
34
-
35
-
36
-
37
-
38
-
39
-
40
 |
 |