Magnavox 27MDTR20 User manual, English (US) - Page 29
Timer Recording
 |
View all Magnavox 27MDTR20 manuals
Add to My Manuals
Save this manual to your list of manuals |
Page 29 highlights
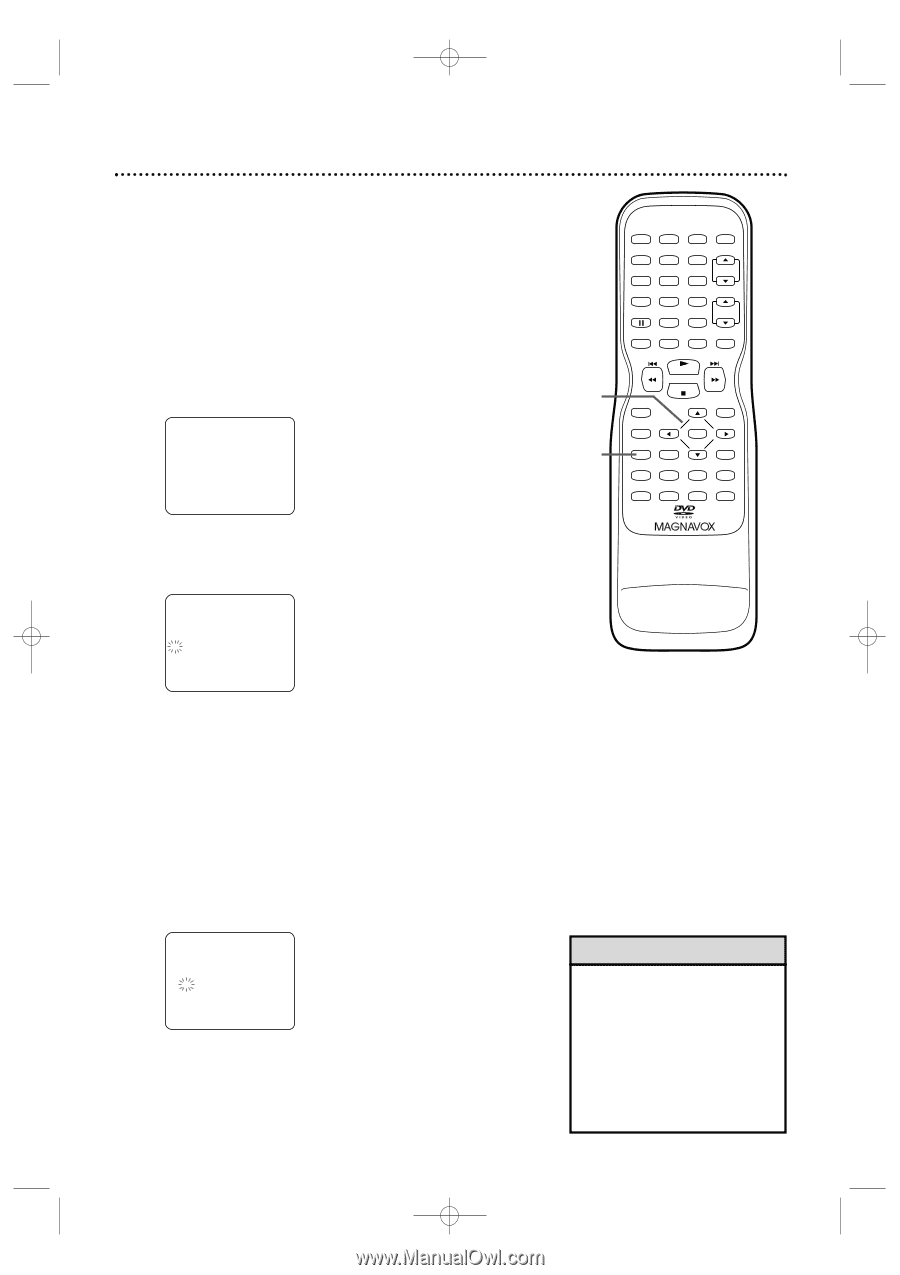
T2132_1102_0102_EN1_0303 3/3/05 10:18 AM Page 29 Timer Recording 29 Follow the steps below to program the TV/VCR/DVD to record TV programs while you're away from home. The TV/VCR/DVD will record and turn itself off automatically. You can set a maximum of 8 timer recordings. Before you begin, make sure ... ● The clock is set. If the clock is not set, the Manual Clock Set menu will appear. See pages 21-22 to set the clock. ● Channels are set. Details are on page 19. ● A tape is in the TV/VCR/DVD. Make sure the record tab is intact. Details are on page 8. 1 Press SETUP. Press ▲ or ▼ to select TIMER PROGRAMMING, then press ENTER. - TV/VCR SETUP - B TIMER PROGRAMMING SETTING CLOCK CHANNEL SET UP USER'S SET UP V-CHIP SET UP LANGUAGE [ENGLISH] CAPTION [OFF] ZERO RETURN TIME SEARCH INDEX SEARCH 1-3 1 STANDBY-ON PICTURE SLEEP SELECT 123 CH. 456 789 +100 0 +10 SPEED C.RESET ZOOM VOL. MUTE RECORD PLAY STOP DISC MENU DISPLAY SETUP TITLE ENTER RETURN CLEAR SEARCH MODE REPEAT REPEAT A-B MODE AUDIO SUBTITLE ANGLE 2 Press ▲ or ▼ to select a program position. Then, press B. - TIMER PROGRAMMING - CH DATE BEGIN END B 3 While CH is selected, press ▲ or ▼ to select the channel you want to record.Then press B. If the TV/VCR/DVD is connected to a Cable Box/Satellite Receiver, the TV/VCR/DVD must be on channel 3, 4 or AUX. Set CH as 03, 04 or AUX in the Timer Programming menu. Choose the channel you want to record at the Cable Box/Satellite Receiver. Leave the Cable Box/Satellite Receiver on for the timer recording. Leave the TV/VCR/DVD set to AUX. (Press SELECT on the remote to choose AUX at the TV/VCR/DVD.) Additional details are on page 9. - TIMER PROGRAMMING - CH DATE BEGIN END B 61 Helpful Hint • You cannot access the Timer Programming menu at step 1 if the clock is not set.The Setting Clock menu will appear. Follow the steps on pages 21-24 to set the clock. • Enter the information while the space is flashing.
-
 1
1 -
2
-
3
-
4
-
5
-
6
-
7
-
8
-
9
-
10
-
11
-
12
-
13
-
14
-
15
-
16
-
17
-
18
-
19
-
20
-
21
-
22
-
23
-
 24
24 -
 25
25 -
 26
26 -
 27
27 -
 28
28 -
 29
29 -
 30
30 -
 31
31 -
 32
32 -
 33
33 -
 34
34 -
35
-
36
-
37
-
38
-
39
-
40
-
41
-
42
-
43
-
44
-
45
-
46
-
47
-
48
-
49
-
50
-
51
-
52
-
53
-
54
-
55
-
56
-
57
-
58
-
59
-
60
-
61
-
62
-
63
-
64
-
65
-
66
-
67
-
68
-
69
-
70
-
71
-
72
-
73
-
74
-
75
-
76
-
77
-
78
-
79
-
80
-
81
-
82
-
83
-
84
 |
 |