Magnavox D-60ES / Owners Manual - Page 3
Filter, Cont., Timer - dehumidifier
 |
View all Magnavox D-60ES manuals
Add to My Manuals
Save this manual to your list of manuals |
Page 3 highlights
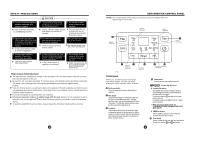
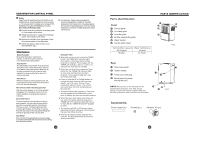
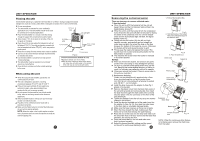
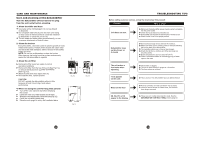
SAFETY PRECAUTIONS Do not cover the intake or exhaust openings with cloths or towels. A lack of air flow can lead to overheating and fire. Never insert your finger or other foreign objects into grills or openings. Take special care to warn children of these dangers. It may cause electric shock or failure of appliance. Always insert the filters securely. Clean filter once every two weeks. Operation without filters may cause failure. CAUTION ! Care should be taken when using the unit in a room with the following persons: Infants, children, elderly people, and people not senstive to humidity. Do not place heavy object on the power cord and take care so that the cord is not compressed. There is danger of fire or electric shock. Do not use in areas where chemicals are handled. This will cause the unit to deteriorate due to chemicals and solvents dissolved in the air. Do not climb up on or sit on the unit. You may be injured if you fall or if the unit falls over. ! If water enters the unit, turn the unit off and disconnect the power , contact a qualified service technician. It may cause failure of appliance or accident. Do not place flower vases or other water container on top of the unit. Water may spill inside the unit, causing insulation failure and electrical shock or fire. ! Electrical Information The manufacturers' nameplate is located on the rear panel of the unit and contains electrical and other technical data specific to this unit. Be sure the unit is properly grounded. To minimize shock or fire hazards, proper grounding is important. The power cord is equipped with a three-prong grounding plug for protection against shock hazards. Your unit must be used in a properly grounded wall receptacle. If the wall receptacle you intend to use is not adequately grounded or protected by a time delay fuse or circuit breaker, have a qualified electrician install the proper receptacle. Ensure the receptacle is accessible after unit installation. Do not use extension cords or an adapter plugs with this unit. However, if it is necessary to use an extension cord, use an approved Dehumidifier extension cord only (available at most local hardware stores). To avoid the possibility of personal injury, always unplug the unit before installing and/or servicing. 3 DEHUMIDIFIER CONTROL PANEL NOTE: The control panel of the unit you purchased may be slightly different depending on the model. 2 Bucket full indicator light Filter Cont. Clean filter indicator light High fan indicator light Filter Turbo Fan Full Normal Cont. On Off Auto defrost Timer 3 Low fan indicator light 1 7 Continuous operation on indicator light Fig.1 6 Timer on/off indicator light Control panel When you push the button to change operation modes, the unit will make a beep sound to indicate mode change. 1 Continuous button Press to activate the continuous dehumidifying operation. 2 Filter button The check filter feature is a reminder to clean the Air Filter for more efficient operation. The Filter light(Clean filter l ight) will illuminate after 250 hours of operation. To reset after cleaning the filter, press the Filter pad and the light will go off. 3 Fan button Control the fan speed. Press to select either High or Normal fan speed. Set the fan control to High for maximum moisture removal. When the humidity has been reduced and quiet operation is preferred, set the fan control to Normal. 4 5 4 Auto defrost operation on indicator light 4 Power button Press to turn the dehumidifier on and off. 57 : Down/Up Buttons Humidity Set buttons The humidity level can be set within a range of 35%RH(Relative Humidity) to 85%RH(Relative Humidity) in 5% increments. For drier air, press the pad and set to a lower percent value(%). For damper air, press the pad and set a higher percent value(%). * When adjusting humidity levels, the CONTINUOUS OPERATION INDICATOR LIGHT MUST BE OFF TIMER Set buttons Use the Up/Down buttons to set the Auto start and Auto stop time from 0.0 to 24. 6 Timer button Press to initiate the Auto start and Auto stop feature, in conjuction with the and key bottons.
-
 1
1 -
 2
2 -
 3
3 -
 4
4 -
 5
5 -
 6
6
 |
 |
