Magnavox D-60ES / Owners Manual - Page 5
There are two ways to remove collected water., Use the bucket, NOTES
 |
View all Magnavox D-60ES manuals
Add to My Manuals
Save this manual to your list of manuals |
Page 5 highlights
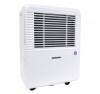
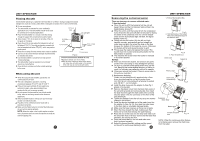
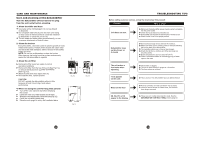
UNIT OPERATION Placing the unit A dehumidifier operating in a basement will have little or no effect in drying an adjacent enclosed storage area, such as a closet, unless there is adequate circulation of air in and out of the area. Do not use outdoors. This dehumidifer is intended for indoor residential applications only. This dehumidifier should not be used for commercial or industrial applications. Place the dehumidifier on a smooth, level floor strong enough to support the unit with a full bucket of water. Allow at least 7.9 in. of air space on all sides of the unit for good air circulation. Place the unit in an area where the temperature will not fall below 5 C(41 F). The coils can become covered with frost at temperatures below 5 C(41 F), which may reduce performance. Place the unit away from the clothes dryer, heater or radiator. Use the unit to prevent moisture damage anywhere books or valuables are stored. Use the dehumidifier in a basement to help prevent moisture damage. The dehumidifier must be operated in an enclosed area to be most effective. Close all doors, windows and other outside openings to the room. 15.7 in.or more Air intake grille 7.9 in. or more Air outlet grille 7.9 in. or more 7.9 in. or more 7.9 in. or more Fig.4a Casters wheels(on the bottom of unit) Casters wheels can move freely. Do not force casters to move over carpet, nor move the unit with water in the bucket. (The unit may tip over and spill water.) When using the unit When first using the dehumidifier, operate the unit continuously for 24 hours. This unit is designed to operate in a working environment between 5O C/41O F and 35O C/95O F. If the unit has been switched off and needs to be switched on again, allow approximately three minutes for the unit to resume normally. Do not connect the dehumidifier to a multiple socket outlet, which is also being used for other electrical appliances. Select a suitable location, making sure you have easy access to an electrical outlet. Plug the unit into a electrical socket-outlet with a grounded connection. Make sure the Water bucket is correctly fitted otherwise the unit will not operate properly. NOTE: When the water in the bucket reaches a certain level, please be careful to move the machine to avoid the unit from tipping over. 7 UNIT OPERATION Removing the collected water 1. Pull out the bucket a little. There are two ways to remove collected water. 1. Use the bucket When the unit is off,if the bucket is full, the unit will beep 8 times and the Full indicator light will flash, the digital display shows P2. When the unit is on,if the bucket is full, the compressor turns off and the fan turns off after 30 seconds for drying the water of the condenser, then the unit will beep 8 times and the Full indicator light will flash, the digital display shows P2. Slowly pull out the bucket. Grip the left and right handles securely, and carefully pull out straight so water does not spill. Do not put the tank on the floor because the bottom of the bucket is uneven. Otherwise the bucket will fall and cause the water to spill. Throw away the water and replace the bucket. The bucket must be in place and securely seated for the dehumidifier to operate. The machine will re-start when the bucket is restored in its correct position. NOTES: When you remove the bucket, do not touch any parts inside of the unit. Doing so may damage the product. Be sure to push the bucket gently all the way into the unit. Banging the bucket against anything or failing to push it in securely may cause the unit not to operate. When you remove the bucket, if there is some water in the unit you must dry it. Fig.5 2. Hold both sides of the bucket with even strength and pull it out from the unit. Fig.6 3. Pour the water out. Drain hose Adaptor A Plastic cover Fig.7 2. Continuous draining Water can be automatically emptied into a floor drain by attaching the unit with a water hose (Id 5/16,not included))with a female threaded end (ID:M=1 , not included). Drain hose subassembly Fig.8 Install the drain hose onto the adaptor A (See Fig.7, placed in the bucket). Remove the plastic cover from the back drain outlet of the unit and set aside and remove bucket, then insert the drain hose through the drain outlet of the unit and securely press it into the connector on the front of the unit.(See.Fig.9) Tighten the adaptor A and the unit by using two screws (placed in the bucket). Install the female threaded end of the water hose into the adaptor A.(See.Fig.10), then lead the water hose to the floor drain or a suitable drainage facility. Make sure the hose is secure so there are no leaks. Direct the hose toward the drain, making sure that there are no kinks that will stop the water flowing. Place the end of the hose into the drain and make sure the end of the hose is level or down to let the water flow smoothly. Do not stop the flow. Place the bucket back in the unit and make sure that it is placed correctly. Select the desired humidity setting and fan speed on the unit for continuous draining to start. 8 Connector Drain hose Fig.9 Water hose Female threaded end Fig.10 NOTE: When the continuous drain feature is not being used, remove the drain hose from the outlet.
-
 1
1 -
 2
2 -
 3
3 -
 4
4 -
 5
5 -
 6
6
 |
 |
