Magnavox DV220MW9 User manual, English (US) - Page 20
Recording - vcr
 |
UPC - 053818570685
View all Magnavox DV220MW9 manuals
Add to My Manuals
Save this manual to your list of manuals |
Page 20 highlights
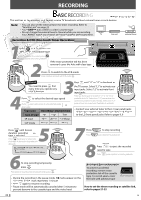
RREECCORDDIINNGG ASICRECORDING Before: Turn on the TV. This unit has no tuner system so it cannot receive TV broadcasts without external tuner or such devices. Note: • You can also set the external tuner for timer recording. Refer to "Satellite Link" on page 22. • You CANNOT dub a DVD to a video cassette tape. • Do not change the external tuner's channel while you are recording. You CANNOT watch one channel and record another at the same time. TV this unit external tuner Recording & OTR (One-touch Timer Recording) STANDBY-ON 1 STANDBY-ON Press to turn on the unit. Then insert a recordable tape. STANDBY-ON Para encender la unidad, pulse . Luego inserte una cinta grabable. • If the erase-protection tab has been 2 removed, cover the hole with clear tape. VCR Press to switch to the VCR mode. Para cambiar al modo de VCR, pulse VCR . REC TIMER REC IR STOP/EJECT PLAY RECORD OPEN/CLOSE TRACKING VCR SOU REMEMBER VCR • You need to press first every time you operate any of VCR features. 3Press INPUT until "L1" or "L2" is displayed on the TV screen. Select "L1" to activate rear input jacks. Select "L2" to activate front input jacks. 4 SPEED Press to select the desired tape speed. SPEED Pulse para seleccionar la velocidad deseada SP de la cinta. Tape speed Recording / playback time Pulse INPUT hasta que se visualice "L1" o "L2" en la pantalla de la TV. Seleccione "L1" para activar los conectores posteriores de entrada. Seleccione "L2" para activar los conectores frontales de entrada. • Connect your external tuner to the L1 (rear panel) jacks of the unit. Connect camcorders and other such devices Type of tape T60 T120 T160 to the L2 (front panel) jacks. Refer to pages 8, 9. SP mode 1hour 2hours 2-2/3hours SLP mode 3hours 6hours 8hours Press RECORD until desired duration recording REC time is selected. RECORD Pulse hasta que se seleccione 5 7 Press STOP to stop recording. Pulse STOP para detener la grabación. el tiempo de duración de grabación deseado. REC OTR (0:30) (normal recording) OTR (1:00)..... OTR (8:00) OTR (7:30) 6To stop recording temporarily, PAUSE press . OPEN/CLOSE 8 Press to eject the recorded cassette tape. OPEN/CLOSE Pulse para expulsar el casete grabado. Accidental Erasure Prevention To prevent accidental PAUSE Para detener la grabación temporalmente, pulse . recording, remove eraseprotection tab of the cassette • During the recording in the pause mode, 5 C marks appear on the TV screen. Each C mark represents 1 minute. tape. To record again, cover the hole with adhesive tape. erase-protection tab • Press PAUSE again to resume recording. • Pause mode will be automatically canceled after 5 minutes to How to set the timer recording or satellite link, prevent damage to the cassette tape and the video head. refer to pages 21-22. 20 EN
-
 1
1 -
2
-
3
-
4
-
5
-
6
-
7
-
8
-
9
-
10
-
11
-
12
-
13
-
14
-
 15
15 -
 16
16 -
 17
17 -
 18
18 -
 19
19 -
 20
20 -
 21
21 -
 22
22 -
 23
23 -
 24
24 -
 25
25 -
26
-
27
-
28
 |
 |
