Magnavox MRD300 User manual, English (US) - Page 2
AV - remote
 |
View all Magnavox MRD300 manuals
Add to My Manuals
Save this manual to your list of manuals |
Page 2 highlights
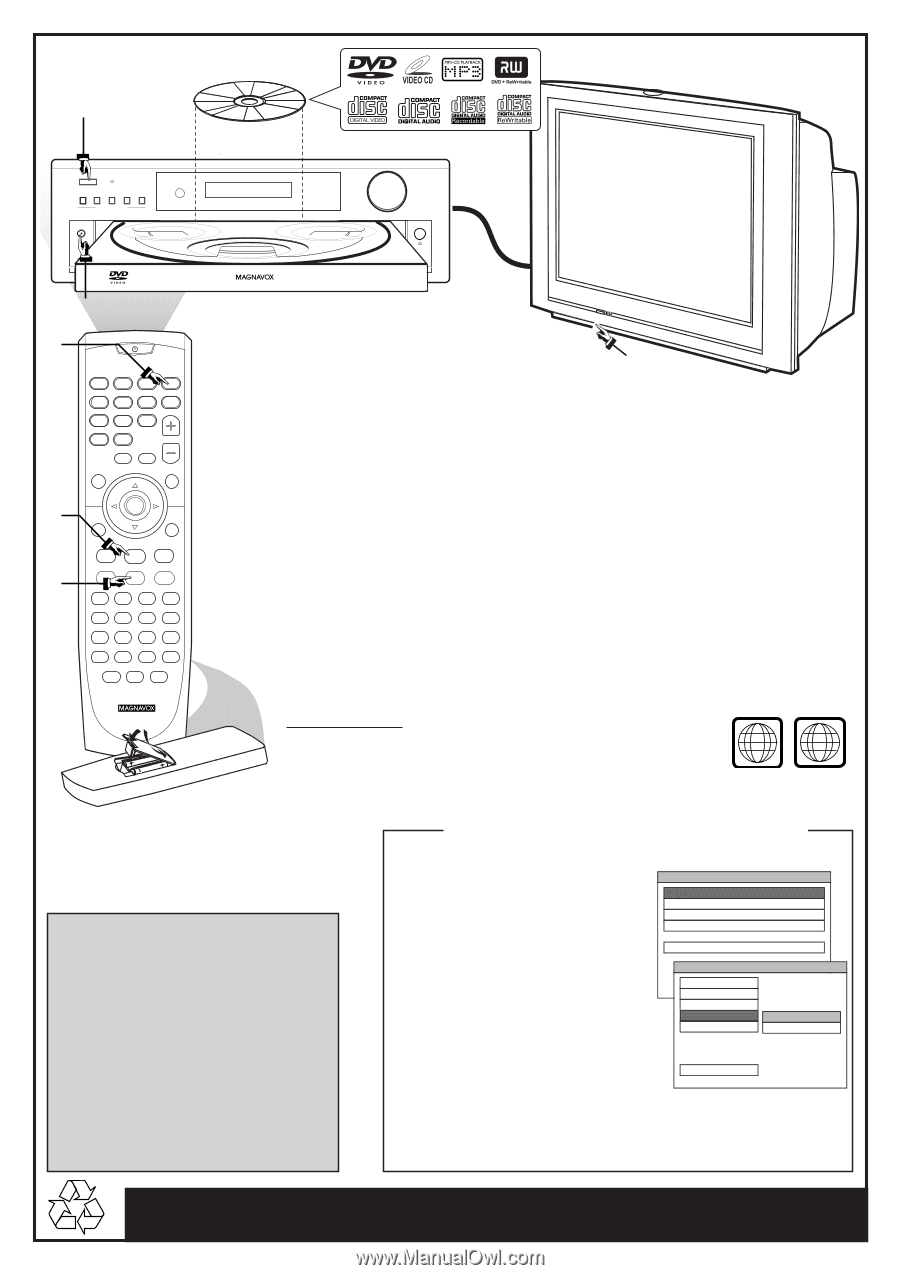
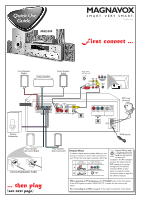
1 AV IN POWER ON•OFF STANDBY ON DISC 1 DISC 2 DISC 3 DISC 4 DISC 5 5 DISC DIRECT PLAY OPEN•CLOSE iR SENSOR DVD VIDEO DIGITAL SURROUND SYSTEM VOLUME STOP PROGRESSIVE SCAN TUNER•BAND TV•AUX DVD MUTE SELECT PREVIOUS NEXT PLAY•PAUSE 5 DVD CHANGER PHONES PROGRESSIVE SCAN 5 DVD CHANGER 3 1 SOURCE 1 2 3 SLEEP 4 5 6 7 8 9 >10 0 MUTE SELECT VOL DISPLAY MENU 4 5 OK SET UP OPEN/ CLOSE PREV í PLAY/PAUSE NEXT ÉÅ ë REW STOP FF à Ç á TITLE ANGLE ZOOM GOTO LANGUAGE SUBTITLE N/P DIM REPEAT A/B SHUFFLE PROGRAM DISC SKIP DISC NO SLOW/MEM CD MODE ST/MONO LISTENING AUDIO Make sure your DVD system and TV are connected and turned on! Playing a disc 4 CHANNEL 3 2 1 Press POWER ON•OFF at the front panel to turn the power on. You can also press the SOURCE button on the remote until "DISC X" appears on the display panel. 2 Turn on the TV and select the correct Video In mode. You should see the blue Philips DVD background screen on the TV (if no disc in the DVD system). 3 Press OPEN•CLOSE 0 at the front panel of the DVD system and load a disc, then press the OPEN•CLOSE 0 again to close the disc tray. Make sure the disc label is facing up. For double-sided discs, load the side you want to play face up. 4 Playback will start automatically. If not, press ÉÅ button. If a disc menu appears, use 3 4 1 2 buttons on the remote to make the necessary selection, then press OK to confirm. Or, use the numeric keypad on the remote to select features. Follow the instructions given in the disc menu. 5 To stop playback, press STOPÇ. Region Codes DVDs must be labeled for ALL regions or Region 1, in order ALL 1 to play on this DVD system. No picture!! Check the AV (Audio/Video) mode on your TV. * Usually this channel is between the lowest and highest channels and may be called FRONT, A/V IN, or VIDEO. * Or, you may go to channel 1 on your TV, then press the Channel down button repeatedly until you see the Video In channel. * Or, your TV remote control may have a button or switch that chooses different video modes. * Do not use channel 3 or 4 on the TV unless you are using an RF modulator. * See your TV manual for more details. DVD system Video Output Selection for Proper Playback 1) Press SETUP button. The Setup Menu main page appears on the TV screen. 2) Select 'GENERAL SETUP,' then press OK. 3) Press 4 button to select 'VIDEO OUT,' then press 2 button. 4) Press 3 / 4 button to select and highlight: S-VIDEO - if you use the S-Video connection. CR CB Y - if you use the Component Video Pr/Cr Pb/Cb Y connection. 5) Press OK button to confirm. The SETUP button to clear the screen when completed. SETUP MENU - - MAIN PAGE GENERAL SETUP SPEAKER SETUP AUDIO SETUP PREFERENCES EXIT SETUP - - GENERAL PAGE - - TV DISPLAY GOTO GAENNEGRALLESEMTUAPRPKAGE OSD LANG VIDEO OUT SCR SAVER S-VIDEO CR CB Y MAIN PAGE SET VIDEO OUTPUT Note: If you have problem access to the Setup Menu, use the VIDEO OUT for connecting the DVD system to your TV (VIDEO IN). This connection enables you to access to the SETUP MENU and make the selection for the type of video output (S-VIDEO or CR CB Y). Detailed playback features and additional functions are described in the accompanying owner's manual.
-
 1
1 -
 2
2 -
 3
3 -
 4
4 -
 5
5 -
 6
6 -
 7
7 -
 8
8 -
9
-
10
-
11
-
12
-
13
-
14
-
15
-
16
-
17
-
18
-
19
-
20
-
21
-
22
-
23
-
24
-
25
-
26
-
27
-
28
-
29
-
30
 |
 |