Magnavox MWD200GA Owners Manual - Page 15
DISPLAY Setting, AUDIO Setting - formats
 |
View all Magnavox MWD200GA manuals
Add to My Manuals
Save this manual to your list of manuals |
Page 15 highlights
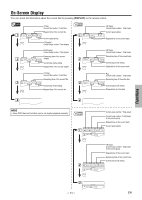
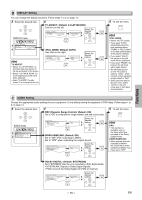
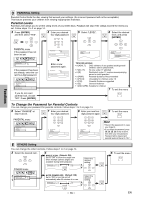
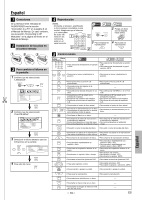
Functions B DISPLAY Setting You can change the display functions. Follow steps 1 to 2 on page 14. 3 Select the desired item. ENTER DISPLAY menu 4 TV ASPECT: (Default: 4:3 LETTER BOX) See Hint on the left. DISPLAY_TV ASPECT TV ASPECT STILL MODE 4:3 LETTER BOX 4:3 PAN & SCAN 16:9 WIDE 4:3 LETTER BOX 4:3 PAN & SCAN 16:9 WIDE Select the desired setting. ENTER ENTER DISPLAY_TV ASPECT TV ASPECT STILL MODE 4:3 LETTER BOX 4:3 PAN & SCAN 16:9 WIDE Hint TV ASPECT: • Select "4:3 LETTER BOX", so that black bars may appear on the top and bottom of the screen. • Select "4:3 PAN & SCAN" for a full height picture with both sides adjusted. • Select "16:9 WIDE" if a wide screen TV is connected to this unit. STILL MODE: (Default: AUTO) See Hint on the right. DISPLAY_STILL MODE TV ASPECT STILL MODE AUTO FIELD FRAME AUTO FIELD FRAME ENTER Select the desired setting. ENTER ENTER ENTER 5 To exit the menu SETUP Hint STILL MODE: • Select "AUTO" usually. • If you select "AUTO", automatically select the best resolution setting (FRAME or FIELD) based on the data characteristics of the pictures. (default). • If you select "FIELD", the picture in the still mode will be stabilized. • If you select "FRAME", the picture in the still mode will be highly defined. • An individual picture on the TV screen is called a "frame", which consists of two separate images called a "field". • Some pictures may be blurred if you select "AUTO" in the still mode due to their data characteristics. C AUDIO Setting Choose the appropriate audio settings for your equipment. It only affects during the playback of DVD discs. Follow steps 1 to 2 on page 14. 3 Select the desired item. ENTER 4 DRC (Dynamic Range Control): (Default: ON) Set to "ON" to compress the range between soft and loud sounds. 5 To exit the menu SETUP AUDIO menu AUDIO_DRC DRC DOWN SAMPLING DOLBY DIGITAL ON OFF AUDIO_DRC DRC DOWN SAMPLING DOLBY DIGITAL ON OFF ON OFF ENTER Select the desired setting. ENTER DOWN SAMPLING: (Default: ON) Set to "ON" when outputting in 48kHz. Set to "OFF" when outputting the original sound. AUDIO_DOWN SAMPLING DRC DOWN SAMPLING DOLBY DIGITAL ON OFF ON OFF ENTER Select the desired setting. ENTER ENTER ENTER Hint DRC: • This function is available only on the discs which are recorded in the Dolby Digital format. DOWN SAMPLING: • When playing disc with copyright protection, the sound will be down sampled at 48kHz, even if you set to "OFF". DOLBY DIGITAL: (Default: BITSTREAM) Set to "BITSTREAM" when the unit is connected to a Dolby Digital decoder. • BITSTREAM: Outputs a Dolby Digital Signals. • PCM: Convert the Dolby Digital into PCM (2 channel). AUDIO_DOLBY DIGITAL DRC DOWN SAMPLING DOLBY DIGITAL BITSTREAM PCM BITSTREAM PCM ENTER Select the desired setting. ENTER ENTER - 15 - EN
-
 1
1 -
2
-
3
-
4
-
5
-
6
-
7
-
8
-
9
-
 10
10 -
 11
11 -
 12
12 -
 13
13 -
 14
14 -
 15
15 -
 16
16 -
 17
17 -
 18
18 -
 19
19 -
 20
20
 |
 |