Marantz AV9000 AV9000 USER'S MANUAL - Page 13
English - surround sound processor
 |
View all Marantz AV9000 manuals
Add to My Manuals
Save this manual to your list of manuals |
Page 13 highlights
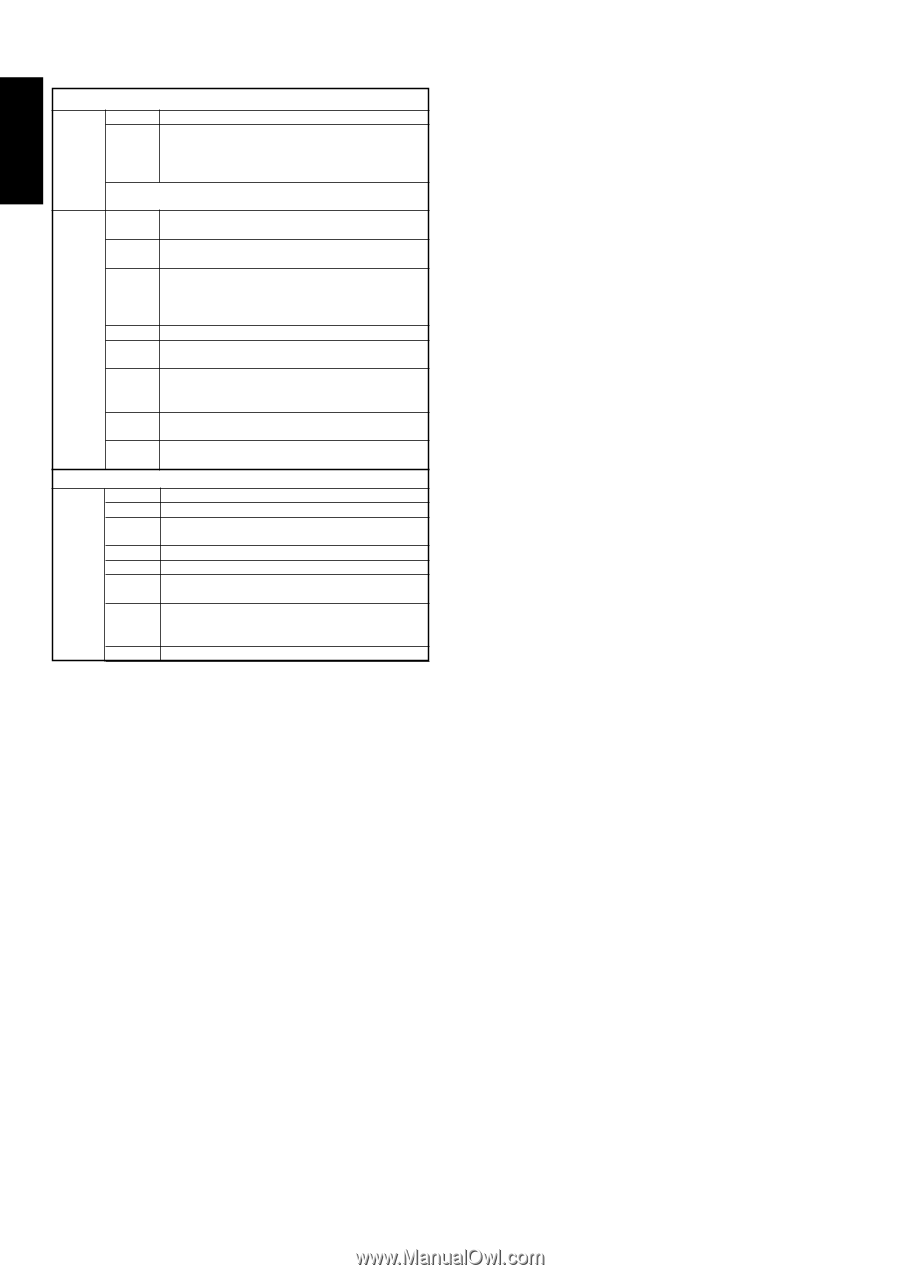
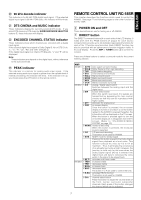
ENGLISH AMP MODE3 PROCESSOR 7 LVL+ Increases channel level volume 8 LVL- decreases channel level volume After pressing the CH+ button, use the LVL+ and LVL- buttons to adjust the volume level of each speaker channel. Note: These level controls are for temporary adjustment, so these setup is not memorized for each source. 1 VOL+ increases external decoder's volume This button is not used for AV9000. 2 VOL- decreases external decoder's volume This button is not used for AV9000. 3 6-CH 6 channel direct button When the surround processor is connected to the DIRECT IN JACKS, press this button to play it. 4 BYP bypasses external processor's decoding 5 SLEP sleep timer button This button is used for setting the sleep timer. 6 DISP display off function When this button is pressed, the display is turned off. 7 MODE surround mode select button This button is not used for AV9000 8 PHNO phono function button This button is not used for AV9000. TUNER BAND 1 FM 2 AM 3 LW 4 BAND 5 MODE 6 TIME 7 F/P 8 SCAN FM band button AM/MW band button long wave band button This button is not used for AV9000 selects radio band button mono/stereo/muting mode selector button time display button This button is not used for AV9000 frequency or preset channel display select button This button is not used for AV9000 preset scan button , PAGE buttons These buttons are used to select any 1 of the 4 pages of 8 functions for each DIRECT button, as explained above. . FUNCTION buttons These buttons are used for selecting the input function. Press one of these buttons twice within 2 seconds. ⁄1 VOLUME UP (+) AND DOWN (-) These buttons are used to raise and lower the main system volume level. ⁄2 TEN KEYPAD They are useful for tuning a pre-set radio station and setting a station name. ⁄3 M (MEMO) button This button is used to enter the tuner preset memory numbers and station names. ⁄4 C (Clear) button This button is used to cancel certain memory or programming operations. ⁄6 CURSOR buttons The cursor buttons can be used to navigate within on-screen menus. These buttons are unavailable when the mode is set to DSS, TV or DVD. ⁄7 MUTE button This button can be used to mute the sound temporarily. ⁄9 LIGHTING button This button is used to activate the back-lit LCD screen and back-lit keys. Useful Functions with the Remote Control Unit • Source direct Press AMP button .. Press DIR D2 on page2 to make higher quality Hi-Fi sounds. When this function is selected, the signals are transmitted by bypassing the tone control circuitry so that they can be reproduced with higher quality. Notes: The surround mode is switched automatically to STEREO when the source direct function is turned on. The source direct function is available with a digital source when the input signal is the PCM. If a Dolby Digital signal or DTS signal input to AV9000, in this mode output from AV9000 will be muted. • Attenuate Press AMP button .. Press ATT D3 on page2 to attenuate the analog AUDIO signal selected with the FUNCTION buttons. When the analog input signal is too great and the voice distorts even by throttling the AV9000 VOLUME control, turn on the function. "ATT" is displayed when this function is activated. The signal-input level is reduced by about half. Attenuate is invalid for use with the output signal of "REC OUT" (TAPE, CD-R/MD, VCR1 and DSS/VCR2 output). This function is memorized for each input function. • Multi room Press AMP button .. Press MLTI D8 on page2 to switch the unit to multi room mode. "MULTI ROOM" appears in the display. • Display off Press AMP button .. Press DISP D6 on page4, the display is turned off and the display off indicator lights up ( DISP ). To turn the display ON again, perform the previous procedure. • FM mode Press TUNER button .. Press FM D1 on page 1 to select the auto stereo mode or mono mode when the FM band is selected. The AUTO indicator lights in the auto stereo mode. • Tuner band selector Press TUNER button .. Press BAND D4 on page 1 to switch between FM mode and AM mode of the tuner. Tuner band is changed in the following sequence. FM → AM → FM → ... 8
-
 1
1 -
2
-
3
-
4
-
5
-
6
-
7
-
 8
8 -
 9
9 -
 10
10 -
 11
11 -
 12
12 -
 13
13 -
 14
14 -
 15
15 -
 16
16 -
 17
17 -
 18
18 -
19
-
20
-
21
-
22
-
23
-
24
-
25
-
26
-
27
-
28
-
29
-
30
-
31
-
32
-
33
-
34
-
35
-
36
-
37
-
38
-
39
-
40
-
41
 |
 |