Marantz CC4300 CC4300 Product Manual - Page 23
Setting Up Manual Edit
 |
View all Marantz CC4300 manuals
Add to My Manuals
Save this manual to your list of manuals |
Page 23 highlights
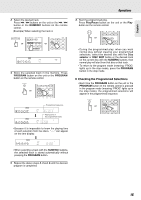
English ❖ Setting Up Manual Edit 1. In the stop mode, select the manual edit mode. Press EDIT button twice on the unit or EDIT button twice on the remote control. EDIT or EDIT T.SIZE DIMMER TIME REMOTE CONTROL UNIT RC4300CC 12345 EDIT 1 23 4 56 7 89 10 11 12 13 14 2. Select the tape length as you do in "Making auto edit" procedure. 3. Press PROGRAM button on the unit or the PROGRAM button on the remote control to manually edit the tracks to be recorded. PROGRAM or RANDOM 7 8 9 PROGRAM DELETE INTRO 0 EDIT T.SIZE DIMMER TIME PROG EDIT A 12345 TRACK Operations 5. Press EDIT button on the unit or the EDIT button on the remote control to start editing for the side B. EDIT or EDIT T.SIZE DIMMER TIME REMOTE CONTROL UNIT RC4300CC PROG EDIT B 12345 TRACK 6. Do the above step 4 to edit the tracks for the side B. • If the PLAY button is pressed after editing the tracks, play starts from the first track of the side A for recording. • If all tracks of the side A have been played, press the PLAY button to start play from the first track of the side B for recording. 4. Edit the tracks for the side A repeating steps 3 and 4 in "Playing Tracks in Any Sequence (Programmed Play)" procedure on page 15. PROG EDIT A 12345 TRACK 1 23 4 56 11 Note : • During manual edit, if the "-" indicator in the time display disappears and " \ " flickers, it means that the total time of the edited tracks exceeds the tape length. So you should edit again. • When a track with a number greater than 30 is edited, the time display may show • Manual edit is only available on the current disc. If you press Disc selector or DISC SKIP buttons, the unit exits from edit mode. 19
-
 1
1 -
2
-
3
-
4
-
5
-
6
-
7
-
8
-
9
-
10
-
11
-
12
-
13
-
14
-
15
-
16
-
17
-
 18
18 -
 19
19 -
 20
20 -
 21
21 -
 22
22 -
 23
23 -
 24
24 -
 25
25 -
 26
26 -
 27
27 -
 28
28 -
29
-
30
-
31
-
32
-
33
-
34
 |
 |
