Marantz SR9200 User Guide - Page 45
Ch Input., Aux2 Input
 |
View all Marantz SR9200 manuals
Add to My Manuals
Save this manual to your list of manuals |
Page 45 highlights
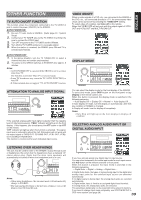
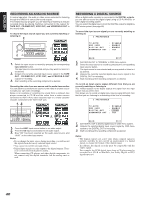
7.1 CH INPUT. The SR9200 is equipped for future expansion through the use of Multi channel SACD or DVD-Audio player. This is selected, the input signals connected to the FL(front left), FR(front right), CENTER, SL (surround left), SR (surround right), SBL (surround back left) and SBR (surround back right) channels of the 7.1 CH. In jacks are output directly to the front (left and right), center, surround (left and right) and surround back(left and right) speaker systems as well as the pre-out jacks without passing through the surround circuitry. In addition, the signal input to the SW (subwoofer) jack is output to the PRE OUT SW (subwoofer) jack. When 7.1 CH. INPUT is selected, the last video input used remains routed to the Monitor 1&2 Outputs. This permits simultaneous viewing with video sources. 2. SELECTOR SELECT STANDBY POWER ON/STANDBY ENTER PHONES DISPLAY CLEAR MEMO DOWN GYRO TUNING UP F/P AUTO-TUNE T-MODE DOWN LD DVD DSS TV VCR 1 VCR2/DVD-R CD TAPE CD-R TUNER MULTI-SPK SLEEP S-DIRECT AUX1 MULTI ROOM A/D 7.1CH-IN AUX2 DIGITAL S-VIDEO AUX1 INPUT VIDEO L AUDIO R MUTE 1. Select a desired Video source to decide the routed video signal to the Monitor 1&2 Outputs . 2. Press the 7.1 CH-IN button or tap 7.1 input on on the remote to switch the 7.1 channel input. 3. If necessary to adjust the output level of each channel, use "7.1 Ch. INPUT LEVEL" in OSD menu system as desired. Adjust the speaker output levels so that you can hear the same sound level from each speaker at the listening position. For the front left, front right, center, surround left, surround right, surround back left and surround back right speakers, the output levels can be adjusted between -10 to +10 dB. The subwoofer can be adjusted between -15 and +10 dB. These adjusting result will be stored to 7.1 Ch. INPUT condition. (see to page 32) 4. Adjust the main volume with the MAIN VOLUME knob or the VOL buttons on the remote. To cancel the 7.1 Ch. INPUT setting, press the 7.1 CH-IN button on the front panel or tap 7.1 input off on the remote. Notes: • When the 7.1 Ch. Input is in use, you may not select a surround mode, as the external decoder determines processing. • In addition, there is no signal at the record outputs when the 7.1 Ch. Input is in use. AUX2 INPUT If you don't need to connect 7.1 Ch. input terminals with multi channel decoder, FL(front left) and FR(front right) inputs terminals are available as AUX2 input. In this case, You can connect additional audio source to AUX2 as other audio input terminals. SELECTOR SELECT STANDBY POWER ON/STANDBY ENTER PHONES DISPLAY CLEAR MEMO DOWN GYRO TUNING UP F/P AUTO-TUNE T-MODE DOWN LD DVD DSS TV VCR 1 VCR2/DVD-R CD TAPE CD-R TUNER MULTI-SPK SLEEP S-DIRECT AUX1 MULTI ROOM A/D 7.1CH-IN AUX2 DIGITAL S-VIDEO AUX1 INPUT VIDEO L AUDIO R MUTE 41 ENGLISH
-
 1
1 -
2
-
3
-
4
-
5
-
6
-
7
-
8
-
9
-
10
-
11
-
12
-
13
-
14
-
15
-
16
-
17
-
18
-
19
-
20
-
21
-
22
-
23
-
24
-
25
-
26
-
27
-
28
-
29
-
30
-
31
-
32
-
33
-
34
-
35
-
36
-
37
-
38
-
39
-
 40
40 -
 41
41 -
 42
42 -
 43
43 -
 44
44 -
 45
45 -
 46
46 -
 47
47 -
 48
48 -
 49
49 -
 50
50 -
51
-
52
-
53
 |
 |
