Maytag MBL2256KES Use and Care Guide - Page 5
Installation - refrigerator
 |
UPC - 719881174099
View all Maytag MBL2256KES manuals
Add to My Manuals
Save this manual to your list of manuals |
Page 5 highlights
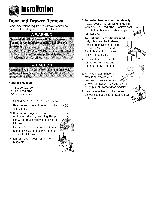
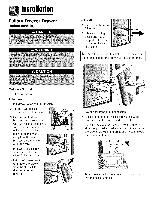
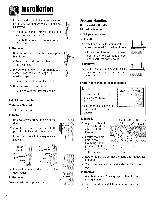
Installation Door and Drawer Removal Some installations require door/drawer removal to transport the refrigerator to its final location. Materials Needed: • Phillips screwdriver • 5/,,, hex head driver • 3/;, hex head driver 1. Unplug power cord from power source. 2. Remove toe grille and bottom bracket cover(s) (see page 3). 3. Remove top hinge cover from refrigerator door by removing Phillips screw and retain screw and cover for later use. 4. Unscrew _,_" hex head screws from top hinge to remove hinge and retain all screws for later use. 5. Lift refrigerator door from center hinge pin. For swing freezer door models only: Hold freezer door while removing hinge pin with a -_" hex head driver. Remove door from bottom hinge and retain hinge pin for later use. For pullout freezer drawer models only: Remove plastic sleeve, if present. Remove center hinge pin with a _,_" hex head driver. Retain hinge pin and plastic sleeve for later use. Remove Phillips screws to remove center hinge and retain all screws for later use. Remove bottom hinge or stabilizing bracket with _8" _ hex head driver and retain _C_/ screws for later use. Lift out bottom hinge pin (on freezer door models). If your model has a pullout freezer drawer, see page 5 for drawer removal instructions.
-
 1
1 -
 2
2 -
 3
3 -
 4
4 -
 5
5 -
 6
6 -
 7
7 -
 8
8 -
 9
9 -
 10
10 -
 11
11 -
12
-
13
-
14
-
15
-
16
-
17
-
18
-
19
-
20
-
21
-
22
-
23
-
24
-
25
-
26
-
27
-
28
-
29
-
30
-
31
-
32
-
33
-
34
-
35
-
36
-
37
-
38
-
39
-
40
-
41
-
42
-
43
-
44
-
45
-
46
-
47
-
48
-
49
-
50
-
51
-
52
-
53
-
54
-
55
-
56
-
57
-
58
-
59
-
60
-
61
-
62
-
63
-
64
-
65
-
66
-
67
-
68
-
69
-
70
-
71
-
72
-
73
-
74
-
75
-
76
-
77
-
78
-
79
-
80
-
81
-
82
-
83
-
84
-
85
-
86
-
87
-
88
-
89
-
90
-
91
-
92
-
93
-
94
-
95
-
96
-
97
-
98
-
99
-
100
-
101
-
102
-
103
-
104
 |
 |
