Maytag MDB7959SK Owners Manual - Page 24
Connect Water Line To House
 |
View all Maytag MDB7959SK manuals
Add to My Manuals
Save this manual to your list of manuals |
Page 24 highlights
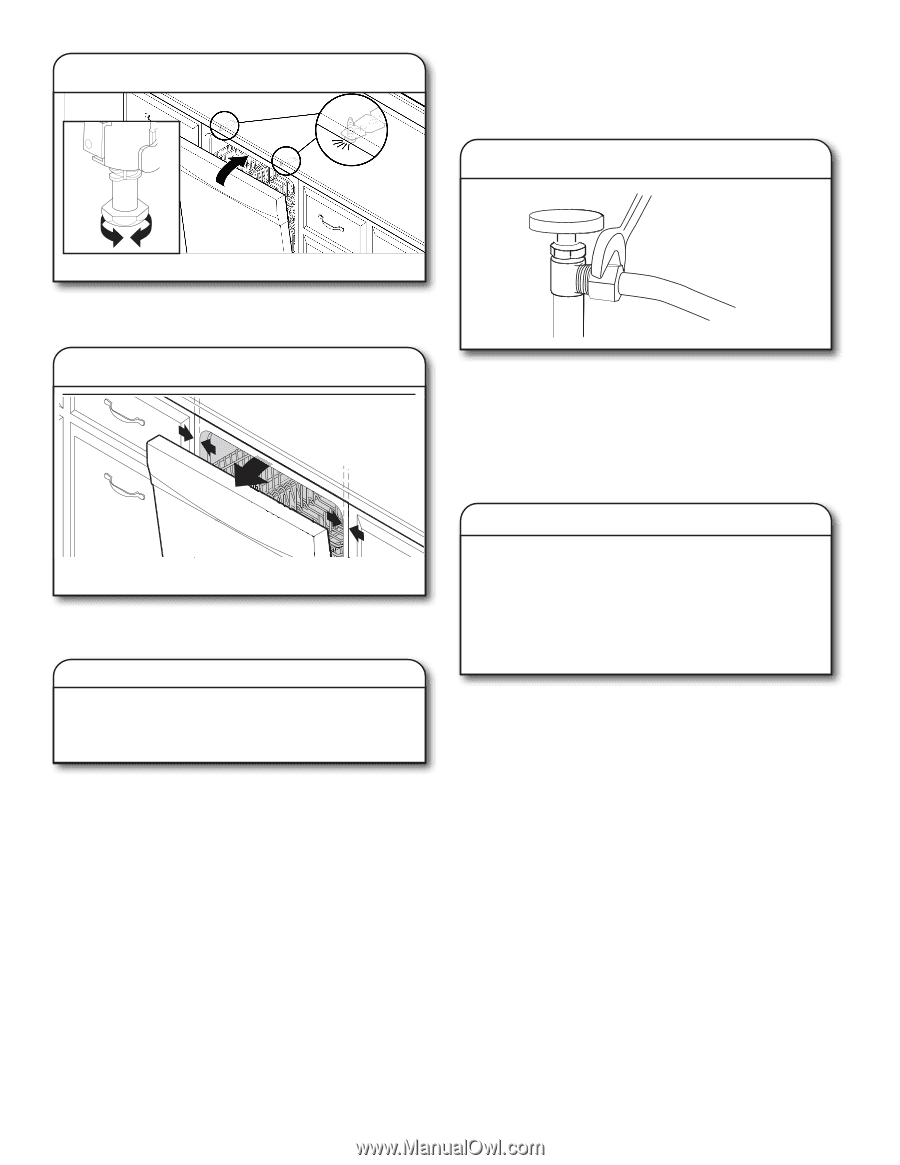
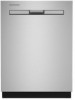
41. Check door clearance CONNECT WATER LINE TO HOUSE SHUT-OFF VALVE NOTE: If using a flexible braided hose, replace inlet hose after 5 years to reduce the risk of hose failure. Record hose installation or replacement dates on the hose for future reference. 44. Attach water supply line IMPORTANT: Check that top of door does not contact screws, brackets, or countertop. If it does, adjust leveling legs or use the side attachment option. 42. Check inner spacing Attach the water supply line (copper tubing or flexible braided line) to the hot water line using a connection configuration that is in compliance with local codes and ordinances. The water supply to the dishwasher should have a manual shut-off valve located under the sink. Turn water valve on after attaching water supply line. Open door and check that space between dishwasher cabinet opening and tub is equal on both sides. If spacing is not equal, loosen bracket screws and shift tub. Tighten bracket screws. 43. Direct Wire Connection To complete direct wire connection. Complete Steps 18 to 24 in this installation guide. Once complete, return here to Step 44 to complete Product Installation. CONNECT DRAIN HOSE 45. Connect drain hose Connect drain hose to waste tee or waste disposer using one of the following options: ■ Option A: Waste disposer - no air gap ■ Option B: No waste disposer - no air gap ■ Option C: Waste disposer - with air gap ■ Option D: No waste disposer - with air gap IMPORTANT: The drain hose connection of the disposer or a waste tee must be made before the drain trap and at least 20" (50.8 cm) above the floor where the dishwasher will be installed. Helpful Tip: To reduce vibration of the hose, keep the hose away from the floor. NOTE: Use the red clamp provided to connect the drain hose to the customer connection - plumbing or garbage disposal. 24
-
 1
1 -
2
-
3
-
4
-
5
-
6
-
7
-
8
-
9
-
10
-
11
-
12
-
13
-
14
-
15
-
16
-
17
-
18
-
 19
19 -
 20
20 -
 21
21 -
 22
22 -
 23
23 -
 24
24 -
 25
25 -
 26
26 -
 27
27 -
 28
28 -
 29
29 -
30
-
31
-
32
-
33
-
34
-
35
-
36
-
37
-
38
-
39
-
40
-
41
-
42
-
43
-
44
-
45
-
46
-
47
-
48
-
49
-
50
-
51
-
52
-
53
-
54
-
55
-
56
-
57
-
58
-
59
-
60
-
61
-
62
-
63
-
64
-
65
-
66
-
67
-
68
-
69
-
70
-
71
-
72
-
73
-
74
-
75
-
76
-
77
-
78
-
79
-
80
-
81
-
82
-
83
-
84
 |
 |