Maytag MER5752BAB Installation Manual
Maytag MER5752BAB - 30 Inch Electric Range Manual
 |
View all Maytag MER5752BAB manuals
Add to My Manuals
Save this manual to your list of manuals |
Maytag MER5752BAB manual content summary:
- Maytag MER5752BAB | Installation Manual - Page 1
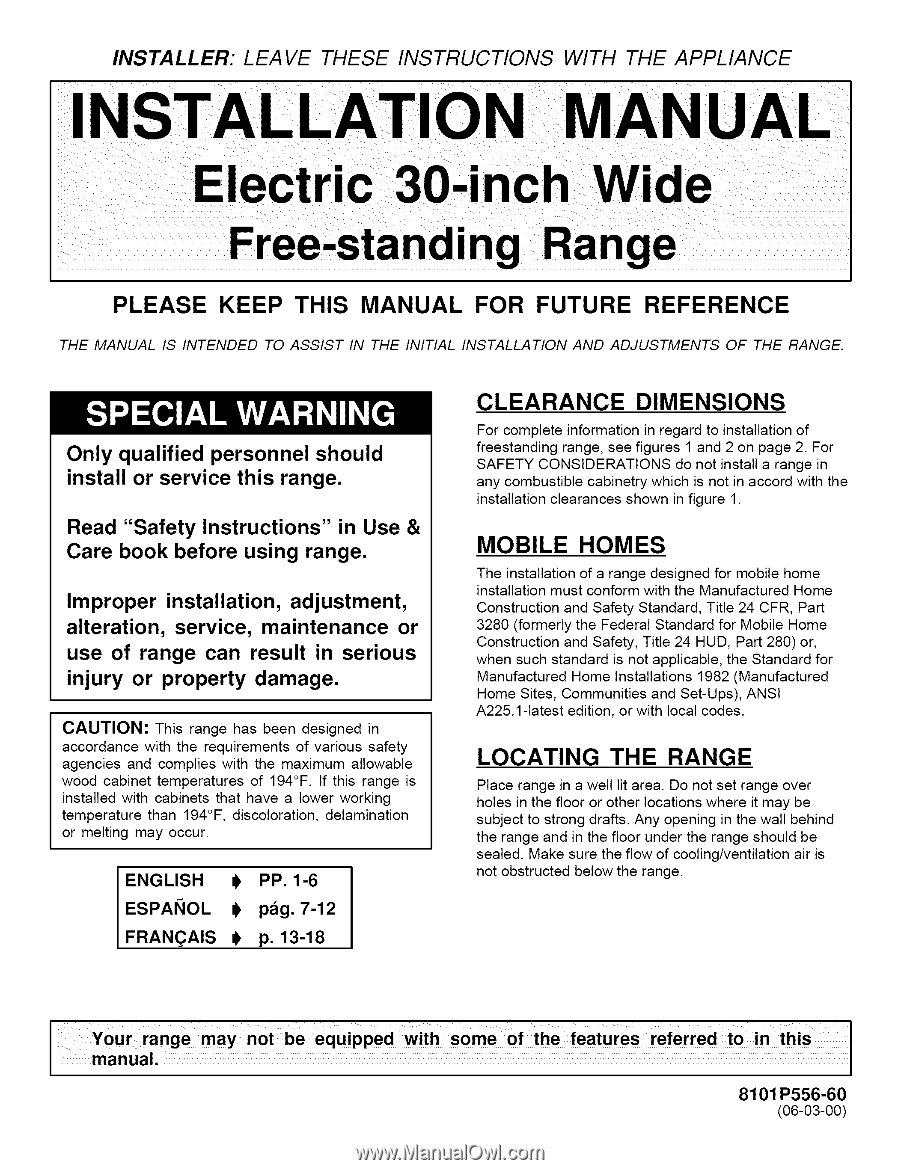
WITH THE APPLIANCE MANUAL Electric 30-inch Wide Free-standi e PLEASE KEEP THIS MANUAL FOR FUTURE REFERENCE THE MANUAL IS INTENDED TO ASSIST IN THE INITIAL INSTALLATION AND ADJUSTMENTS OF THE RANGE. Only qualified personnel should install or service this range. Read "Safety Instructions" in Use - Maytag MER5752BAB | Installation Manual - Page 2
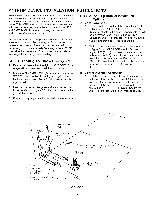
BUILDING WALLS. 4 - COMBUSTIBLE WALL CABINET. A free-standing range may be installed adjacent to (0" from) combustible walls 1, 2 & 3. NOTE: FOR INSTALLATION IN CANADA, A FREE-STANDING RANGE IS NOT TO BE INSTALLED CLOSER THAN 12MM FROM ANY ADJACENT SURFACE, "A' = 30" (76.2 CM) - 31" (78.7 CM) FOR - Maytag MER5752BAB | Installation Manual - Page 3
in the USE and CARE MANUAL and avoid using the oven door and/or lower drawer as a step stool. Installation instructions are provided for wood and 3. D. Free-standing range may be secured to either floor or wall. t 16" [24 mm] FROM EDGE OF RANGE MARKED EDGE OF RANGE ORIENTATION HOLE WALL HOLES - Maytag MER5752BAB | Installation Manual - Page 4
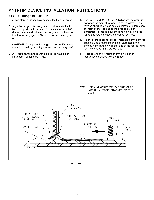
feet is engaged in the bracket slot. F. Proceed with the remainder of the installation instructions provided with the range. SCREWS MUST ENTER WOOD QR METAL. WALL PLATE ART# 9215-117 NOTE: USE A MINIMUM OF (2) SCREWS TO INSTALL ANTI-TIP BRACKET TO THE WALL OR FLOOR. ANTI-TIP BRACKET SCREW BRACKET - Maytag MER5752BAB | Installation Manual - Page 5
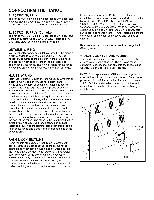
(see figures 6 and 7). After installation, insure tightness of all electrical connections and replace all covers. Remove terminal block access cover from range back. (See figure 5). RANGE CONNECTIONS (Canada) This model was shipped direct from the factory with service cord (pigtail) attached. There - Maytag MER5752BAB | Installation Manual - Page 6
-Standing Models With 3-Wire Service Cord Attached), Disconnect range from power. Remove the access cover on back of range and remove the 3-wire service cord from the main terminal block. Follow instructions as outlined in figure 9 to connect the 4-wire service cord. NOTE: Cord replacement - ONLY - Maytag MER5752BAB | Installation Manual - Page 7
MANUAL DE INSTA ON Estufa electrica individual de 30 pulgadas (76.2 cm) de ancho CONSERVE ESTE MANUAL PARA REFERENCIA FUTURA EL MANUAL RAZONES DE SEGURIDAD no instale la estufa en ningQn Parte 3280 (anteriormente Federal Standard for Mobile Home Construction and Safety, Titulo 24 HUD, Parte - Maytag MER5752BAB | Installation Manual - Page 8
DIBUJOS DE INSTALACION IMPORTANTE SiRVASCEONSERVAPRALROOA UELOI USE EL INSPECTOR ELECTRICO LOCAL: "A" = 30 pulgadas (76.2 cm) espacio minimo entre la parte superior de la superficie de cocinar y la parte inferior de un gabinete sin proteccion de madera o metal, o "A" = 24 pulgadas (61 cm) cuando - Maytag MER5752BAB | Installation Manual - Page 9
reduce el riesgo de LADEO. AI usar este dispositivo el consumidor aun debe acatar las precauciones de seguridad que se dictan en el MANUAL DE USO Y CUIDADO y debe evitar utilizar las puertas del horno come banquillo. Las instrucciones de instalacion se proporcionan para madera y cemento tanto en - Maytag MER5752BAB | Installation Manual - Page 10
segQn sea necesario. E. Para revisar que el soporte antiladeo este instalado correctamente en la estufa: Use una linterna y vea debajo de la parte inferior de la estufa para comprobar que una de las patas niveladoras posteriores este asegurada a la ranura del soporte. F. ContinQe con el resto - Maytag MER5752BAB | Installation Manual - Page 11
Reglamentos locales para edificios exigen que todo el cableado electrico Io instale un electricista con licencia. Todo el cableado debe estar en conformidad de nuevo. Quite la cubierta de acceso del bloque terminal de la parte posterior de la estufa. (Vea la figura 5). CONEXIONES DE LA ESTUFA - Maytag MER5752BAB | Installation Manual - Page 12
NEGRO_ BLOQUE DE CONEXION DEL TERMINAL PRINCIPAL ALAMBRE DE MEDIC DEL CORDON DE SERVIC{O FIGURA 7 Instalacion del conductor o los cordones de servicio de 4 la estufa del suministro electrico. Retire la cubierta de acceso de la parte posterior de la estufa y quite el cord6n de servicio de 3 hilos - Maytag MER5752BAB | Installation Manual - Page 13
INSTRUCTIONS A VEC L'APPAREIL MAN VEUILLEZ CONSERVER CE MANUEL POUR RI_FI_RENCE ULTI_RIEURE CE MANUEL EST DESTINE A FACILITER LA MISE EN SERVICE ET LE REGLAGE INITIAUX DE LA CUISINIERE. La mise en service est adjacente a des armoires pouvant supporter une temperature inferieure a 194°F ( - Maytag MER5752BAB | Installation Manual - Page 14
representer exactement I'apparell. A = degagement minimum de 30 po (76,2 cm) entre la table de une armoire au-dessus de la table de cuisson, I'installation d'une hotte depassant d'au moins 5 po (13 cm REMARQUE : DANS LE CAS D'UNE MISE EN SERVICE AU CANADA, UNE CUISINIERE AMOVIBLE NE DOlT PAS ETRE - Maytag MER5752BAB | Installation Manual - Page 15
cuisiniere risque de basculer si elle n'est pas mise en place conformement aux instructions fournies. Si le support est utilise correctement, il reduit le risque que la cuisiniere ne BASCULE. M6me si le support est utilise correctement, le consommateur doit observer les precautions indiquees dans le - Maytag MER5752BAB | Installation Manual - Page 16
pieds arri@e de mise niveau est bien insere dans la fente du support. F. Finir la mise en service de la cuisiniere tel qu'indique dans les instructions fournies avec la cuisiniere. REMARQUE : UTILISER AU MOINS 2 VlS POUR LA FIXATION DU SUPPORT AU MUR OU AU PLANCHER LES VIS D ,OIV,ENT DANS LE BOIS - Maytag MER5752BAB | Installation Manual - Page 17
en kW). ALIMENTATION I_LECTRIQUE (Canada) Lors de la mise en service, la cuisiniere dolt _tre installee conformement aux normes ACN STD.C22 muni de serre-fils. BORNIER CONNEXIONS DE LA CUISINIERE Certains modeles ont un cordon d'alimentation (spirale) installe en usine. Dans ce cas, il n'y a aucune - Maytag MER5752BAB | Installation Manual - Page 18
installation a 4 fils (Modeles amovibles avec cordon d'alimentation a 3 fils en place). Debrancher la cuisiniere du secteur. Enlever le couvercle du bornier se trouvant a I'arriere de la cuisiniere et deconnecter le cordon d'alimentation a 3 ills du bornier. Suivre les instructions UNE SUPPORT,
-
 1
1 -
 2
2 -
 3
3 -
 4
4 -
 5
5 -
 6
6 -
 7
7 -
8
-
9
-
10
-
11
-
12
-
13
-
14
-
15
-
16
-
17
-
18
 |
 |
INSTALLER:
LEAVE
THESE
INSTRUCTIONS
WITH
THE APPLIANCE
ON
MANUAL
IN
Electric
30-inch
Wide
Free-standi
PLEASE
KEEP
THIS
MANUAL
e
FOR
FUTURE
REFERENCE
THE MANUAL
IS INTENDED
TO ASSIST
IN THE INITIAL
INSTALLATION
AND ADJUSTMENTS
OF
THE RANGE.
Only qualified personnel should
install or service this range.
Read
"Safety
Instructions"
in Use
&
Care
book before using
range.
Improper
installation,
adjustment,
alteration,
service,
maintenance
or
use
of range
can
result
in serious
injury
or property
damage,
CAUTION:
This range
has been designed
in
accordance
with the requirements
of various
safety
agencies
and complies
with the maximum
allowable
wood cabinet
temperatures
of
194°F. If this range
is
installed
with cabinets
that have a lower working
temperature
than 194°F, discoloration,
delamination
or melting
may occur.
ENGLISH
0
PP.
1-6
ESPANOL
0
pag.
7-12
FRAN(_AIS
$
p. 13-18
CLEARANCE
DIMENSIONS
For complete information
in regard to installation of
freestanding
range, see figures
1 and 2 on page 2. For
SAFETY CONSIDERATIONS
do not install a range in
any combustible
cabinetry which is not in accord with the
installation clearances
shown in figure 1.
MOBILE
HOMES
The installation
of a range designed for mobile home
installation must conform with the Manufactured
Home
Construction
and Safety Standard,
Title 24 CFR, Part
3280 (formerly
the Federal Standard for Mobile Home
Construction
and Safety, Title 24 HUD, Part 280) or,
when such standard is not applicable,
the Standard for
Manufactured
Home Installations
1982 (Manufactured
Home Sites, Communities
and Set-Ups), ANSI
A225.1-1atest edition, or with local codes.
LOCATING
THE
RANGE
Place range in a well lit area. Do not set range over
holes in the floor or other locations where it may be
subject to strong drafts. Any opening
in the wall behind
the range and in the floor under the range should be
sealed.
Make sure the flow of cooling/ventilation
air is
not obstructed
below the range.
8101 P556-60
(06-03-00)