Maytag MEW9530AB Use & Care Guide - Page 10
Positioning Racks and Bakeware, Roll-Out Rack, Meat Thermometer
 |
View all Maytag MEW9530AB manuals
Add to My Manuals
Save this manual to your list of manuals |
Page 10 highlights
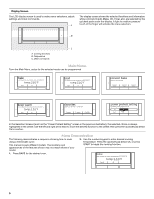
Positioning Racks and Bakeware IMPORTANT: To avoid permanent damage to the porcelain finish, do not place food or bakeware directly on the oven door or bottom. RACKS ■ Position racks before turning on the oven. ■ Do not position racks with bakeware on them. ■ Make sure racks are level. Depending on the oven model, you could have flat racks and/or roll-out racks. If "f" is after the rack position, the flat rack should be used. An "ro" indicates the roll-out rack should be used. For example: 1ro, 3f, 5f indicates the use of the roll-out rack in position 1, and the flat rack in positions 3 and 5. Refer to the section for the cooking cycle you are using for specific rack recommendations. 27" (68.6 cm) Rack Positions 6 5 4 3 2 1 30" (76.2 cm) Rack Positions 6 5 4 3 2 1 BAKEWARE To cook food evenly, hot air must be able to circulate. Allow 2" (5.0 cm) of space around bakeware and oven walls. Roll-Out Rack The roll-out rack allows easy access to position and remove food in the oven. The roll-out rack will fit in all positions. Open Position A B A. Slide rails B. Sliding shelf Closed and Engaged Position A B A. Slide rails B. Sliding shelf To Remove Roll-out Rack 1. Slide the rack in completely so that it is closed and engaged with the sliding shelf. A B C A. Slide rails B. Rack C. Sliding shelf 2. Using 2 hands, lift up on the front edge of the rack and the sliding shelf together. Slowly push rack and sliding shelf to the back wall of the oven so the front edge of the sliding shelf sits on the rack guides, located on the sides of the oven. The front edge of the rack and the sliding shelf should be higher than the back edge. 3. Using 2 hands, lift up on the front edge of the rack and sliding shelf together. 4. Pull out the rack and sliding shelf. To Replace Roll-out Rack 1. Using 2 hands, grasp the front of the closed rack and the sliding shelf. Position the closed rack and the sliding shelf on the rack guide. 2. Using 2 hands, lift up on the front edge of the rack and the sliding shelf together. 3. Slowly push the rack and the sliding shelf to the back of the oven until the back edge of the rack pulls over the end of the rack guide. To avoid damage to the sliding shelves, do not place more than 25 lbs (11.4 kg) on the rack. Do not clean the roll-out extension rack in a dishwasher. It may remove the rack's lubricant and affect its ability to slide. See the "General Cleaning" section for more information. Meat Thermometer On models without a temperature probe, use a meat thermometer to determine whether meat, poultry and fish are cooked to the desired degree of doneness. The internal temperature, not appearance, should be used to determine doneness. A meat thermometer is not supplied with this appliance. Follow manufacturer's directions for using a meat thermometer. 10
-
 1
1 -
2
-
3
-
4
-
 5
5 -
 6
6 -
 7
7 -
 8
8 -
 9
9 -
 10
10 -
 11
11 -
 12
12 -
 13
13 -
 14
14 -
 15
15 -
16
-
17
-
18
-
19
-
20
-
21
-
22
-
23
-
24
-
25
-
26
-
27
-
28
-
29
-
30
-
31
-
32
-
33
-
34
-
35
-
36
-
37
-
38
-
39
-
40
-
41
-
42
-
43
-
44
-
45
-
46
-
47
-
48
-
49
-
50
-
51
-
52
-
53
-
54
-
55
-
56
 |
 |
