Maytag MEW9530AB Use & Care Guide - Page 21
Oven Lights, Oven Door
 |
View all Maytag MEW9530AB manuals
Add to My Manuals
Save this manual to your list of manuals |
Page 21 highlights
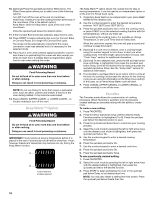
Oven Lights The oven lights are standard 25-watt incandescent appliance bulbs. They will come on when the oven door is opened. They will not work during the Self-Cleaning cycle. When the oven door is closed, press OVEN LIGHT to turn them on or off. To Replace: Before replacing, make sure the oven is off and cool. 1. Disconnect power. 2. Turn the glass bulb cover in the back of the oven counterclockwise to remove. To Remove: 1. Open oven door to the fully open position 2. Locate the oven door latches in both corners of the oven door and rotate the latches forward to the unlocked position. A B 3. Turn bulb counterclockwise to remove from socket. 4. Replace bulb and bulb cover by turning clockwise. 5. Reconnect power. A. Oven door latch in locked position B. Oven door latch in unlocked position 3. Grasp the edges of the oven door with both hands and close the oven door until it will no longer close. Lift and pull oven door toward you and remove. 4. Set the oven door(s) aside on a covered work surface. Oven Door WARNING Excessive Weight Hazard Use two or more people to move and install oven doors. Failure to do so can result in back or other injury. IMPORTANT: To avoid oven door glass breakage: ■ Do not close the oven door if the racks are not fully inserted into the oven cavity or when bakeware extends past the front edge of an oven rack. ■ Do not set objects on the glass surface of the oven door. ■ Do not hit glass surfaces with bakeware or other objects. ■ Do not wipe down glass surfaces until the oven has completely cooled. For normal oven use, it is not suggested to remove the oven door. However, if removal is necessary, make sure the oven is off and cool. Then, follow these instructions. The oven door is heavy. To Replace: 1. Insert both hanger arms into the door. 2. Open the oven door. You should hear a "click" as the door is set into place. 3. Move the latches back to the locked position. Check that the door is free to open and close. If it is not, repeat the removal and installation procedures. 21
-
 1
1 -
2
-
3
-
4
-
5
-
6
-
7
-
8
-
9
-
10
-
11
-
12
-
13
-
14
-
15
-
 16
16 -
 17
17 -
 18
18 -
 19
19 -
 20
20 -
 21
21 -
 22
22 -
 23
23 -
 24
24 -
 25
25 -
 26
26 -
27
-
28
-
29
-
30
-
31
-
32
-
33
-
34
-
35
-
36
-
37
-
38
-
39
-
40
-
41
-
42
-
43
-
44
-
45
-
46
-
47
-
48
-
49
-
50
-
51
-
52
-
53
-
54
-
55
-
56
 |
 |
