Maytag MFI2067AE User Instructions - Page 4
Gather, therequired, toolsandpartsbefore, starting, installation., Readandfollow, theinstructions, - washer
 |
UPC - 719881171715
View all Maytag MFI2067AE manuals
Add to My Manuals
Save this manual to your list of manuals |
Page 4 highlights
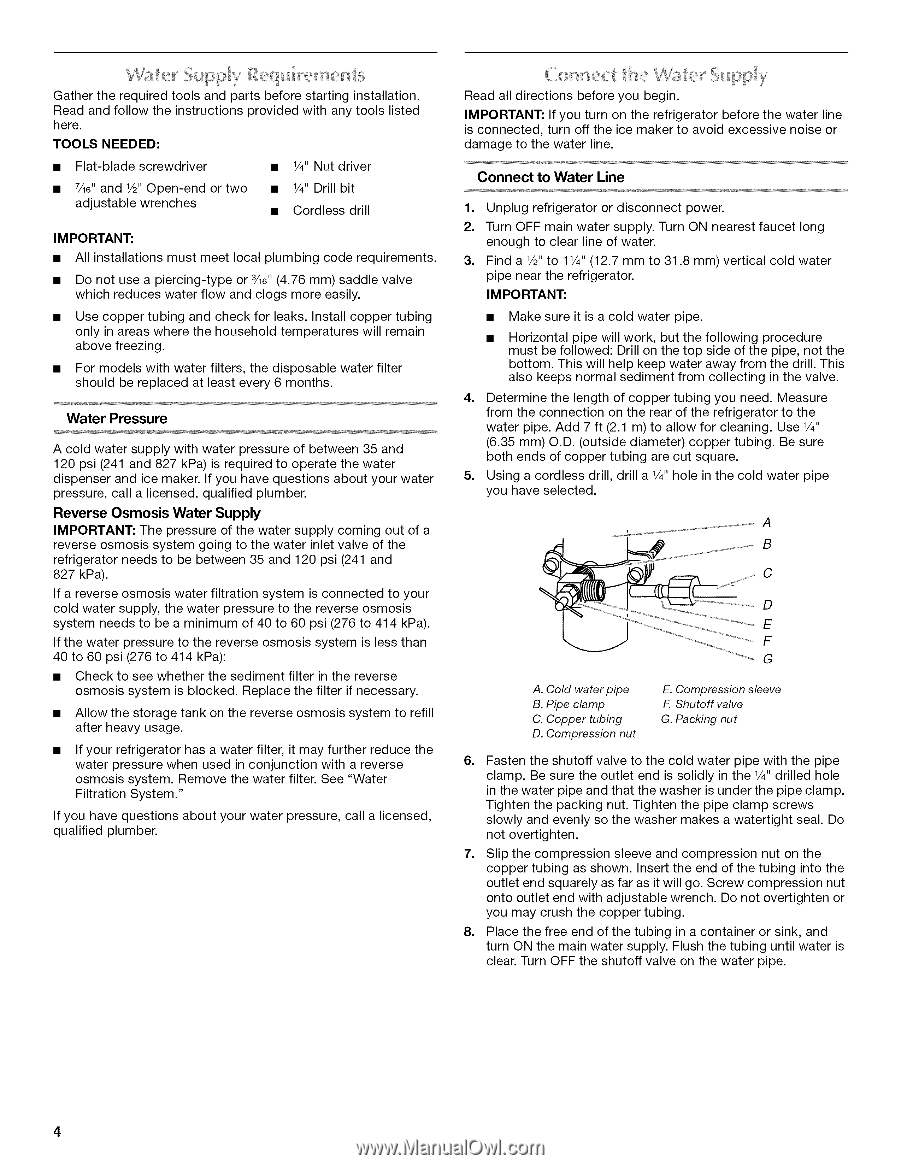
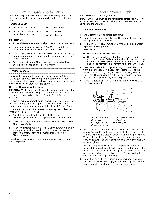
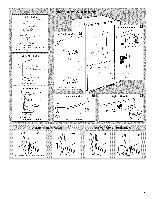
Gathetrherequiretdoolsandpartsbeforsetartinginstallation. Readandfollowtheinstructionpsrovidewdithanytoolslisted here. TOOLS NEEDED: • Flat-blade screwdriver • 1/4"Nut driver • 7/le" and 1/2"Open-end or two adjustable wrenches • 1/4"Drill bit • Cordless drill IMPORTANT: • All installations must meet local plumbing code requirements. • Do not use a piercing-type or 3/le" (4.76 mm) saddle valve which reduces water flow and clogs more easily. • Use copper tubing and check for leaks. Install copper tubing only in areas where the household temperatures will remain above freezing. • For models with water filters, the disposable water filter should be replaced at least every 6 months. Water Pressure A cold water supply with water pressure of between 35 and 120 psi (241 and 827 kPa) is required to operate the water dispenser and ice maker. If you have questions about your water pressure, call a licensed, qualified plumber. Reverse Osmosis Water Supply IMPORTANT: The pressure of the water supply coming out of a reverse osmosis system going to the water inlet valve of the refrigerator needs to be between 35 and 120 psi (241 and 827 kPa). If a reverse osmosis water filtration system is connected to your cold water supply, the water pressure to the reverse osmosis system needs to be a minimum of 40 to 60 psi (276 to 414 kPa). If the water pressure to the reverse osmosis system is less than 40 to 60 psi (276 to 414 kPa): • Check to see whether the sediment filter in the reverse osmosis system is blocked. Replace the filter if necessary. • Allow the storage tank on the reverse osmosis system to refill after heavy usage. • If your refrigerator has a water filter, it may further reduce the water pressure when used in conjunction with a reverse osmosis system. Remove the water filter. See "Water Filtration System." If you have questions about your water pressure, call a licensed, qualified plumber. , J- Read all directions before you begin. IMPORTANT: If you turn on the refrigerator before the water line is connected, turn off the ice maker to avoid excessive noise or damage to the water line. Connect to Water Line 1. Unplug refrigerator or disconnect power. 2. Turn OFF main water supply. Turn ON nearest faucet long enough to clear line of water. 3. Find a 1/2"to 1W' (12.7 mm to 31.8 mm) vertical cold water pipe near the refrigerator. IM PO RTANT: • Make sure it is a cold water pipe. • Horizontal pipe will work, but the following procedure must be followed: Drill on the top side of the pipe, not the bottom. This will help keep water away from the drill. This also keeps normal sediment from collecting in the valve. 4. Determine the length of copper tubing you need. Measure from the connection on the rear of the refrigerator to the water pipe. Add 7 ft (2.1 m) to allow for cleaning. Use 1/4" (6.35 mm) O.D. (outside diameter) copper tubing. Be sure both ends of copper tubing are cut square. 5. Using a cordless drill, drill a 1/4"hole in the cold water pipe you have selected. B C D E F G A. Cold waterpipe B. Pipe clamp C. Copper tubing D. Compression nut E. Compression sleeve F. Shutoff valve G. Packing nut 6. Fasten the shutoff valve to the cold water pipe with the pipe clamp. Be sure the outlet end is solidly in the 1/4"drilled hole in the water pipe and that the washer is under the pipe clamp. Tighten the packing nut. Tighten the pipe clamp screws slowly and evenly so the washer makes a watertight seal. Do not overtighten. 7. Slip the compression sleeve and compression nut on the copper tubing as shown. Insert the end of the tubing into the outlet end squarely as far as it will go. Screw compression nut onto outlet end with adjustable wrench. Do not overtighten or you may crush the copper tubing. 8. Place the free end of the tubing in a container or sink, and turn ON the main water supply. Flush the tubing until water is clear. Turn OFF the shutoff valve on the water pipe.
-
 1
1 -
 2
2 -
 3
3 -
 4
4 -
 5
5 -
 6
6 -
 7
7 -
 8
8 -
 9
9 -
 10
10 -
11
-
12
-
13
-
14
-
15
-
16
-
17
-
18
-
19
-
20
-
21
-
22
-
23
-
24
-
25
-
26
-
27
-
28
-
29
-
30
-
31
-
32
-
33
-
34
-
35
-
36
-
37
-
38
-
39
-
40
 |
 |