Maytag MHWE500VP Use and Care Guide - Page 8
Recommended, installation, spacing for cabinet, Electrical, Shock, Plug into, prong outlet., prong - dimensions
 |
UPC - 883049144153
View all Maytag MHWE500VP manuals
Add to My Manuals
Save this manual to your list of manuals |
Page 8 highlights
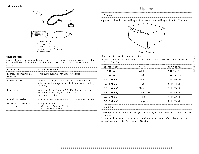
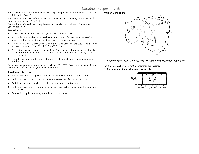
Recommended installation spacing for cabinet installation • The dimensions shown are for the recommended spacing. • For cabinet installation, with a doo_, the minimum ventilation openings in the top are required. 7"(178rnrn) 7"(176rnrn} 00 Laundry tub drain system (view C) The laundry tub needs a minimum 20 gal. (76 I.) capacity. be at least 30" (762 mm) above the floor. The top of the laundry tub must Floor drain system (view D) The floor drain system requires a siphon break that may be purchased and Parts." separately. See "Tools The siphon break must be a minimum of 28" (711 mm) from the bottom of the washer. Additional hoses might be needed. D 4" 311/2'' 1" 1" 27" 1" (102turn} (800rnrn}(25rnrn}(25rnrn}(686rnrn} (25rnrn} The washer can be installed using the standpipe drain system (floor or wall), the laundry tub drain system, or the floor drain system. Select the drain hose installation method you need. See "Tools and Parts." Standpipe drain system - wall or floor (views A & B) The standpipe drain requires a minimum diameter standpipe of 2" 150 rnrn). The minimum carry-away capacity can be no less than 17 gal. (64 I_) per minute. The top of the standpipe must be at least 30" (762 mm) high and no higher than 96" (2.4 m) from the bottom of the washer. T 39"rnin. (762ira) Electrical Shock Hazard Plug into a grounded 3 prong outlet. Do not remove ground prong. Do not use an adapter. Do not use an extension cord. Failure to follow these instructions can result in death, fire, or electrical shock. • A 120 volt, 60 Hz., AC only, 15- or 20-amp, fused electrical supply is required. Timedelay fuse or circuit breaker is recommended. It is recommended that a separate circuit serving only this appliance be provided. A B 8
-
 1
1 -
2
-
 3
3 -
 4
4 -
 5
5 -
 6
6 -
 7
7 -
 8
8 -
 9
9 -
 10
10 -
 11
11 -
 12
12 -
 13
13 -
14
-
15
-
16
-
17
-
18
-
19
-
20
-
21
-
22
-
23
-
24
-
25
-
26
-
27
-
28
-
29
-
30
-
31
-
32
-
33
-
34
-
35
-
36
-
37
-
38
-
39
-
40
-
41
-
42
-
43
-
44
-
45
-
46
-
47
-
48
-
49
-
50
-
51
-
52
-
53
-
54
-
55
-
56
 |
 |
