Meade LX850 User Manual - Page 23
One Star Alignment, Syncing your Eyepiece or Camera, using Starlock
 |
View all Meade LX850 manuals
Add to My Manuals
Save this manual to your list of manuals |
Page 23 highlights
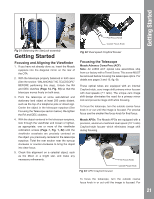
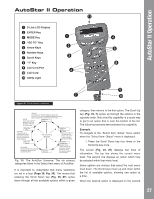
Getting Started You are now ready to perform AutoStar's One-Star alignment procedure. One Star Alignment To prepare your telescope for One Star Alignment: 1. Plug in the AC adapter to the control panel. 2. Verify both the RA and DEC clutches are tight. 3. Connect Autostar II to the HBX port of the control panel. 4. Flip the power switch of the control panel to the ON position. The Autostar II screen is activated and a copyright message displays briefly. 5. "Press 0 to Align or Mode for Menu" displays. Press 0. 6. The telescope will seek the home position and align with its internal sensors. 7. "GERMAN NORTH" is displayed. Instructions how to place your mount in the german home position scrolls in the lower portion of the display. Press ENTER. Since the mount has used its internal home position sensors to position it in the home position. Your mount has been factory calibrated to sufficient accuracy to provide a reasonable alignment. (press any Autostar II key to abort the Alignment). 8. Autostarnowacquiresa"GPSFix."TheLX850'sGPS receiver acquires and syncs up with signals from GPS satellites. After performing these operations, Autostar II now knows: • The telescope's limiting positions star visible. Use the Arrow keys to move the telescope until the star is visible and centered in the eyepiece. The alignment star should be easily recognized and be the brightest star in the area of the sky where the telescope is pointing. Press ENTER. "Align Successful" displays. If "Align Unsuccessful displays," repeat the procedure. NOTE: When the second star is centered and Enter is pressed, the StarLock is automatically aligned with the primary OTA. After the alignment, if you wish to realign the StarLock with the primary OTA after a GoTo to a star, press and hold the ENTER key on Autostar for 2 seconds, then release. "Enter to Sync" will display, press Enter. This aligns the StarLock to the Primary OTA and improves the mounts high precision pointing performance. After your initial alignment, you can update the Home position for your scope, by selecting "Calibrate Home Position" from the SETUP/TELESCOPE menu. This will provide even more accurate results for subsequent alignments. This procedure only need be done once, or after recollimation of you optics or exchanging OTAs. Syncing your Eyepiece or Camera using Starlock Whenever you change eyepieces, diagonals or cameras, the center field of view may shift slightly. Starlock can compensate for this slight difference by performing the following routine: • The observing site's location • The date and time 9. "CTR Polaris: Slewing" displays. When the telescope stops slewing, center Polaris in the eyepiece using only the mounts latitude and azimuth adjust knobs (Page, Fig. 1, #17 and #34). DO NOT USE THE HANDBOX TO CENTER POLARIS. When Polaris is centered lock the Altitude and Azimuth locks, then press ENTER. 10.Autostar II then chooses another star to align upon. "Searching...." displays. The telescope then slews to a bright star for alignment. If it does not appear in the field of view in the eyepiece, look through the viewfinder-the star will be the nearest bright 1. Press the MODE key several times, until "Select Item: Object" is displayed. 2. Press the ENTER key to choose the "Object" option and move down four (4) levels. "Object: Star" is displayed. 3. Press the ENTER key to choose the "Star" option and move down one (1) level. "Named" is displayed. 3. Press the ENTER key to choose the "Named" option. 4. Scroll thorough the lists of Named star until you come to a bright star that is visible (if you are not sure what to choose use the same star that 23
-
 1
1 -
2
-
3
-
4
-
5
-
6
-
7
-
8
-
9
-
10
-
11
-
12
-
13
-
14
-
15
-
16
-
17
-
 18
18 -
 19
19 -
 20
20 -
 21
21 -
 22
22 -
 23
23 -
 24
24 -
 25
25 -
 26
26 -
 27
27 -
 28
28 -
29
-
30
-
31
-
32
-
33
-
34
-
35
-
36
-
37
-
38
-
39
-
40
-
41
-
42
-
43
-
44
-
45
-
46
-
47
-
48
-
49
-
50
-
51
-
52
-
53
-
54
-
55
-
56
-
57
-
58
-
59
-
60
 |
 |
